
Christmas angel made of felt - a charming DIY New Year's craft. Such a toy is a Christmas tree decoration, a table decoration, a souvenir gift or a figurine for a Christmas nativity scene. In addition to felt, to make this Christmas angel you will need a bead and a piece of chenille wire. You can make this craft with children 8-9 years old or older. For younger children, we suggest making or. During the New Year holidays, I want to look into the future. We suggest you entrust the fate of your guests next year to the Christmas angels. Make as many crafts as you expect to see at the holiday table. Place a note with a “prediction” inside each figure. Of course, all predictions must be favorable! Place felt Christmas angels on a tray and let each guest choose their own destiny for the coming year with their own hands. May everyone be healthy, rich, smart and beautiful! Happy New Year and Merry Christmas!
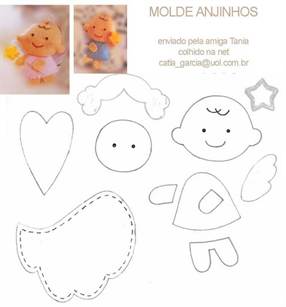
To make a Christmas angel you will need felt, a chenille stick, a bead with a diameter of 2cm in white or light color, hair threads and braid for finishing.  Print or draw the angel pattern on paper. Cut out the pattern.
  Pin the paper pattern to the folded felt using a stapler.

 Pay attention to the fold line on the material.
  If you are using braid trim, sew it to the sleeves of the angel dress at this stage. The braid should extend slightly beyond the felt pattern. If the braid is synthetic, singe the ends over the fire so that the braid does not unravel.
  Sew one side seam of the angel's dress using a buttonhole stitch, tucking the braid into the seam.
  Making hands for a Christmas angel. Fold a chenille stick, preferably white, in half.
Then bend the stick so that you get the hands of an angel.  The angel's hands should be such that they extend slightly beyond the dress.
 Insert the Christmas angel arms into the dress and sew the second side seam.
  If you are making trim, at this stage sew the braid along the bottom of the felt angel's skirt.
  Through the chenille wire loop, thread a rope on which the angel will hang.
  Insert a bead with a diameter of 2 cm through the string - this is the head of an angel.
Making hair for a Christmas angel. We suggest making angel hair from wool threads.  We wind the hair threads onto the base, cut the bundle of threads and remove it from the base.
  On top of the angel's head we have a string for hanging. We put a bun of hair on our head and tie it with this string.
 If you wish, you can use a little glue and glue the hair to your head so that it lies more neatly.
We sew the wings of the Christmas angel to the dress with several straight stitches. 

 And the last attribute of the Christmas angel is the halo. Cut out a circle of felt and make a small cut in the center. We pass a garter rope through the cut. To keep the halo on your head at a slight angle, you can glue it to your head.
  We insert a Christmas star made from a toothpick and rhinestones into the angel’s hands. The rhinestone can be replaced with a beautiful bead or a star can be cut out of paper. We break off the toothpick a little from the bottom.
Our New Year's craft - Christmas angel made of felt is ready.
If you are making just a figurine and not a pendant, then instead of a rope for the pendant, take the threads that you use for the angel's hair. After tying the hair to the head, you can attach the remaining threads to the hair, and simply glue the halo to the head.
Tip: If you want to draw the face of the Christmas angel, then it is best to draw on a wooden bead with colored pencils.
This homemade felt toy is a cute gift for Valentine's Day. Such an angel can be sewn for Valentine's Day or for any other holiday. Once you’ve made one, you won’t want to part with your baby, so prepare the materials for two toys at once.
To make a felt toy you will need the following materials:
- felt in white, red, flesh and red colors (instead of red, you can take brown or light yellow)
- Super glue
- black acrylic paint
- dry pastel
- red ribbon 1-1.2 cm wide
- 2 rhinestones
- threads to match all colors of felt
- padding polyester or holofiber

Master class “Angel - DIY felt toy for Valentine’s Day”:
1) The pattern can be transferred from the monitor to paper in this way: copy and paste the picture with the templates into a word document, adjust it to the desired size, and then simply apply a sheet of paper to the computer screen and trace the translucent contours with a pencil.

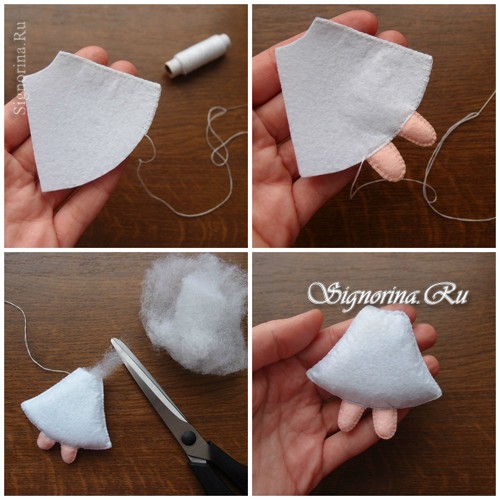
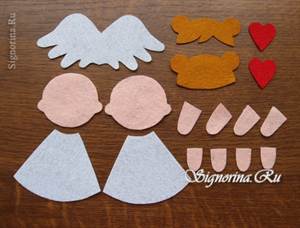
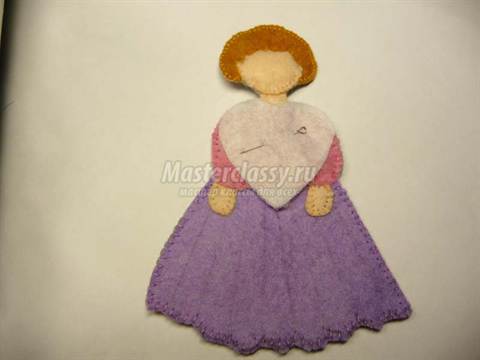
2) To make 1 toy, we cut out 2 parts each for arms, legs, head, heart and dress. Wings and hairs - 1 piece each.

3) First of all, we sew the arms and legs of the future doll. To do this, take pale pink or flesh-colored threads to match the felt and sew the parts together with a buttonhole stitch using small stitches. We give them volume by filling them a little with synthetic padding. We immediately sew up the legs completely (you can use regular stitches), leave the arms unsewn.

4) Use white thread to sew the dress together, starting from the top edge. At the bottom we insert the legs between the two parts of the dress and sew these places with regular running stitches. We fill the body with padding polyester or holofiber through the hole in the neck area. It is convenient to push the stuffing through using a sushi stick or the tip of scissors. Sew up the upper part of the body, break the thread.
5) The head will be sewn together with the hairs, so the parts need to be carefully folded next to each other, and can be secured in several places with small stitches. The hairstyle should be a couple of millimeters larger than the volume of the head, this is necessary so that the pink felt does not peek out between the seams. We start sewing from the ear, piercing 4 parts at once with a needle, reaching the next ear, fasten and break the thread. We change it to pink and continue sewing now the lower part of the head. We first push the filler into the buns and ears, then fill the entire head. We sew it up to the end and break the thread.
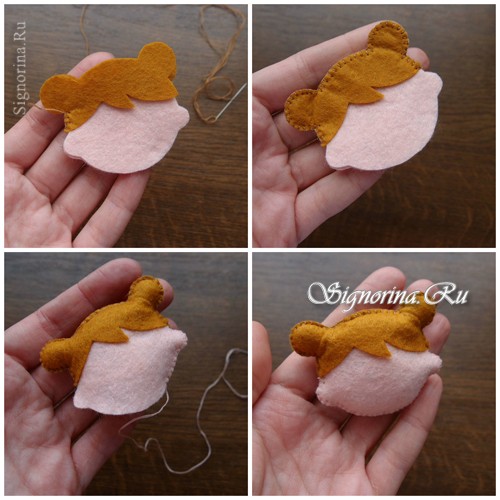
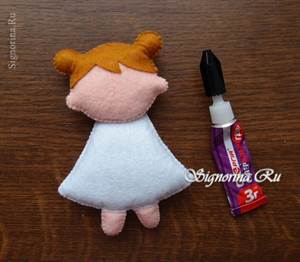
6) Apply super glue to the dress in the neck area and glue the head to it.

7) We attach handles to the side seams of the dress and sew them with a buttonhole stitch, at the same time sewing up the holes through which the parts were stuffed.

8) We sew the heart together with red thread and stuff it with padding polyester just like the angel.


9) Lubricate the tips of the handles on the inside with glue and glue the heart to them.

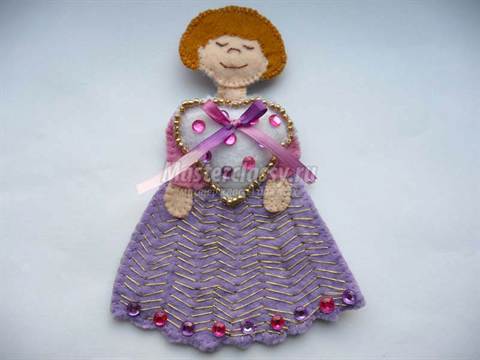
10) Large wings will cover the back of the angel; we also glue them with super glue.

11) We draw the eyes with black acrylic paint. It is convenient to apply small circles with a ball on a pin. You can use small black beads instead of paint, but you need to sew them on before sewing together the head parts (to avoid knots on the front side).

12) Grind the dry pastel and use a soft brush to apply a scarlet blush to the cheeks.

13) From a ribbon 1 cm wide we make 2 primitive bows. Cut 2 pieces 4-5 cm long, burn the edges. We fold the ribbon so that its ends overlap each other by 3-4 millimeters, stitch the middle and tighten it - we get a miniature bow. You can glue a rhinestone or sew a bead in the center. We also attach bows to the hairs using glue.
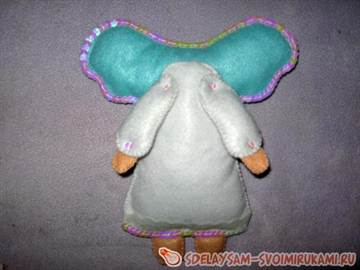
Wonderful, rosy-cheeked, robust angels can be a wonderful decoration for a child’s room. If you know how to sew at least a little, you can create a wonderful craft - an angel made of felt. You can create a cute doll and an unusual applique for a children's room.
The benefits of working with felt
High environmental friendliness, plasticity and the absence of “shedding” of the edges of felt, made from the finest down of goats and rabbits, allow this material to be used for children's creativity. Preschool children can create wonderful and bright appliques from multi-colored woolen sheets.

Making them is not difficult, and the pleasure and benefits from the exercises are guaranteed. When working with small parts, cutting them out with scissors, gluing them, the child’s speech center is stimulated. This happens due to its proximity to the center responsible for fine motor skills of the hands and fingers. Let your child choose the color scheme of the craft on his own, and he will develop his creative talent. Connecting parts into a whole picture will contribute to the development of logic, because it’s like putting together a puzzle, only from fabric.
Application for kids
There are many different patterns for sewing felt toys. Figures can be flat or three-dimensional.
Use the pattern to create applique details, just sew them together, there is no need. You can glue the felt using PVA glue.
To complete the application with your child you will need:
- Figurine template;
- A sheet of colored cardboard for the background;
- Glue and scissors;
- Sheets of thin felt in various colors;
- Decorative elements - sparkles, beads, braid, ribbons.
First, choose a suitable picture. You can draw it yourself and make a template, or use one of the patterns below.


Trace the prepared template onto sheets of felt and cut out the details. All that remains is to trust the child to assemble them under your guidance. Invite your child to decorate his angel himself. Place the finished picture in a frame, let the baby admire the fruits of his painstaking work.
For older children
When a child already knows how to use a needle, you can offer him to create a simple felt angel with his own hands, for example, like this one.

To make it you will need:
- Felt of various colors;
- Sample;
- Sewing supplies;
- Scissors;
- Filler;
- Decorative elements - snowflakes, ribbons, lace, beads, rhinestones.

Transfer the pattern to cardboard and cut out the parts.


Make cuttings in accordance with the selected shades of felt and try them on.


Sew the body, arms and legs and fill them with stuffing. Make neat and even stitches using a seam “over the edge”; there is no need to turn the parts inside out.

Sew the legs to the hem of the angel's dress.

Sew the wing parts together and fill them with stuffing.


Sew and stuff the rest of the details too.

Decorate the hem of the dress and the outline of the wings with sequin ribbon and lace.

Sew the sleeves and handles to the dress, securing them with sequins.
Decorate your head with a ribbon and decorate your face by embroidering it with floss threads.


Use instant or hot glue to attach the head to the body. Complete the angel trim by sewing on a hanging ribbon.
You can combine toys into garlands or make a mobile out of them.

Gift for Valentine's Day
Do you want to please your soulmate with an unusual gift? Use bright and colorful felt! We offer you a master class on creating a very cute angel with a heart. It will be relevant for any occasion, be it your wedding anniversary, first date, or just celebrating Christmas or Valentine's Day.
To make an angel you will need:
- Felt (red, white, nude and brown);
- Second glue;
- Acrylic paints;
- Dry pink pastel;
- Sewing supplies;
- Filler;
- Satin ribbon, adhesive rhinestones.
To work, use the following pattern.

Place the cardboard template of the part on the felt and cut out the necessary parts.
Sew the arms and legs. The legs can be closed immediately.

When sewing the dress, insert the leg pieces into place and sew them with running stitches.

All four parts of the head are sewn together immediately.
Note! When cutting, carefully ensure that the details of the hairstyle are slightly larger than the head.

Secure the head with instant glue.
Sew handles to the sides of the dress.
Sew a heart and place it in the angel's arms using glue.

The wings are also attached with glue.

Draw the angel's eyes and blush.

Sew ribbon bows, decorate them with adhesive rhinestones and glue them to your hair.

The angel is ready!

Preparation for the main holiday
When rare snowflakes begin to pass outside the window, you involuntarily think that the main holiday of the year is just around the corner. New Year's angels made of felt will help you decorate your home. You can study the process of their “birth” step by step in this master class.
You will need:
- Felt;
- Sewing supplies;
- A little filler;
- Scissors;
- Decorative elements.
To work on a New Year's figurine, you can use any sketch. Draw an angel, cut it out on a thick felt base, cut and sew the parts, and make your angel beautiful. The principle of operation is no different from that described above. You can follow the stages of creating a New Year's toy in the photo.


On the eve of Orthodox Christmas, I invite you to make a festive craft with us - felt angels. When I started sewing them, they immediately turned out to be unangelically bright and multinational. Probably because children are the same angels: they easily find a common language with each other, without looking at the color of their skin or faith, they know how to enjoy the simple and real, and their sensitive heart has not yet had time to hide behind a mask of confidence and indifference.
Once you start sewing, it’s difficult to stop, because everyone turns out unique, with their own character, you want to immediately create a fun company.
Sew an angel from felt
From the materials we will need:
- regular or adhesive felt
- needles: regular and for beads
- threads: white, black, red and to match the color of clothing
- gold or silver beads for the halo and optionally for clothing decoration
- beads, braid, decorative bells
- black beads - for eyes (if eyes are not embroidered)
- cut out template details
- a small piece of padding polyester or cotton wool for stuffing the head
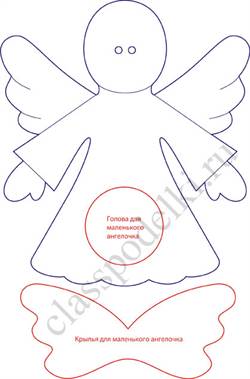
I took the idea from the Internet, modified it to make it easier to create with children, and I ended up with this template. It needs to be printed on an A4 sheet and cut out.

If the felt is without an adhesive base, then the question may arise - how to outline it so as not to stain the material, and the line would be visible on the fleecy surface. I used a silver gel pen - it is clearly visible on both light and dark tones. If you don’t have a suitable color, you can try any color and wash the angel before decorating - fresh lines from gel pens wash off the felt well.

Cut according to the template:
- two pieces of head and wings made of white felt
- two hand parts made of white felt
- two dress parts made of colored felt
- two sleeve parts made of colored felt
- one piece each of the front and back of the hairstyle
We sew or glue (if you have adhesive felt) two parts of the head and wings, not forgetting about stuffing the head (accordingly, leave a hole for stuffing or stuff it immediately during the gluing process). The parts can be sewn together with a seam over the edge or, since I was focused on working with children, with a simple running seam with the same stitches. I sewed all the details with white threads - it turned out to be a simple decorative stitch. If you have adhesive felt, then after connecting the parts, it’s difficult to lay a stitch, and there’s no need to decorate felt angel You can use braid and beads. By the way, to secure the end of the thread to the felt, it is enough to make several “dot” stitches in one place (this is how some sewing machines secure it) and tighten the thread well.

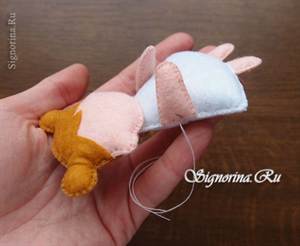
The arm part needs to be folded in half in the center and each one needs to be sewn.


We put the handle into the sleeve part, as in the picture, so that approximately half is inside the sleeve, and half protrudes outside. Fold the sleeve piece in half and sew it together with the arm from the open edge.


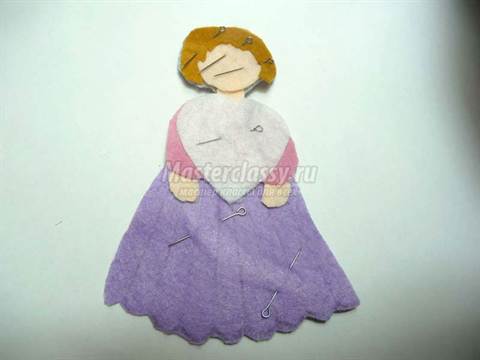
Sew or glue the details of the dress.


We sew the dress and sleeves only at the very top to the neck - this way the angel’s wings remain free and there will be no extra stitches at the back.

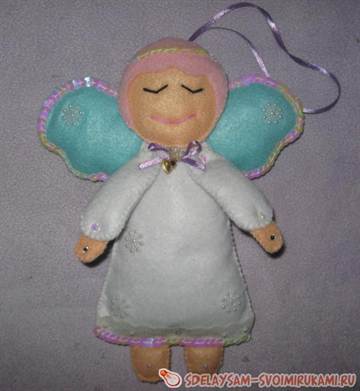
Glue or sew on the hair. You can experiment endlessly with hairstyles; the template contains the basis for a girl’s and a boy’s hairstyle, and in the photographs below you can see several of our variations on this theme. We make a halo from beads and sew on the sides of the hairstyle.

Let’s bring our little angel to life: you can decorate the eyes with beads or embroider the eyes and mouth with thread using a “back needle” stitch. And all that remains is to place a book, a candle, a bell, or something of your choice into the angel’s hands. And give him company :)


A funny and quite beautiful angel made of felt, created with your own hands, is considered a wonderful New Year's decoration for the Christmas tree. Creating such a toy will not require much time, and the materials are available and the price is reasonable. To make your own felt angel, you should draw a pattern of the elements or use a template from the Internet, increasing or decreasing it to the size you need.
Materials for work
Before work you need to prepare everything you need. To create an angel yourself, you need to buy the following materials:

After preparing the materials, you can proceed to creating a pattern for the product.
Creation of an Angel
 In order to sew a soft craft, you need to take the first step - create a pattern. It won’t be difficult for a person with the skills to draw and make it according to a model, but for others there is an interesting trick. You just need to copy the felt angel pattern on the Internet, paste it into a document on your PC, stretch it to make the desired size. Then print the pattern. The final step will be cutting out the template.
For one-sided parts (wings and hair), you will need to create one element for the angel from felt. The pattern of the arms, legs, head, dress and heart suggests that these parts of the craft are double-sided. They need to be sewn, which means you will need patterns for 2 parts.
Making figures and clothes toys
You can start the process by creating the limbs of the toy. The threads must match the color of the material. The work is done with a buttonhole stitch and a small stitch. One side must be unsewn for stuffing with certain materials. Legs can be sewn up immediately, and put the handles aside for a while.
 Clothing for an angel is sewn from the top edge. In this case, the threads are selected according to the color scheme of the fabric. At the bottom, between the 2 parts of the clothing pattern, you need to insert the legs and sew them with a simple stitch. Then you should use padding polyester to stuff the body through the hole remaining in the area where the head will be attached. To simplify the process, you can take scissors. Once the stuffing is complete, the hole is sewn up and the thread is cut.
The head and hair are easiest to sew together. The parts are slowly attached to each other. To make it more convenient to work, they need to be fastened using pins. Between the seams of the hairstyle, pieces of the material from which the head was created may peek out. For a higher quality look, it is better to make the hair a few millimeters longer.
The thread is taken to match the color of the hairstyle and all parts are sewn together at once, starting from one ear and ending next to the second. At the end of the work, the thread must be secured and cut. Then the head of the product is stuffed, and after that the head can be sewn up from below. So the topic of creating an angel from felt with your own hands has been discussed.
Wings for a costume
It is very easy to create your own wings for an angel. The materials for their creation can be very different. The frame can be created from wire, onto which the fabric part will be stretched.
In the standard version, the wings are cut out of plain paper. The process is then performed as follows:

In other tutorials on how to create angel wings from cardboard, they suggest connecting them with a large elastic band. It is also necessary to create straps for the handles. A hole is created at the base, then the rubber band is secured on both sides, and the fastening area is masked with feathers from filters or napkins. When you create straps, do not forget to calculate their width and height before doing so. That's it, the work is completed.
Attention, TODAY only!


