
Looking for a new hobby? How about some paper cutting? Surely someone was smiling ironically now. Absolutely in vain: artistic carving is incredibly beautiful. We were convinced of this by opening the book “The Magic of Paper”. See for yourself.
“You can cut out paper even without drawing ability,” says Louise Firschau.
There are a million ready-made templates: just print them out. Or come up with your own design on your computer: install the free design software Inkscape, which you can use to create basic templates.

How to start cutting
Intricate plots and ornate contours - each picture seems to have been created by a skilled artist. But believe me, you can easily do it yourself. All you need is desire and a few tools.
Choose a round one: it’s more convenient to work with a holder that looks like a pencil than with a flat one. You will understand this when you start making rounded cuts and feel the knife turning slightly in your hand.

Surgical blades
The choice of blades on the market is huge: it's up to you. At first it may seem too flexible and unpredictable. But once you get used to it, you will understand that they are very convenient for making round cuts, and the tip is great for cutting out small parts.
Self-healing cutting mat
You don't need expensive branded cutting mats. Take a regular rubber one - after a few weeks of intensive use they all look the same.
It is better to have two mats: one for cutting, the other for gluing. If you do everything on one, it will get dirty with glue and could ruin the next cut.
Paper
- Don't use office paper: the lines will be uneven and the results will be unimpressive.
- Use special paper for cutting or experiment with thick paper. For example, you can take textured watercolor or mulberry.
- Do not use paper thicker than 170 g/m²: it is very difficult to cut and your hand gets tired quickly.
Cutting template
Where to start? We offer you this cute picture from the book “The Magic of Paper”: it will decorate any home.

- Before you take on your first template, practice simply cutting paper. Understand how hard to press on the blade so that it doesn’t break, your hand doesn’t start to hurt, and the cut turns out “clean.” Apply gentle pressure to the blade and carefully cut through the paper. Slowly make several lines, maintaining the same pressure along the entire length.
- Start cutting from the most difficult area or from the place that causes you the most doubts. That way, if you make a mistake, you won't have to redo too much.
- Take your time. Change the blade every 10 to 15 minutes and pause regularly to relax your head and neck. It is much more convenient to work on an inclined surface - for example, on a drawing board.
- Pencil marks on the reverse side do not need to be erased. No one will see them anyway, and using an eraser can damage the paper. Always cut from the inside out.
- Do not remove scraps of paper while working, even if you really want to.. Leave everything in place - this will stabilize the tenderloin. The sleeve/bracelet/cat's tail will have nothing to catch on.
- When you finish cutting, do not push the paper scraps out with your finger, but remove them with a knife. This way the paper will not tear, and you will see in which places you need to go through the blade again.

Imagine how surprised your friends will be and how delighted your acquaintances will be when they see the pictures you create. And, besides fame, you will find real pleasure in the creative process, when an ordinary template turns into a charming and charming masterpiece.
Illustrations and materials from the book “The Magic of Paper”. The book will be out very soon. You can sign up for a release notification - and get a nice discount just for your own people.
Creativity in winter has a special, incomparable magic. And this magic of paper captivates both adults and children, and you really want to create this little magic with your own hands. After all, nothing can decorate the atmosphere of a home better than something created with your own hands, like something into which you put your soul, time, feelings...
Artistic cutting from paper, or vytynanka
Today we’ll talk about artistic paper cutting, or vytynanki, cuttings, silhouette cutting. Every year, silhouette paper cutting becomes more and more popular and more and more masters and craftswomen delight us with their masterpieces. In fact, a winter window decorated with protrusions seems to open the door to an unusual fairy tale, surprisingly decorating not only the interior, but also the mood.
Vytynanka is the subtle art of cutting out patterns, plot figures and paintings from paper. To create it, you need fairly thick paper and a cutting tool. Thin nail scissors, a sharp stationery knife or a breadboard knife are often used as tools. A convenient cutting board or a special cutting mat will also be useful.
As a rule, white paper is used to create New Year's decorations. On the Internet you can download a million templates with thematic scenes and decorate the interior of the room with them. Below I will give some beautiful templates for vytnanka.
Where to use protrusions
Vytynankas perfectly create a New Year's mood, sitting on windows or glass doors.
You can make a light air mobile just like that or for a chandelier.

Also, as a window decoration, voluminous protrusions on the windowsill with lighting look romantic. For lighting, you can use New Year's garlands or table lamps.

Artistic cutting is a chic element when creating cards and panels. High-class craftswomen create voluminous protrusions that can be placed, for example, on a table and give the office a New Year's atmosphere.

Last year, vytynanki helped us create.
How to glue protrusions to windows
The vytynankas are easily glued to windows using soap. To do this, lather soap in a small amount of water, wet the window and place a design on top. When the window dries, the pattern will stick.
You can also use tape, just remember that you can remove traces of it from the window, but it’s more difficult.
Subjects for vytynanka
The plots can be very different. The main thing is to convey a fabulous mood. And it can be created by: snow-covered cities, and a forest in snowdrifts, a frosty starry sky, a clear month and floating snowflakes, snowmen and Father Frost and the Snow Maiden, candles, Christmas tree decorations and garlands, Christmas trees, children and cartoon characters, animals...
Patterns of vytynanok
You can draw the plot for the vytynanka yourself. You can trace your favorite story from any book onto paper and cut it out.
Or you can use ready-made templates for artistic cutting. Below are templates for cutting out New Year's eves, taken from the vastness of the World Wide Web. You can download them by right-clicking and selecting “save picture as.”


The magic of paper. Cutting art ideas.

This unique book, published by the beloved publishing house Mann, Ivanov and Ferber, will inspire both those who are just falling in love with the artistic art of paper cutting and those who already have experience in this painstaking task.
Paper Panda blogger and writer Louise Firschau has created this cutting guide. She talks in detail about everything: about cutting tools, how to use them and what can be replaced, about the secrets and subtleties of this art, about possible mistakes and areas of application of handmade masterpieces.

Here are some tips from Louise Firschau from the book “Paper Magic”:
1. Always copy the original image. If you make an error, you can start over.
2. Start cutting from the most difficult area or from the place that causes you the most doubt. That way, if you make a mistake, you won't have to redo too much.
3. Take your time, change the blade every 10-15 minutes and take regular breaks to relax your head and neck. It is much more convenient to work on an inclined surface - for example, on a drawing board.
4. When you finish cutting, do not push out the scraps of paper with your finger, but remove them with a knife. This way the paper will not tear, and you will see in which places you need to go through the blade again.
And here is one of the examples of Louise’s author’s templates: 
In this video I talked about the book “The Magic of Paper” and showed how I cut out my first protrusion)))
Inspirational New Year's creativity to you!
With love,
Paper cutting has its roots in the distant 2nd century. This type of applied art comes from China. Much later, openwork paper cutting was also mastered in Ukraine. The patterns of such creativity are varied, and people call its fruits vytynanki. To master it, you will need perseverance, patience, accuracy and limitless imagination.
Creating your masterpiece: general aspects
Artistic paper cutting is a real art. Not everyone can turn an ordinary piece of paper into an elegant and sophisticated masterpiece. Since ancient times, vytynankas have been used to decorate houses for the holidays. They were considered amulets.
And today vytynanki are a common design decoration. You can decorate your interior in an original way not only for Christmas or New Year. If you show your imagination and ability to work with paper, you can make a very complex craft that will take pride of place in your home.
How is vytynanka made? Schemes are the basis of such a craft. After transferring the drawing onto paper, we proceed directly to cutting. To do this, you can use regular curved nail scissors. To cut out small parts, it is better to take a blade, scalpel or stationery knife. Experienced needlewomen use the extrusion technique, but beginners are better off starting with something simple.
Absolutely any paper will do: white offset, colored, and even cardboard. Depending on the design, the paper can be folded in several layers or like an accordion. And some simply use a flat sheet of paper and transfer the diagram onto it.
Let's not talk in vain anymore, but let's engage in an exciting creative process.
That the coming year?
It is known that in 2017 the Rooster will patronize. The holiday is just around the corner, and I really want to decorate my home with symbolic figures. And here openwork paper cutting will come to our aid. Templates can be found on the global network, downloaded and, using the functionality of your computer, enlarged to the required size and printed.
Necessary materials:
- paper;
- sample;
- scissors;
- blade or utility knife.

You can decorate the openwork cockerel at your discretion. Don't forget that this year Petya the Cockerel will bring good luck and joy to your home.
I remember, I'm proud...
Great victory of 1945! Everyone associates May 9 with unbearable pain, great loss and pride for their heroes. From childhood we are told about them, because thanks to our grandfathers and great-grandfathers we live on this earth. On Victory Day we need to honor the memory. Invite your child to make a card in the style of openwork cutting. And we will help you with this.

Necessary materials:
- a sheet of white paper;
- watercolor or gouache paints;
- brushes;
- felt-tip pens or markers;
- glue;
- red paper;
- scissors and a stationery knife.
Step-by-step description of the creative process:

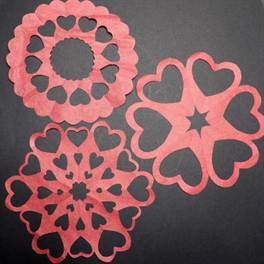
Craftsmen can cut out an openwork carnation on paper, but a voluminous flower looks more original.
Cutting out shapes and shapes from paper helps young children develop fine motor skills in a fun way!
How to teach a child paper cutting?
- First of all, your baby’s hands should be ready to learn the skill of cutting. The best exercise for a baby is squeezing water out of a simple sponge; it trains the necessary muscles.
- Then show your child how fun it is to tear old newspapers and pieces of paper into pieces - this will teach him to hold the paper in his hands without dropping it.
- Now you can learn paper cutting using special materials for children! Start by cutting out straight and wavy lines, then teach your child to cut out shapes before introducing pictures to cut out.
Important! Remember to take breaks if your child is tired or bored. Be sure to encourage your child verbally, praise him, and try to interfere less with the cutting process itself.
Safety when cutting from paper
Before you begin, show your child how to hold scissors correctly and talk to him about using scissors safely. The child must clearly understand that:
- You need to cut in the direction away from the body and fingers.
- You can't play and fool around when you have scissors in your hands.
At what age should you start learning to carve?
All children develop differently. The age limits below should be used as a guide, taking into account individual children's interests, temperament and attention span.
2 years: Children at this age will enjoy tearing paper into small pieces and cutting things out only by repeating after adults;
3 years: at this age you can try to cut out any shapes with your child, sitting next to him and continuously observing the process;
4 years: the child is able to cut out simple lines and shapes himself with a little help from an adult;
from 5 years and older: The child should be able to easily cut out pictures and even glue them onto paper, making appliqués.
Anyone who sees products made in the form of carved lace from ordinary paper for the first time is always surprised that such beauty is so easy to create with your own hands. Everyone can master openwork. The patterns that are taken as a basis can easily be found in specialized literature. The necessary tools are inexpensive and accessible.
Decor ideas
This interesting technique can be used to make postcards, panels, and interior decoration. The products are usually made from white or black paper, but other shades also look great. The interesting thing is that they do not only flat things. Volumetric openwork paper cutting looks very impressive. Schemes for such objects are also presented in the form of a contour drawing on a flat sheet, which is then folded along certain lines and glued into a three-dimensional part. So, in technology you can do the following:
- Postcards.
- Snowflakes.
- Window decorations.
- Napkins for the table.
- Volumetric decor based on a flat product or an assembled three-dimensional paper structure.
Having mastered simple options, you will be able to make fabulously beautiful things. 
Materials and tools
You will need the following to master openwork paper cutting:
- Diagrams and a printer to print them.
- Sheets of white (or other) color.
- The base on which you will cut (a special tablet, a regular board or a piece of thick cardboard).
- Small manicure scissors as an alternative to a knife or an addition to it.
The rest is optional and depends on how you will use the blanks:
- Glue onto a colored base - decorative cardboard and glue.
- Hang on the Christmas tree or in the space of the room - pendants (threads).
- Decorate a window - regular or
In fact, nothing complicated, special or expensive is needed. Regular office stationery. The main thing is patience, perseverance and the desire to make a masterpiece with your own hands.

Openwork paper cutting: diagrams, master class
Traditionally, patterns are created by cutting out part of the design on a sheet of paper folded in a specific sequence. One of the most common and familiar products is snowflakes, but they are not the only ones you can make. A napkin or mirror frame made according to the following pattern will look very impressive.

Work like this:

Openwork paper cutting: New Year's patterns
To decorate the interior with elements of this technique, you can make various decorations using ready-made templates. Print them to the required scale (usually the blanks are designed for a standard A4 landscape sheet), cut out the pattern. There are a lot of preparations on the Internet, both directly festive and just winter themed.


- Entire landscapes and lacy plot scenes.
Copy paper, tracing paper and cardboard for the template;
Simple pencil;
Universal glue;

Using carbon paper and tracing paper, the pattern from diagram 1 shown below or another is transferred to the template paper. To do this, tracing paper is placed under the pattern pattern and outlined with a simple soft pencil. Then the drawing is outlined again with a pencil and cut along the contour with scissors. The result is a ready-made template.

Take colored paper and fold it 2 times (according to scheme 2). The template is applied to the workpiece and the drawing is outlined with a well-sharpened pencil. The template should be removed and the pattern cut out with sharp scissors or a knife with removable blades. The paper is unfolded, another sheet of paper is placed on it and carefully smoothed with the convex side of the spoon, straightening out all traces of folds. The resulting napkin is glued onto paper of a contrasting color and laminated to ensure that the product remains beautiful and practical. The napkin can be used for fruit or used to place it in a shallow vase and serve, say, cherries or grapes in it.


Decor for the mirror
A mirror familiar to our eyes can be turned into an antique version. And to do this, you just need to cut out a frame from textured gold paper with a floral pattern and use it to decorate the already existing – inexpressive – frame on the mirror. This will definitely please the owner of the house, and then a happy, smiling face will be reflected in the mirror.

What do you need to cut out an openwork frame for a mirror? This is metallized paper with a golden rumpled effect, tracing paper, thick paper or cardboard, simple pencils and scissors. Using tracing paper, the pattern is transferred onto thick paper and a template is cut out to decorate the frame. The second sheet of paper of the required size is folded 3 times straight and 1 time diagonally. The template is applied to folded paper and outlined with a pencil. The template is removed and the design is cut out with scissors. The product unfolds and smoothes out. The perimeter of the mirror is decorated with such openwork blanks, gluing them onto the old frame. Photo frames are also decorated in the same way.
Almost everyone cut out intricate patterned snowflakes for the New Year, but not many people know that openwork paper cutting patterns are a whole form of art. Vytynanka, silhouette cutting, paper graphics - there are many names, but the essence is the same, it is always a solidly cut out drawing on a plain background. There are two main directions: cutting with a knife and scissors. Despite its apparent simplicity, creating paper patterns requires enormous patience and perseverance.
A little history
Silhouette carving's roots go back centuries, more precisely to the 2nd century AD, to ancient China. As you know, paper was invented in the Middle Kingdom. It was there that the openwork cut appeared for the first time. At first it was an occupation of the nobility due to the high cost of paper. However, it gradually spread to other segments of the population. From China this art migrated to other countries. First, Japan and Korea, then Persia and Turkey, and from there along the Great Silk Road to the countries of Western Europe and America.

Required tools and materials
In addition to a reserve of patience and a great desire to make a beautiful thing with your own hands, you will need:
- stationery (layout) knife;
- small scissors;
- diagrams (you can take ready-made ones, for example, print them from the Internet, or come up with them yourself);
- sheets of paper or cardboard of suitable size and color;
- tablet or board on which you will cut.
Interior decoration
For centuries, filigree carving has been successfully used to make decorations for interior design. For beginners, postcards, snowflakes, table napkins, and window decorations will be of interest.

More experienced craftsmen can make various three-dimensional objects.
Master class on openwork paper cutting
When all materials are prepared, you can begin. Most often, patterns are cut out on a sheet that is folded in a certain way. The most common and familiar to many, of course, are snowflakes. However, in this way you can make a frame for a mirror or, for example, a napkin. The master class will help those who are just mastering this interesting art!
- You need to take a sheet of paper and fold it as shown in the figure below.
- Next, use tracing paper to transfer the outline of the pattern onto the base, or cut out a blank part of the pattern and use it as a stencil.
- Then we cut out the pattern with scissors or a knife.
- Carefully unroll the product.
- We straighten the folds and iron them with an iron.
- Place the resulting napkin on a base of a suitable color and glue it (the glue should not leave marks).
- The finished creation can be laminated so that it retains its original appearance longer.
You can decorate your home in an original way with such lace creations. The main thing is to show your imagination.

Decorating the house for Easter
Easter is one of the most beloved holidays in families, both Orthodox and Catholic. Several traditions associated with this holiday are unchanged - painting eggs, baking Easter cakes, decorating the house. Using special templates, you can make many attributes and decorations for Easter. And someone will want to get creative with the filigree cutting technique and come up with their own options.
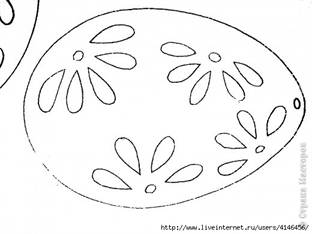
One of the integral symbols of this holiday is, of course, eggs. These can be painted natural eggs or decorative ones, for example, made of wood or plastic. Or you can make openwork eggs with your own hands. To do this, using carbon paper or tracing paper, we transfer the pattern onto drawing paper (you can take any other paper, but being dense, it holds its shape more easily and adheres better), cut it out and carefully glue it together. It is better to start gluing from the center, first to one end, then to the other. You need to let the glue dry before starting a new seam, otherwise it may come apart. The finished eggs can be placed in a patterned basket to create a whole composition.
Protruding eggs are also used to make greeting cards, decorate gift bags and boxes, even as a holiday garland, connecting them together.

You can decorate windows with patterned cuttings, or, making a three-dimensional composition, place it on a festive table. Inspiration and flights of fancy will help you create a unique holiday.
DIY Christmas decorations
New Year rightfully takes the place of the most favorite holiday for both children and adults. And everyone wants to plunge into this atmosphere of magic. It’s not difficult to create a New Year’s fairy tale at home, the main thing is to approach the process with imagination. Nowadays, New Year's decorations are not limited to balls for the Christmas tree and a couple of garlands. The more varied the holiday decorations at home, the brighter the feeling. So let's get started! Let's start with the simplest thing - snowflakes. They can be made, for example, like this.

In addition to snowflakes, for decoration you can use figurines of Santa Claus and Snow Maiden, snowman, bells, Christmas tree balls, deer and many others.
You can use New Year's templates as independent decorations, or create the following compositions:

Fantasy and good mood are the key to truly festive home decoration.
Video selection
And finally, a few videos that will most clearly show the art of openwork cutting.
In a world where even creativity has moved into electronic format, it is so important to create something with your own hands. We suggest you try paper cutting. A simple, effective and inexpensive hobby.
On the Internet, I have more than once come across photos with openwork scenes cut out of paper.

Source: facebook.com/PaperPandaPapercuts
At the same time, I never asked the question: “How is this done?” - until the release of the book “The Magic of Paper”. After a quick acquaintance with the book, I really wanted to try myself in this type of creativity. I propose to walk with me the path from viewing the contents of the book on the MIF website to the first independent cutting.
Materials

You probably already have almost all the materials needed for paper cutting at home. Ruler, glue, tweezers, double-sided tape, paper. Of the mandatory and important purchases, you only need a knife, or rather, a holder and blades. You can easily find it at your local hobby store. A self-healing cutting mat will also make the work much easier, although it can be replaced with improvised means. The author notes that many craftsmen prefer glass boards (you probably have one in your kitchen), however, if you are a beginner, you should be careful, glass is slippery. The choice of paper is a matter of taste. For my first experiments, I simply cut off several sheets from different notebooks. One of the notebooks contained very thick paper for watercolors, which is difficult to cut - you have to press hard on the blade, and your hand gets tired quickly.
The author says that for a long time she could not find suitable black paper, and then she accidentally saw completely ordinary black paper for children's creativity, and it turned out that it was perfect. So don't be afraid to try!
Tip: If you are cutting on black paper and the knife is not sharp enough, the white edges may be visible. However, they can be easily dealt with by simply coloring them in with a black marker. Just try the color on scraps first.
It is better to start cutting with the simplest elements. Lines, circles, squares. I made my first cuttings very hesitantly, but after 20 minutes the knife “fell” in my hand, I felt the paper, and I wanted to move on to something more interesting.
Tip: You can practice cutting, for example, on coloring books in which you or your children have lost interest.
The Paper Magic book has 20 pages of cutting templates. You can copy them, or you can take a page straight from the book and cut it out. This is convenient because there is a very suitable paper, different styles and levels of complexity of the templates.

I chose what I liked in terms of the plot, suitable for a beginner, and got to work. During the cutting process, these tips were especially useful to me, even if I didn’t always follow them.

Safety
The book devotes quite a bit of text to this, for example, it says that it is best to start cutting with your hair pulled back. I felt the importance of this advice when, during enthusiastic work, I mechanically straightened a fallen strand with a blade in my hands. Of course, I didn’t get hurt, but I realized that it’s not as difficult as it seems. However, during the preparation of a video based on this book, the coffee table was damaged. Be careful not to try to cut and do another thing at the same time, and keep an eye on children and pets.
The paper suffers from errors
If you think that you won’t be able to create such gorgeous works as in the illustrations from the book, then you are mistaken. If you cut something not according to the template, or made an element larger or smaller by 1 millimeter, this is completely unnoticeable when you look at the paper from the front side. And even if you cut off something important, glue will come to the rescue.
Don't remove trimmings
“Do not remove scraps of paper while working, even if you really want to. Leave in place - this will stabilize the tenderloin. The sleeve/bracelet/cat’s tail will have something to catch on.” I was so eager to see the result of my first efforts that I immediately removed the paper, which ultimately led to several wrinkled parts.
Start with the most difficult
Start cutting with complex elements and holes. This way the sheet of paper will remain intact and it will be easier to work. The more elements you cut out, the more vulnerable your template becomes, which means it is easier to wrinkle or snag.
Don't forget to warm up
I sat on one of the templates for two and a half hours without getting up, I was so carried away. This is fraught with a stiff back and neck pain.
Paper cutouts are a great idea for decorating New Year's gifts. You can take the templates from the book and add cut-out inscriptions to them (names of gift recipients, for example), and then glue them to wrapping paper, only if you cut out the inscriptions, do not forget to mirror them in the photo editor.
There is still time before the new year to hone your cutting skills!
We are waiting for your works with the hashtag #papermagic.
Having seen products made in the form of carved lace from plain paper, you would never say that such beauty is not difficult to create with your own hands. Anyone can master openwork paper cutting, diagrams of which are also provided. This type of needlework is also called paper graphics, silhouette cutting, but the essence is the same, it is always a solid cut-out design on a plain background. There are two main directions: cutting with a knife and scissors. For beginners, creating paper patterns will require great patience, perseverance and desire.

This interesting technique can be used not only to create postcards and panels, but also to decorate the interior. Products are usually made from white or black paper, but other shades will look good. Openwork paper cutting can be either flat or voluminous. So, using the silhouette cutting technique, you can make such fabulous things: window decorations, snowflakes, cards, napkins and much more.

What materials and tools will you need to master openwork paper cutting? In fact, nothing special or expensive is needed. You will need:
- printed diagrams (invented independently or ready-made);
- sheets of white (or other) colors;
- breadboard (stationery) knife;
- a tablet, a regular board or a piece of thick cardboard on which you will cut;
- nail scissors.
As you can see, you will need regular office stationery.


Let's consider a master class on openwork paper cutting, which will help you master this interesting art.
When all the tools and materials are prepared, you can begin work. Most often, patterns are cut out on a sheet of paper that is folded in a certain way. Almost everyone cut out intricately patterned New Year's snowflakes in childhood. But in this way you can still make a frame for a mirror or a napkin for a table. A napkin or frame made like the one in the photo below will look very nice:

Step-by-step description of the work:
- Take a sheet of white paper and fold it.
- Using tracing paper, we transfer the outline of the pattern onto the base, tracing it twice.
- Cut out the pattern with scissors or a knife.
- Unfold the product very carefully and iron the folds through another sheet.
- We place the openwork napkin on colored cardboard or paper and glue it. Make sure that the glue does not leave any traces.
- If desired, you can laminate the product to make it last longer.
Decorating the house for the holiday
Easter is one of the most favorite holidays for both Orthodox and Catholics. Many housewives traditionally prepare for it - they paint eggs, bake Easter cakes, and decorate their home. We will help you in this matter. Using special templates, you can make beautiful attributes and wonderful decorations for Easter. But you can show your imagination using the filigree cutting technique and come up with your own options.
One of the main symbols of this holiday is eggs. Housewives usually paint natural eggs or decorative ones, for example, made from wood. But you can easily make openwork eggs with your own hands. To do this, you just need to transfer the pattern using carbon paper or tracing paper onto drawing paper, cut it out and carefully glue it together. It is better to glue from the center, first to one end, then to the other. As you work, you need to let the glue dry before moving on to the next seam, otherwise it may come apart. Place the finished eggs in a patterned basket and you will get a fabulous composition!


In this way you can also make greeting cards for Easter, decorate gift bags and boxes, and decorate windows. Protruding eggs are even used as a festive garland, connecting them together. Inspiration and imagination will help you create a unique Easter celebration.
For the New Year
Both children and adults love the New Year holiday. Everyone wants to create a New Year's fairy tale at home and plunge into the wonderful atmosphere of magic. Nowadays, New Year's decorations are not only balls for the Christmas tree and garlands, but also many other wonderful things for the festive decoration of your home. Our tips will help you prepare uniquely for this wonderful holiday. One of the most traditional ways to decorate a room is to decorate with paper snowflakes. They can be made, for example, like this.

They are usually glued to windows, cabinet doors, shelves, and walls. Some people make garlands out of them and place them on the Christmas tree.

To make beautiful openwork paper snowflakes, it is better to take ready-made patterns for cutting.
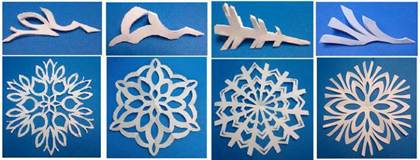
The main thing in the work is to correctly fold the sheet of paper to apply the template. Each snowflake consists of a pattern repeating around its circumference. The blanks are usually folded for 1/6 and 1/12 parts. You can fold the part based on an already cut circle or any sheet that first needs to be cut to a square and then folded, or, conversely, the folds are made first, and then the shape of a sector of the circle is cut out.


