Isothreading is not just a needlework technique, but a real art. Many of them are familiar with it from school. The technique will seem quite simple to master even for a child, so it is widely used in educational institutions. As a result of several hours of creativity, a unique picture of threads is obtained, ideal as a gift or interior decoration.
Isothread paintings: materials and tools
The picture, made with isothread, is an image of a complex interweaving of threads on cardboard. Embroidery is carried out with a needle according to a specially designed pattern. In the process of creating paintings, threads of various shades are used. The schemes are also different. To master this art, it is recommended to start with simple ones.

For beginners, schemes with numbers designed for children are suitable. You will also need a solid foundation. Most often, cardboard is used in this type of embroidery. It can be covered with velvet fabric. The base comes in various shades, however, needlewomen prefer to use a predominantly dark background. On it, a complex pattern made with isothread is more clearly and clearly visible.

Isothread picture schemes for beginners: master class and video
Beginners to master the art of embroidering pictures with isothread can start by making images of simple shapes: a circle, a square, a rhombus. In the middle of the figures, as a rule, either an empty space remains or a volume is created.

Any work begins with drawing on the basis of the picture. Then, along the perimeter of the image, it is necessary to pierce the holes and number them. Consider the method of filling a triangle according to a simple scheme:
- Pull the thread from the inside out from the point at the top of the triangle.
- Pull it to the mark located on the opposite side in the center.
- Bring the thread out of the adjacent hole and pull it in the opposite direction.
- Repeat steps 2 and 3 until the picture is completely filled.
The principles of filling circles, squares and rhombuses are the same. The figure is divided into the number of parts equal to 12. Then the markings should be placed around the perimeter with numbers. The thread is not pulled in opposite directions, but to points No. 1 and 11, 12 and 2, 3 and 13, etc.
You will quickly learn how to embroider with threads on cardboard according to patterns if you follow all the recommendations. To facilitate the task, we suggest watching a video with a master class on filling a regular-shaped circle with isothread:
Children's schemes with numbers for embroidery with isothread
Currently, a huge number of patterns for embroidery with threads on cardboard have been developed. Pictures for children are distinguished by the simplicity of forms and methods for filling in shapes. In the diagrams, it is imperative to put down numbers so that the child quickly masters the technique of this type of needlework.

Teachers recommend starting to create paintings using the Isothread technique from the moment a child reaches senior preschool age. Toddlers learn to independently count, plan and perform complex finger movements, which has a positive effect on the development of fine motor skills. Isothread contributes to the formation of creative abilities. Needlework of this kind develops imagination and fantasy.
Consider a scheme for embroidering a triangle with isothread with numbers.

It is also interesting to try to embroider a small circle with isothread according to the scheme with numbers.

Isothread was developed in the 17th century in England. Initially, weavers created patterns on planks, and carnations were used as fasteners instead of holes. The results of their work served as decoration for the interior.
Pictures with isothread are an excellent memorable gift for any occasion. Professional needlewomen create images of stunning beauty: landscapes, still lifes and even portraits.

Isothread embroidery materials
Materials and tools for thread graphics are in every home. Therefore, even for beginners, it will not be difficult to find everything you need.
Basic techniques for embroidering with isothread
Any thread graphics schemes have similar methods of filling elements. Consider the main methods.
corner filling
On a piece of thick paper, you need to draw an angle. The size and severity of the difference do not have. Each side of the isothread drawing must be divided into equal sections. To do this, use a ruler to measure intervals of 5 millimeters. We start work from the top of the corner. Each distance is marked with a dot and a number. In these places, using a substrate and an awl, holes should be made. The corner is sewn up, as shown in the diagram. Embroidery starts from the inside.

Filling the circle
On thick paper, a circle is drawn with a compass. It must be divided into twelve identical segments. We also mark the points with numbers and make punctures in these places. A feature of filling the circle is that the smaller the distance between the punctures, the more beautiful the image will be. The main thing is that there should be an even number of holes.

As for the length of the isothread stitches, long stitches fill the element more than small stitches. And accordingly, the central hole will also be smaller. The circle is embroidered according to the scheme.
Arcs and spirals
The embroidery of these elements is carried out by the same method as for the circle. But the length of the stitches should be small. The size of one stitch must be less than half of the arc. The width of the embroidery is directly related to the stitch size. The smaller it is, the thinner the arc will be.


As for the peculiarities of embroidery of spiral figures, it is done all the time in only one direction. The stitch length of this isothread can only be from 3 to 5 punctures. After you have dealt with the basic methods of embroidery in the technique of thread graphics, you can proceed directly to the product. We offer a small master class of a children's scheme.
Kitty
This one is easy. A master class of such work is quite suitable for the first creativity of children.
For embroidery you will need:
- black thick paper;
- white floss threads;
- thin white paper;
- pencil;
- pin;
- clip;
- glue;
- needle.
Manufacturing process
On white paper with a sharp pencil, you need to draw a contour of the cat. The photo shows what such a scheme looks like.

We apply the sheet to dark cardboard and fasten it with clips. If you use paper clips, dents will remain on the finished product that will not disappear. Therefore, it is better to take special paper clips.
On the contour of the image at regular intervals, it is necessary to put dots with numbers. In these places, we pierce holes with a pin. Before you start making holes, place a thick, dense material under the workpiece. It will not damage the work surface. We thread the needle, but do not make a knot. Isothread embroidery should be started from the wrong side. After you make a couple of stitches, the end of the thread should be fixed on the wrong side with glue.

The ears and part of the tail are embroidered using the corner filling method. All other elements - by way of filling the circle. Separately, we cut out the eyes, nose, antennae from multi-colored materials and glue them to the cat. Embroidery is ready!

You can also conduct a master class with children on embroidery using the technique of isolating dandelions. It is not difficult, any child can cope with it.
spring dandelions

This master class does not require special skills. Such an image is an excellent option to isolate schemes for beginners. The picture is created by means of the simplest stitches.
For embroidery you will need:
- cardboard;
- green paper;
- glue;
- needle;
- pencil;
- awl;
- yellow and green threads.
Manufacturing process
Glue green paper onto cardboard. It has a color chart on it. Through equal distances, points with numbers should be marked with a pencil. With the help of an awl, holes are made along the contour of the pattern. We begin to embroider from the wrong side, securing the tail of the thread with glue.


The flower and dandelion bud, which are shown in the photo, are embroidered with yellow thread, by filling the arc with triangles. The stem is created with stitches of green thread. Leaflets are made by filling the corner also with green threads. The finished embroidery can be framed or decorated with a baguette.
Tone thread graphics
The creation of tonal isothread is considered the highest degree of skill. But it is also easy to do. The main thing in such art is to choose the right materials and beautifully harmoniously place all the elements.
In nature, all shades are divided into two groups: warm and cold. Visually warm are perceived as protruding forward, cold - receding back. Using such tricks, a unique volumetric embroidery is created.

In addition, shades are divided into light and heavy. To heavy - include dark, saturated, to light - cold, light. If the composition is embroidered correctly, the top of the image will be "lighter" than the bottom. It is also necessary to monitor the harmony of the combination of color shades and the canvas. In the photo, such paintings have a unique art and originality.
The tonal embroidery is very beautiful. It is distinguished by its special sophistication and picturesqueness. The master class of such works is based on the correct ratio of color schemes.
The isothing technique is an ideal activity for children of any age. It is not difficult to perform, but very exciting. The very first classes allow you to create attractive and artistic works, which young needlewomen really like. In addition, this embroidery method develops attention, thoroughness, and fine motor skills in the child. Isothread for beginners, the best way to join such needlework as embroidery.
Isothreading schemes: lessons for beginners (photo)Isothreading schemes: lessons for beginners (photo)
Paintings in
are extraordinarily beautiful and graceful. At first glance, it may seem that thick paper is a very complex material. It is clear that each needlework requires skills. It is unlikely that it will be possible to create a complex intricate drawing from a photo right away. But one has only to learn the two main methods: filling the corner and the circle, as the needlework will immediately become easy and understandable. Those who already have experience in this needlework can easily create the most intricate patterns and compositions.
Isolate schemes are depicted quite simply. Such embroidery can create almost any pattern. It is enough to draw a contour and make holes along it. Next, we will consider in detail the master class on how to perform such work. 


Isothread embroidery materials
Materials and tools for thread graphics are in every home. Therefore, even for beginners, it will not be difficult to find everything you need.

Compass. Such a tool will be required if, according to the scheme, it is necessary to draw a circle;
Basic techniques for embroidering with isothread
Any thread graphics schemes have similar methods of filling elements. Consider the main methods.
Filling in the corner On a piece of thick paper, you need to draw a corner. The size and severity of the difference do not have. Each side of the isothread drawing must be divided into equal sections. To do this, use a ruler to measure intervals of 5 millimeters. We start work from the top of the corner. Each distance is marked with a dot and a number. In these places, using a substrate and an awl, holes should be made. The corner is sewn up, as shown in the diagram. Embroidery starts from the inside. 
Filling in a circle Draw a circle on thick paper using a compass. It must be divided into twelve identical segments. We also mark the points with numbers and make punctures in these places. A feature of filling the circle is that the smaller the distance between the punctures, the more beautiful the image will be. The main thing is that there should be an even number of holes. 
As for the length of the isothread stitches, long stitches fill the element more than small stitches. And accordingly, the central hole will also be smaller. The circle is embroidered according to the pattern.
Arcs and spirals These elements are embroidered in the same way as for the circle. But the length of the stitches should be small. The size of one stitch must be less than half of the arc. The width of the embroidery is directly related to the stitch size. The smaller it is, the thinner the arc will be. 

As for the peculiarities of embroidery of spiral figures, it is done all the time in only one direction. The stitch length of this isothread can only be from 3 to 5 punctures. After you have dealt with the basic methods of embroidery in the technique of thread graphics, you can proceed directly to the product. We offer a small master class of a children's scheme.
Kitty
This one is easy. A master class of such work is quite suitable for the first creativity of children.
For embroidery you will need:
- black thick paper;
- white floss threads;
- thin white paper;
- pencil;
- pin;
- clip;
- glue;
- needle.
Manufacturing process On white paper with a sharp pencil, you need to draw the outline of a cat. The photo shows what such a scheme looks like. 
We apply the sheet to dark cardboard and fasten it with clips. If you use paper clips, dents will remain on the finished product that will not disappear. Therefore, it is better to take special paper clips.
On the contour of the image at regular intervals, it is necessary to put dots with numbers. In these places, we pierce holes with a pin. Before you start making holes, place a thick, dense material under the workpiece. It will not damage the work surface. We thread the needle, but do not make a knot. Isothread embroidery should be started from the wrong side. After you make a couple of stitches, the end of the thread should be fixed on the wrong side with glue. 
The ears and part of the tail are embroidered using the corner filling method. All other elements - by way of filling the circle. Separately, we cut out the eyes, nose, antennae from multi-colored materials and glue them to the cat. Embroidery is ready! 
You can also conduct a master class with children on embroidery using the technique of isolating dandelions. It is not difficult, any child can cope with it.
spring dandelions

This master class does not require special skills. Such an image is an excellent option to isolate schemes for beginners. The picture is created by means of the simplest stitches.
For embroidery you will need:
- cardboard;
- green paper;
- glue;
- needle;
- pencil;
- awl;
- yellow and green threads.
Manufacturing process Green paper must be glued onto the cardboard. It has a color chart on it. Through equal distances, points with numbers should be marked with a pencil. With the help of an awl, holes are made along the contour of the pattern. We begin to embroider from the wrong side, securing the tail of the thread with glue. 

The flower and dandelion bud, which are shown in the photo, are embroidered with yellow thread, by filling the arc with triangles. The stem is created with stitches of green thread. Leaflets are made by filling the corner also with green threads. The finished embroidery can be framed or decorated with a baguette.
Tone thread graphics
The creation of tonal isothread is considered the highest degree of skill. But it is also easy to do. The main thing in such art is to choose the right materials and beautifully harmoniously place all the elements.
In nature, all shades are divided into two groups: warm and cold. Visually warm are perceived as protruding forward, cold - receding back. Using such tricks, a unique volumetric embroidery is created. 
In addition, shades are divided into light and heavy. To heavy - include dark, saturated, to light - cold, light. If the composition is embroidered correctly, the top of the image will be "lighter" than the bottom. It is also necessary to monitor the harmony of the combination of color shades and the canvas. In the photo, such paintings have a unique art and originality.
The tonal embroidery is very beautiful. It is distinguished by its special sophistication and picturesqueness. The master class of such works is based on the correct ratio of color schemes.
The isothing technique is an ideal activity for children of any age. It is not difficult to perform, but very exciting. The very first classes allow you to create attractive and artistic works, which young needlewomen really like. In addition, this embroidery method develops attention, thoroughness, and fine motor skills in the child. Isothread for beginners, the best way to join such needlework as embroidery.
Schemes for beginners


Comments
related posts:
 Isolate for beginners schemes with numbers heart for the holiday
And lines. Although from a distance you can see the whole pattern: landscape, portrait, flowers. And just approaching the picture, you are surprised at the technique of execution. It seems that the mysterious interweaving of threads is beyond the control of an ordinary person. However, even a schoolboy can master it. Having understood the fundamental foundations of this needlework, you can eventually create real masterpieces.
What is izonit?
This needlework appeared in the 17th century in England. Masters used this pattern as a decoration of houses. Carnations were driven into the boards, threads were wound in a certain sequence, and an unusual element was created. Subsequently, the boards with carnations were replaced with cardboard, velvet paper with holes. And some craftswomen transferred isothread to fabric.
From geometric shapes and lines, magnificent pictures with isothread are obtained. Schemes of simple plots can be found in handicraft books. There is little information on creating complex paintings.
The fact is that there are not so many professionals in this direction, everyone keeps their achievements in secret. In most cases, the isothreading technique, or nitkography, is used in developmental labor lessons with older preschoolers and first-graders. With children, they create small postcards, crafts on disks, simple paintings with one plot.
For this type of creativity, get thin threads. The more colors, the brighter the work will be. You will also need a pencil, a compass, a ruler, an awl, needles of different thicknesses, foam and cardboard.
Pictures with isothread: diagrams of the main elements
Let's start with a circle. Draw a circle, divide it into equal segments. By embroidering chords in a certain sequence, you get a filled or incomplete circle. To remember what distance between the segments and what sequence of embroidery gives a particular pattern, make card templates. They will come in handy when creating your schemes.
Consider 3 ways to embroider a circle. On the template, you can draw a circle with a compass. In the finished picture, use prepared samples so that there are no unnecessary punctures. Mark 19 points on the circle, number them. Put the template on the foam, pierce the points. You make a drawing and a puncture from the wrong side. Next, insert the thread, make a large knot, drive the needle from the inside to the first point. According to this principle, all work in the technique of izonit goes. Schemes for beginners:
- Embroider each chord so that a large circle forms on the face, there will be small stitches from the inside. That is, from the first point enter into the third. On the wrong side, insert the needle into the second point and go to the fourth. From the wrong side, from the third point, enter the fifth, etc.
Embroider a circle
We continue to consider the main elements of nitkography, from which all pictures are obtained using the isothread technique. Schemes of filled circles:
- "Lengthen" the chord, starting from the first and fifth points. Also, on both sides, consistently walk around the entire circumference. That is, from the fifth point on the wrong side, insert the needle into the second and go to the sixth. In this variation, the inner circle becomes smaller.
- To get a more filled circle, make the chords bigger. For example, from the first point enter the ninth. On the wrong side, insert the needle into the tenth point and bring it out to the second. Then insert the needle at the third point and withdraw at the eleventh. That is, short stitches are formed from the wrong side.
These are simple circles, if you “impose” layers on top of each other with different threads, you will get a multi-layered circle. That is, embroider the third method, then the second and then the first pattern. You can experiment with other geometric shapes. If the points are close to each other, then take a thin needle and get elegant pictures with a thread.

Schemes of triangles and arcs
The pattern depends on the length of the triangles. The number of points must be the same. For example, the distance between the points can be a centimeter from all sides, or on one side the same number of points alternates every five millimeters.
Number the sides of the triangle. Start embroidering by withdrawing the needle from the end of one edge and inserting it into a point from the corner of the other side. For example, from the first point of edge A along the front side, go to the second point of edge B. From the wrong side of B, make a small stitch to the third point. On the front side, enter the fourth, etc.
Triangles make interesting pictures. Izonit with schemes of complex circles consisting of triangles allows you to get beautiful abstract balls. Only in this case, number all three sides of the figure. Study carefully the pattern of embroidery balls. In one version, the triangles are fully embroidered, while in the other they form petals. The arcs are numbered twice, starting from the second point. Combine figures, get unusual plots.

Rooster with isothread
For embroidery, simple coloring templates are suitable. Print out the picture, divide each element into dots, number, embroider. To make it easier to choose a pattern, scroll through the needlework patterns (meaning isothread). Schemes of pictures with numbers will confuse beginners. Therefore, sew one piece at a time.
For example, you embroider a scallop divided into three parts on a rooster. Create them like triangles from a complex circle. Next, move on to the beak. Now pay attention to the eye. First, embroider the head in a circle, and on top of this type create an eye. The remaining parts are embroidered in the same way as a circle or an oval.
When filling in the shapes, pay attention to the middle, which, due to the “thickness” of the weaves, creates a direction. Therefore, you embroider the crest, tail from the top, but create the wings, the body from the bottom. You embroider the paws with a “triangle”, and finish the lower leg by connecting both parts. In this technique, for postcards, take bright multi-colored threads, and for a picture - several shades of the same color scheme.

Flowers
Isothread is also used for postcards and bookmarks. You will not find schemes of paintings (flowers, animals, landscapes, architecture) on the Internet. Masters create complex plots on their own. Beginners should practice on "children's" subjects, so that later they can be depicted in other proportions.
For example, a single rose is suitable for a postcard, and by combining a bouquet, we get a mini-picture. First, embroider the rose strictly according to the scheme, and then experiment with the size of the details and technique.
Petals, thorns, sepals are embroidered like corners, leaves like ovals, stems and some lines are made with a simple “back with a needle” stitch. Some masters first draw a background with the colors of plants, then the pattern complements the background. Others work with technology, embroidering thin lines tightly together.
To make sunflowers, embroider the middle with a “lattice”, petals and leaves with arcs. In this case, divide the sheet into four corners to emphasize its width. Using several shades of the same color, you can reflect the shady and sunny areas of the flower.

Animal world
Monochrome is a classic of any needlework. It is no exception and paintings can be borrowed from cross-stitch. cardboard, from the wrong side, draw a swan floating on the water. Draw the waves. Now divide the bird into parts. You can immediately draw shapes of different sizes to fill the bird completely. Then on a black background you get a white swan. The smaller the figures are embroidered, the more accurately the embroidery is obtained.

Here's a little advice if the diagrams were not found, and the finished picture is incomprehensible. Print the plot on a color printer, pick up the threads. Glue the pattern from the inside, embroider from the background. If finances allow, make a finished print on canvas.
In many animals, most of the details are filled with ordinary stitches. For example, a cow's ears, tail, legs, udder are made with strokes. The torso, head, eyes, nose, muzzle - are embroidered according to the type of circle. At the same time, make the eyes and nose on top of the embroidered muzzle. Embroider horns like arcs.
Varieties of work
In our time, masters represent isothread differently. Schemes of paintings are described by professionals in books. Pictures are not only embroidered on cardboard, but also return to old traditions. A beautiful fabric is stretched onto the board, a diagram is attached, and decorative nails are driven in point by point. The paper is removed, and threads are wound around the cloves. In this case, pictures from different sides create a new image.

Even if you use the isothread technique to connect two circles held on four pillars, you will get an unusual hourglass. In this variant, use shiny ones. The interweaving of geometric shapes is used to create flowers and in dumbbells. Only wire is used instead of nails and warps.
When creating complex paintings on cardboard, place the dots next to each other. Take beaded needles. It will take a long time to embroider, but the plot will be realistic. And many more professionals create their own patterns. First, they draw a sketch on paper, put dots, draw lines, numbering them. Then embroider the resulting pattern and look at the result.

Brief conclusions
If the embroidery on the canvas seems complicated, then master the isothread (diagrams for beginners). You will not find paintings with a complex pattern describing the manufacturing technology. But as soon as you master the embroidery of the main elements, you will be able to “divide” the works of masters and even ordinary photos into shapes. Try your hand at new needlework and delight others with your work.
Many interesting types of needlework were known several centuries ago. So it is with isothread - it is believed that for the first time the technique of creating drawings on a solid basis with the help of threads appeared in England quite a long time ago. English craftsmen hammered carnations into wooden planks, wound multi-colored threads around the carnations, creating a certain pattern.
Today, thread graphics have again become widespread. Only to facilitate the work, thick cardboard is used instead of wood.
Isothread: materials and tools for work
For work you will need:
Styrofoam.
Base (wooden or cardboard board),
Threads (can be completely different, from thick woolen to bright floss),
A needle with an eyelet of sufficient diameter (to fit your thread),
In addition to the main ones, you may also need auxiliary tools, materials, including a beautiful substrate (plain fabric, leather, and others), glue, adhesive tape, an awl, safety pins, and additional accessories with which you can decorate the finished panel. Sometimes a thread pattern can be formed around a base in the form of a brooch, a wooden house, several animal figurines, etc.
Cardboard- the easiest base, ideal for beginners. It is not necessary to look for any special types of cardboard; you can buy ordinary colored cardboard in an ordinary stationery store or hypermarket. Take several packs of cardboard of different density (indicated in grams per square meter). The thicker the cardboard, the thicker the needle and thread will need to be used.
You can experiment with velvet substrates (there is even velvet cardboard), but if the material is too thin, it will be inconvenient to work with it. In this case, ordinary PVA glue will help you out, with which a sheet of ordinary white cardboard can be glued to the base. This will make work much easier.
Similarly, you can glue fabric onto cardboard.
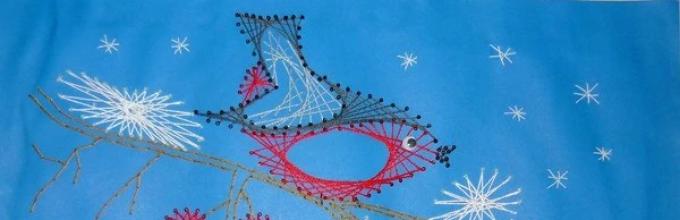
Threads can be not just different, but differ even within the same panel. For example, you embroider a spruce with thick fluffy threads, and snowflakes with thin ones. Please note that in this case you will need several different needles, with different sizes of ears.
You can even start embroidery with ordinary threads sold on spools. But usually craftswomen stop at "Muline" or "Iris" as the main ones, using other varieties as needed to complement the image.
Ruler and compass in the work are needed in order to put pictures on the basis of isothreading (schemes of future images). The most popular schemes are based on a circle, square, angle.
One of the main occupations that make up the work of a craftswoman is piercing holes in the base. With seeming simplicity, this requires skill and care, there is a chance to prick your fingers or damage the surface of the desktop. Here the sheet comes to the rescue polystyrene. It is desirable that it be the size of the future picture or a little more. It is laid on the base. You can also use a folded towel. But dense (extruded) foam is still the most convenient option.
Scotch useful in order to fix the threads on the wrong side. Not every knot will stick well on the cardboard and there is not always a thread of sufficient length to tie it. Scotch tape (good, sticky tape) does the job just fine.
Awl will help to pierce thick cardboard or leather. It is not always convenient to do this with a thread, especially if you decide to use thin threads and the needle is matched to them.
Basic techniques in isothread technique
Actually, over the centuries of the existence of this technique, only two main figures and two methods of filling them in were invented - a circle and a square (right angle). Let's look at them in more detail.
We use a circle. With it, we draw a circle of the diameter you need on the basis. It is better to let it be a small circle if you are just getting acquainted with the technique. Next, imagine that this circle is the face of a clock. Put marks in the places where the numbers are usually placed on the dial. In total, you will get 12 marks. Poke holes in them with an awl. Number them.
So, we thread the needle with a hole at number one from the wrong side.
Important! You can connect any points of the circle in accordance with your (or someone else's, if you use a ready-made diagram) idea, but in such a way that the distance between the two connected points is always less than the diameter of the circle. That is, on the example of our picture, you cannot connect the numbers 12 and 6, 3 and 9, 11 and 5, etc.
This technique is taken as the basis for many beautiful embroideries. See picture below.

Or like this:

Here you will need a ruler. With its help, an acute, right or obtuse angle is drawn. As in the case of a circle, its sides are divided into equal sections, where holes are made. They must be in pairs, even if one side of the corner is longer than the other.
No hole is made at the top of the corner. The holes are numbered starting from the top. The thread is threaded from the wrong side. Next - according to your scheme.
The easiest option for beginners:

Again, filling the corner in the isothread technique cannot be done in such a way that opposite points located at an equal distance from the top of the corner are connected.
If you use the technique of embroidering flowers, then you cannot do without this technique. The fan consists of a segment, over which an arc is drawn at some distance. The purpose of the reception is to connect the holes on the segment with the holes on the arc, getting a beautiful petal. For an example, see the diagram:

The holes on the arc are made at an equal distance from each other. They begin to pull the thread from the first puncture in the arc (number 1).
This is how not only leaves are formed, but also petals, as well as buds.
Also, for a floral ornament, you can use an arc-shaped pattern. For him, a part of the circle is drawn. Next, the holes are connected with a thread so that the distance between them is less than half of the embroidered arc. Look at the diagram:

As always, the distance between the holes should be equal.
A spiral is embroidered according to a similar pattern:

It is important to embroider it in one direction.
And this is how a droplet is embroidered using the isothread technique:

In this case, an arc and two segments are taken as the basis. Embroidery starts at one end, ends at the other.
Isothread technique: some secrets of needlework
If the chord (the distance between two connected points in a circle) is made as large as possible, then the circle will eventually be filled with threads as much as possible.
An interesting pattern is obtained if the circle is stitched twice - with one color of thread with a small chord, the other with a large one.
When embroidering a circle on the front side, we get a star on the back.
If you want to get a corner embroidered with strokes, embroider it from the wrong side. Then on the front it will turn out the same, but shaded.
To fix the knots and the whole pattern as a whole, after the end of the embroidery, you need to glue the base from the wrong side with a thick sheet of paper.
A picture in the technique of isothreading in stages with numbers: a goldfish. Step-by-step master class for children
Even a child can perform such a simple drawing. In general, the isothing technique for children is extremely useful: it develops fine motor skills, imagination, and perseverance. Of course, you can also embroider a complex fish. But for kids, we advise you to take this simple scheme:

What you need
Of the tools and materials you will need:
Simple pencil.
Colored cardboard of medium density,
Progress
Step 1. Put dots on the cardboard, as indicated in the diagram.
You will get something like this:

Step 2. We make holes in the cardboard with a thin awl, according to the drawn diagram.
Step 3. With a thread of the same color, we sew the lower ornament (sea waves) according to the scheme.

In the end it should look like this:

Step 4. Let's start embroidering the fish. To do this, using the standard technique, we sew a circle. Like this:

Step 5. In the final stage, we sew the tail, mouth and fin of the fish:

To make it look more natural, do not forget to draw an eye on the fish.
There is nothing complicated about the Easter theme. The main thing is to choose the right patterns in the technique of isothing, some of which are so simple that you can use them to create handicrafts, which are often asked to be made to kindergarten or school.
Panel "Chicken with egg"
The finished image looks like this:


Postcard for Easter "Basket with eggs"

Pattern for embroidery:


You can isolate on disks. In the Easter theme, there is such a cute craft:

The circuit (shard) looks like this:

It is not difficult to embroider a heart on cardboard, and as a result you can get a unique valentine with your own hands.
In the finished version, the picture will look like this:

It is necessary to embroider according to this pattern:

As you can see, the numbering of holes in the upper part of the heart starts from the center, and at the bottom we bypass the corner element - there the holes diverge away from the center, the center itself is not numbered.
In general, you should have an even number of holes in order to be able to connect them in pairs.
We start stitching from the inside out, threading the needle into the number 1 (see diagram).
As you continue to work, your valentine will look like this:

When you are done with this diagram, to complicate the drawing, you will need to do the following:
From the wrong side, where the thread will be at the end of the work, thread it into the hole at number 47. From there - to 48. Then to 49 and so on to the end.
It will turn out like this:

Another version of the scheme


What is good about a heart - if its edges are cut with curly scissors, then you can not use a needle, wrapping the part with threads. It is easier, faster and more convenient than the classic isothreading technique.
As a result, you will get a heart like this:

Required tools and materials:
Accessories for decoration (rhinestones, beads, beads, satin ribbons, etc.).
Red and white cardboard
Threads of medium thickness red, pink and black,
Curly scissors for cutting the edges of a valentine,
regular scissors,
simple pencil,
Progress
To make the heart even and neat, it is better to cut it out according to a ready-made template, which abound on the Internet. Cut out the circled template with curly scissors.
Now, with ordinary scissors in the places of the “wave”, we make cuts with ordinary scissors. See drawing.

We turn our workpiece over to the wrong side and fix the thread there with tape.
We transfer the thread to the front side. We begin to wrap the heart, threading the notches. We work according to this scheme:

When the work according to the scheme is completed, we again turn the heart inside out and fix the end of the thread there. On the front side, you can decorate the heart with rhinestones and other decorations.
You can wrap it like this:

Imagine, and the result will certainly exceed your expectations.