Latest patterns
Do you want to learn how to knit and weave?
“Of course, yes,” you answer me.
I even know how you would like to learn knitting and weaving: quickly, efficiently, with pleasure.
Just sit down one day and knit at least a simple scarf in 2 hours.
But it seems impossible to you, since the Internet is filled with articles about how wonderful you can learn to knit and how great it is to be able to knit in general.
What to do?
Learn to knit and weave on my website. It's convenient, fast and high quality.
I create my knitting and weaving courses specifically for beginners. I show all the subtleties and features of each work. I record all models on a video camera. All you have to do is watch and repeat after me.
Quick results!
By learning from my videos, you will immediately make a simple and at the same time beautiful thing in 2 hours. And you will like these types of needlework so much that later you will no longer be able to refuse.
There are no restrictions for handicrafts!
Some of my students write to me: “I live on your site, I have already knitted a bunch of things for my family.”
You will have the feeling that I am next to you, just showing you how to start, what to do next, how to finish.
The courses are available to users of any age and gender, there are no restrictions even on knowledge of the Russian language. People from all over the world watch, learn and buy videos.
Where will they offer this to you?
You can study at any time, watch free lessons as many times as you like. Where? In what knitting courses will you repeat the same movement 100 times? There are no restrictions on my site!!!
Choose what suits you!
Of course, you can continue to look at incomprehensible diagrams and descriptions and look for answers on forums, wasting time and money, but not getting any results. You can also sign up for knitting or weaving courses. In Moscow, for example, such courses cost from 5,000 rubles per month. And believe me, in a month you will knit 3-5 simple things. You simply won't have time to connect anymore.
Let's learn - FREE!
There are many free courses on the site.
If you want to get VIP courses, then you just need to participate in popularizing the site.
The most important thing is that you will learn to knit and weave: ONCE AND FOR ALL!!!
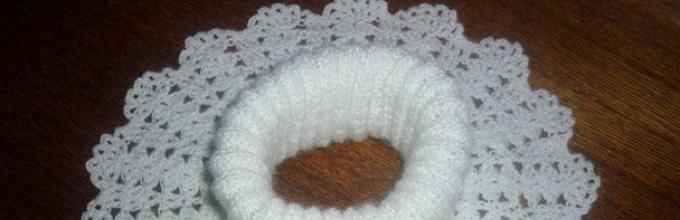
A knitted shirtfront is a circular scarf that has a narrow part for the neckline and a flared part that covers the décolleté area. Often a shirtfront is simply called a collar. This knitted piece of clothing provides excellent protection from cold winds. The shirtfront will be especially warm if you knit it from high-quality wool or wool blend yarn. A shirt shirt for a small girl using a crochet hook will be possible not only for experienced needlewomen, but also for beginner knitters.
The shirt front has not lost its relevance and has not gone out of fashion for quite a long period of time. This modern and fashionable accessory is very practical and convenient not only for adults, but also for children. For restless kids who are in perpetual motion, a warm knitted shirt will come in handy. It is very easy and quick to put on; with constant movement, the shirtfront does not expose your child’s neck and ears.
Let's look at a master class on crocheting a shirtfront for girls
We bring to your attention a detailed description of the process of making a warm accessory for a girl with your own hands. The knitting will be made from a lace knit and a neckline. The neckline of the shirtfront will need to be knitted in a ribbed crochet pattern, one to one of the double crochets. Elastic is the main element in many knitted products. Everyone knows that you can knit an elastic band with knitting needles, but few people know such a pattern as crocheting an elastic band. This pattern makes the canvas. A product crocheted with a one-to-one ribbed double crochet pattern is not only elastic, but also resilient.

The openwork part of the shirtfront will be knitted from double crochets and air loops. In crochet, there are only a few simple elements, which, when alternating, produce a huge variety of patterns.
To work you will need the following material:
- Yarn of your choice.
- Crochet hook number four and number 2.5.
- Tailor's measuring tape.
Before mating, measure the volume of your child's head and add one centimeter to the resulting number.

Start the knitting pattern for your shirtfront:
- Using hook number four, cast on a chain of chain stitches equal to your preliminary calculations. Knit the first row in double crochets.
- From the second to the fourth row, knit with an elastic band one to one. At the beginning of the row, make three lifting chain loops, then throw the thread on the hook, intending to knit a double crochet stitch. Next, place the head of the hook under the front wall of the double crochet stitch from the previous row, grab the thread, and pull it through. Three loops have formed on the hook, knit the first two and then the two remaining loops on the hook - this is the front column of your future elastic band. Now knit a purl stitch with two crochets: also throw the thread on the hook twice, place the head of the hook behind the back wall of the stitch with two crochets from the previous row, grab the thread, pull it through and again we have three loops on the hook, of which you knit two first the first, then the remaining two. Now continue the row, alternating knit and purl stitches with double crochets. Continue knitting rows like this until the neckline of the shirtfront is five centimeters.
- Now knit the extended part of the shirtfront using an openwork pattern. Use double crochets, chain stitches and double crochets.
- In the fifth row, make three lifting chain loops and make two double crochets, then a chain loop and again a double crochet. Then work one double crochet through one loop. Next, repeat two double crochets - chain crochet - two double crochets - double crochet, knit to the end of the row. Then the rows are repeated. Knit four rows according to the pattern, only in the place where you have knitted one double crochet, increase the number of double crochets by one in each row.
- Knit the eighth row. Move the thread under the chain loop and pull through, cast on three chain loops and knit two double crochets and make a chain loop, three double crochets again. Then double crochet into the stitches of the previous row. Then again three double crochets in the chain stitch of the previous row, a chain loop and again three double crochets in the same chain loop of the previous row. Continue to the end of the row.
- Ninth row: final openwork row. Make 3 air loops, double crochet, again a loop and again a double crochet. Alternate them with an air loop.
Finish knitting your shirtfront.
Video on the topic of the article
We bring to your attention several thematic videos on crocheting a shirt front.
In the climatic region in which Russia is located, it is always worthwhile to be well insulated, especially with the arrival of autumn. It is in order to keep warm that people sew such clothes for themselves, and often to replace a scarf, since the shirtfront looks much more beautiful. It can be perfect for insulation for both women and men. Also, such a product can easily be suitable for the younger generation. A shirt front can be great for a child, and maybe even for a newborn. Therefore, every mother should be able to sew such products. A crochet shirtfront, which is suitable for beginners, is very easy to knit, since the whole process is not very long, and there are also patterns that you can easily follow.
This article will contain a complete description of how to make a shirtfront with knitting needles, and most likely this article is suitable for beginners, since everything is done very easily and simply.
We knit a simple crochet shirtfront for beginners
What you need to take before you start:- tape (it should have marks in increments of 1 centimeter, this will be needed when taking measurements.)
- from hooks we will need hooks numbered No. 2.5 and No. 4
- from yarn we will need yarn called “Alize Sekerim” 350m/100g

As already mentioned, a shirtfront can be sewn for both adults and children, so you should first take measurements using the same tape. The measurement involves using a tape to measure the circumference of a person’s head. If the shirtfront is sewn for a child, then you need to add another 1 centimeter to the resulting measurement so that the head can easily pass through the hole in the shirtfront. If this craft is made for a man or a woman, then it is worth adding 3-4 centimeters to the measurements obtained, depending on the size of the person’s head.

An ordinary shirt-front consists of two parts, a neckline and an openwork part. Each of them has its own unique pattern, and this article will show a master class, as well as provide diagrams for creating a beautiful pattern. The neck part of this shirt-front will be sewn using the “One to One Elastic” pattern. This craft will use a very rare crochet technique, namely crocheting with an elastic band. In fact, few people know about this method of knitting, and therefore it is quite unique. Therefore, this craft can be considered unique.
At the bottom of our shirtfront there will be crochet items such as chain stitches, double crochets and single crochets. After all the preparatory work has been completed, you can begin to work.
- First, on hook number 4 you need to cast on a chain of yarn that was taken earlier, from air loops. The chain itself will be equal to the circumference of a person’s head. In order to avoid tightness on the shirtfront, it is recommended to crochet with a large diameter crochet hook. Using a hook with this diameter will also allow you to cast on fewer loops than would be the case if the hook were with a small diameter. When the process of measuring a chain of air loops begins, it is highly not recommended to stretch it.
- The first row is knitted in the round using double crochets.
- After this you need to knit 2-4 rows. All these rows need to be knitted with a one-to-one rib pattern. At the very beginning of the row you need to make three lifting air loops. After this, you need to throw the thread onto the hook, as if going to knit a post with two capes. Now you need to take the hook, using its head, bring it under the front wall in the previous row, grab the thread and pull it through. Thus, we have 3 loops on the hook. To create the front stitch of the elastic, you need to knit the first two loops, and then the last two. Now you need to knit the purl stitch. You need to throw a thread on the hook, then the head of the hook needs to be placed on the back wall of the column from the previous row. After this, the thread is pulled through and the same 3 loops are formed on the hook that need to be knitted as in the beginning. The row must be continued with alternating columns. This must be done until the neck is 5 cm.
- After the neckline has been knitted, you can proceed to the extended part of the shirtfront. In order to knit the fifth row, you need to make 3 lifting air loops, and then knit them into loops that form the purl loops of the elastic band. The result is the following sequence: through a loop, two double crochets, an air loop and at the end two double crochets. After this, you need to knit one double crochet through one loop. Next you need to knit in a certain sequence: two double crochets, chain crochet, two double crochets, double crochet. And so you need to continue making several rows. Thus, using the pattern, you need to knit 4 rows. However, it is worth remembering that where there is one double crochet stitch, you need to increase the number of stitches by one in each row.
Now you need to make one special row, and this is row 8. First you need to take our thread and pass it under the air loop and then pull it through. Now we cast on three air loops, and in the same place you need to knit 2 double crochets, and then you need to knit 3 double crochets again. Now you need to find the loops of the previous row and knit them with double crochets. Then you still need to knit 3 stitches into the air loop of the previous row, and then one more time in exactly the same way. This algorithm needs to be knitted to the end of the row.

There is not much left, you need to make the ninth row. The ninth row itself can be divided into 2 full parts. First you need to knit three lifting air loops, and you also need to make the same additional loop. An air loop is taken from the previous row, under which it is in turn knitted in a certain sequence, which will alternate seven times. First there is a double crochet, and then an air loop. Now in the previous row you need to find the place where the stitches go from the previous row, and in the same place three double crochets are knitted. Alternating seven double crochets and chain stitches, the first one needs to be knitted under the second ones, and this is repeated until the end of the row.
We find seven double crochets from the previous row, which in turn alternate with an air loop, under the first of them 3 air loops are collected and pierced into the second loop, which is in the previous row, thereby creating a single crochet. And then just like that one more time. In the place in the previous row where there are three double crochets, in the same place, repeating until the end of the row, single crochets are knitted.

You can also make such a shirtfront with buttons. To decorate, simply take knitting needles and sew to the front of the shirtfront.
Video material on this topic
You can also watch the video to learn more.

Crochet shirt front pattern for children.
A shirt front is a necessary item of everyday clothing, especially for children. For active children's games in the fresh air, the child must be well protected from the cold, but in this case a scarf is inferior to a shirtfront. The scarf is tied or wrapped in layers, causing inconvenience for your child, and the shirtfront is conveniently located on the body and does not slip off the child’s neck. Today I want to invite you to knit a shirtfront, the pattern of which is very popular. But your item will still be unique, since each needlewoman adds a twist to the knitted item, decorating it to her own taste.
Our shirtfront will be knitted from two types of patterns: the neckline and the openwork part of the shirtfront. We will knit the neck of our shirt-front using the ribbed crochet one-to-one double crochet pattern. Elastic is the main element in many knitted products. Everyone knows that you can knit an elastic band with knitting needles, but few people know the crochet elastic pattern. This pattern allows the knitted fabric to stretch well, which is very important when knitting sweaters, necklines and much more. Fabric crocheted with a one-to-one ribbed double crochet pattern not only stretches well, but also shrinks well.
Openwork part of the shirtfront will be knitted from double crochets and air loops. In crochet, there are only a few simple elements, which, when alternating, produce a huge variety of patterns.
We will need:
- yarn "Alize sekerim" (90% Polyacryl / 10% Polyamide) 350m/100g
- hook No. 4 and No. 2.5
- tape measure
Preparing for work:
We measure the circumference of your child’s head and add it to 1 cm. As always, to make it easier for you, I will do all the calculations using my own example. My child is one year old and his head circumference = 48 cm + 1 cm = 49 cm.
We don't need anything else to prepare.
Progress:
- Using crochet number 4, we make a chain with a thread of yarn "Alize sekerim" from air loops equal to your mathematical calculation (child's head circumference + 1cm), for me it is 49cm. We crochet with a large diameter so that the edge of the shirt front is not pulled together. This will also allow us to cast on fewer stitches, and the neck of the shirtfront will fit the child’s neck more tightly. Do not stretch the chain of chain loops when you measure it with a measuring tape.
- First row: We knit double crochets in a circle.
- Second, third, fourth rows: We knit with an elastic band one to one. Everyone knows about elastic knitted for a product, but crocheted elastic is rarely found in knitted models and few people know about it.
“One to one crochet elastic band pattern”:
At the beginning of the row we make three lifting air loops, then we begin to throw the thread on the hook, intending to knit a double crochet stitch. Next, we place the head of the hook under the front wall of the double crochet stitch from the previous row, grab the thread, and pull it through. Three loops have formed on the hook, we knit the first two and then the two remaining loops on the hook - this is the front column of our future elastic band. Now we knit a purl stitch with two crochets: we also throw the thread on the hook twice, place the hook head behind the back wall of the stitch with two crochets from the previous row, grab the thread, pull it through and again we have three loops on the hook, of which we knit two first the first, then the remaining two. Now we continue our row, alternating knit and purl stitches with double crochets. We continue to knit such rows until the neck of the shirtfront is 5 cm. I got three rows with an elastic band.
One-to-one elastic pattern for shirt neck

- Now let's start knitting ь extended part of the shirtfront with an openwork pattern.
“Lacy pattern for shirt front”:
The openwork part of the shirtfront will be knitted from double crochets, chain stitches and two double crochets. In crochet, there are only a few simple elements, which, when alternating, produce a huge variety of patterns.
Fifth row: we make three lifting air loops and we will knit into those loops that form the purl loops of the elastic, that is, into relief columns behind the back wall. That is, we knit through a loop, make two double crochets, then one chain loop and two double crochets. Then we knit one double crochet through one loop. And now we repeat two double crochets - an air loop - two double crochets - a double crochet, thus knitting to the end of the row. Then the rows are repeated.
Knit four rows according to the pattern, only in the place where we knit one double crochet, we increase the number of double crochets by one in each row, that is, there will be two of them in the fifth row, and three in the sixth.
Eighth row: This row will be different from the previous rows. We transfer our thread under the chain loop and pull it through, cast on three chain loops, here we knit 2 double crochets and make a chain loop, again three double crochets. Then we knit double crochets into the loops of the previous row, where double crochets were knitted, that is, there are three of them, as in the previous one. Then again three double crochets in the chain stitch of the previous row, a chain loop and again three double crochets in the same chain loop of the previous row. Thus, we knit to the end of the row. You can knit this part longer by adding one double crochet at a time in the repeat. We do it this way, we knit three double crochets, a chain stitch, three double crochets, double crochets, adding one for each of your new rows.
Ninth row: final openwork row. It consists of two parts. First part: we make three lifting air loops, one additional air loop. Now, under the chain loop of the previous row, we knit a double crochet - chain loop - double crochet - chain loop - double crochet. We knit seven double crochets, alternating them with an air loop. Next come three double crochets from the previous row, in this row we knit three double crochets in the place where the double crochets from the previous row go. Then again under the chain loop of the previous row we knit seven double crochets, alternating them with the chain loop, and so on until the end of the row.
Where in the previous row there were seven double crochets, alternating with an air loop, we cast on three air loops under the first air loop and make a single crochet into the second air loop of the previous row. Then again three air loops and a single crochet in the next air loop. And where we had three double crochets in a row in the previous row, we knit single crochets in their place in this row. We repeat everything until the end of the row.

Now we cut the thread, fasten the ends of the cut threads so that they do not spoil the appearance of the shirtfront and do not stick out. The bib for your child is ready!
Mar 09
Dickey crocheted
Dickey- a necessary item of everyday clothing, especially for children. For active children's games in the fresh air, the child must be well protected from the cold, but in this case a scarf is inferior to a shirtfront. The scarf is tied or wrapped in layers, causing inconvenience for your child, and the shirtfront is conveniently located on the body and does not slip off the child’s neck. Today I want to invite you to knit a shirtfront, the pattern of which is very popular. But your item will still be unique, since each needlewoman adds a twist to the knitted item, decorating it to her own taste.
Our shirtfront will be knitted from two types of patterns: the neckline and the openwork part of the shirtfront. We will knit the neck of our shirt-front using the ribbed crochet one-to-one double crochet pattern. Elastic is the main element in many knitted products. Everyone knows that you can knit an elastic band with knitting needles, but few people know the crochet elastic pattern. This pattern allows the knitted fabric to stretch well, which is very important when knitting sweaters, necklines and much more. Fabric crocheted with a one-to-one ribbed double crochet pattern not only stretches well, but also shrinks well.
The openwork part of the shirtfront will be knitted from double crochets and air loops. In crochet, there are only a few simple elements, which, when alternating, produce a huge variety of patterns.
We will need:
- yarn "Alize sekerim" (ninety percent polyacrylic to ten percent polyamide) in one hundred grams three hundred and fifty meters;
- hook number four;
- hook number two and a half;
- tape measure;
Preparing for work:
We measure the circumference of your child's head and add one centimeter to the measurements. As always, to make it easier for you, I will do all the calculations using my own example. My child is one year old and his head circumference is forty-eight centimeters, and if we add one, we get forty-nine centimeters. We don't need anything else to prepare.
Progress:
- Using crochet number four, we make a chain with a thread of yarn "Alize sekerim" from air loops equal to your mathematical calculation (child's head circumference plus one centimeter), for me it is forty-nine centimeters. We crochet with a large diameter so that the edge of the shirt front is not pulled together. This will also allow us to cast on fewer stitches, and the neck of the shirtfront will fit the child’s neck more tightly. Do not stretch the chain of chain loops when you measure it with a measuring tape.
- First row: We knit double crochets in the round.
- Second, third, fourth rows: Knit with an elastic band one to one. Everyone knows about elastic knitted for a product, but crocheted elastic is rarely found in knitted models and few people know about it.
« One to one crochet elastic band pattern": at the beginning of the row we make three lifting air loops, then we begin to throw the thread on the hook, intending to knit a double crochet stitch. Next, we place the head of the hook under the front wall of the double crochet stitch from the previous row, grab the thread, and pull it through. Three loops have formed on the hook, we knit the first two and then the two remaining loops on the hook - this is the front column of our future elastic band. Now we knit a purl stitch with two crochets: we also throw the thread on the hook twice, place the hook head behind the back wall of the stitch with two crochets from the previous row, grab the thread, pull it through and again we have three loops on the hook, of which we knit two first the first, then the remaining two. Now we continue our row, alternating knit and purl stitches with double crochets. We continue to knit such rows until the neck of the shirtfront is five centimeters. I got three rows of elastic.
One-to-one elastic pattern for shirt neck
- Now we begin to knit the extended part of the shirtfront with an openwork pattern.
« Openwork pattern for shirt front»:
The openwork part of the shirtfront will be knitted from double crochets, chain stitches and two double crochets. In crochet, there are only a few simple elements, which, when alternating, produce a huge variety of patterns.
Fifth row: we make three lifting air loops and we will knit in those loops that form the purl loops of the elastic, that is, in relief columns behind the back wall. That is, we knit through a loop, make two double crochets, then one chain loop and two double crochets. Then we knit one double crochet through one loop. And now we repeat two double crochets - an air loop - two double crochets - a double crochet, thus knitting to the end of the row. Then the rows are repeated. Knit four rows according to the pattern, only in the place where we knit one double crochet, we increase the number of double crochets by one in each row, that is, there will be two of them in the fifth row, and three in the sixth.
Eighth row: This row will be different from the previous rows. We transfer our thread under the chain loop and pull it through, cast on three chain loops, here we knit 2 double crochets and make a chain loop, again three double crochets. Then we knit double crochets into the loops of the previous row, where double crochets were knitted, that is, there are three of them, as in the previous one. Then again three double crochets in the chain stitch of the previous row, a chain loop and again three double crochets in the same chain loop of the previous row. Thus, we knit to the end of the row. You can knit this part longer by adding one double crochet at a time in the repeat. We do it this way, we knit three double crochets, a chain stitch, three double crochets, double crochets, adding one for each of your new rows.
Ninth row: final openwork row. It consists of two parts. First part: we make three lifting air loops, one additional air loop. Now, under the chain loop of the previous row, we knit a double crochet - chain loop - double crochet - chain loop - double crochet. We knit seven double crochets, alternating them with an air loop. Next come three double crochets from the previous row, in this row we knit three double crochets in the place where the double crochets from the previous row go. Then again under the chain loop of the previous row we knit seven double crochets, alternating them with the chain loop, and so on until the end of the row.
Where in the previous row there were seven double crochets, alternating with an air loop, we cast on three air loops under the first air loop and make a single crochet into the second air loop of the previous row. Then again three air loops and a single crochet in the next air loop. And where in the previous row we had three double crochets in a row, we knit single crochets in their place in this row. We repeat everything until the end of the row.
Now we cut the thread, fasten the ends of the cut threads so that they do not spoil the appearance of the shirtfront and do not stick out. The bib for your child is ready!
Crochet shirt front video for beginners.
I would like to offer you a video of a shirtfront that is popular. A crocheted baby shirt-front consists of two parts of the neck, for which a one-to-one elastic pattern is used. And the actual openwork part of the shirtfront. The video is simple and understandable, designed for those who are just learning to crochet.
In contact with
Classmates


