Every woman sooner or later decides to radically change her image in order to add even more beauty and attractiveness. And modern hair coloring methods can help with the upcoming update: a well-chosen shade and technique directly influence the result to exceed all expectations. What to rely on - the classic option or creativity - in creating a style is up to the lady herself to decide. A combination of various techniques and professional execution will allow you to achieve maximum effect during transformation.

Now in hairdressing there are a lot of coloring methods that are in particular demand. Experienced stylists and colorists offer very practical techniques, due to which the hairstyle takes on the most organic look or makes it possible to emphasize a unique appearance. Modern technologies for changing hair color allow you to play with the palette in such a way that curls of any length, structure and density look neat and stylish at the same time.
 As one of the most famous procedures in the salon, such a technique will never go out of fashion, but will only be improved and acquired new types. Every season, this coloring principle is at the peak of popularity. Highlighting can be easily done on both dark and light hair. The result depends entirely on the base color of the hair, the chosen tone for the strands and the technique itself. Its essence lies in the fact that hair strands are evenly lightened along the entire length. The width of the curls can be changed, but the thinner it is, the more natural the hairstyle looks. Typically, highlighting is done in two stages: first, the strands are prepared using a special dye, and then they are tinted, achieving the desired shade.

This concept hides the unusual coloring of not the entire mass of hair, but individual strands in bright colors. It may imply not just one tone, but different colors on the strands - it all depends on the boldness of the experiment. Hair coloring lasts for two types: full and partial. In the second case, a certain part of the curls is dyed, where the main tones will be exclusively natural. The color set must be discussed in advance so that the final picture looks harmonious.
 Another method of hair coloring, which uses ammonia-free cream-like dye with the addition of wax and other substances that are soft for the hair. With it, the risk of hair damage is very low, which is considered the central competitive advantage of the technique. But mazhimesh dyeing is not suitable for dark hair. Due to its gentle composition, the dye simply cannot completely replace the shade of dark hair without damaging it. Therefore, this approach is used only for experiments on light brown and light curls.
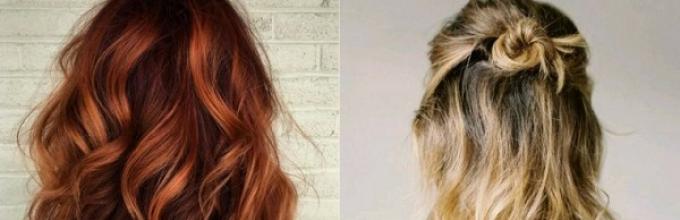
 Recreating a smooth and sometimes even sharp transition between striking tones is ombre. This effect is perceived as burnt ends or slightly regrown roots, neatly turning into a different tone. However, on long straight hair, the option with a strictly marked line between the colors looks especially fashionable. Typically, this technique is used to harmoniously present dark roots with lightened strands and decorate blonde hair with red tips. It is important to understand that this is not just highlighting, but a complete color change, and therefore requires intensity.
 The new subtype of the sombre method is distinguished by its naturalness and naturalness, since it includes the use of several shades and allows you to create a style of light sun glare. The attempt to add volume does not involve detailed treatment of the strands with paint and the use of foil, but the composition itself, which has a lightening effect, should be applied very quickly and left for a long time. Sombre is ideal for brunettes and fair-haired girls of any age, having the effect of sun-bleached curls.
 The main feature of the new subspecies comes down to the desire to give the hair a natural look and soften the transition against the background of the effect of burnt strands. The resulting smooth and beautiful shades do not require periodic tinting later. And an additional advantage of the technique is that any flaws remain almost invisible, because frequent hair coloring changes its structure for the worse. Blondes, brunettes and fair-haired women are advised to use the shatush technique, although the result will be more noticeable on long hair.\
 The dyeing technique under consideration includes in its process the lightening of selected strands. With its help, you can bring to life an unsurpassed image or dilute a boring color with the addition of bright curls. When dyeing balayage, the ends of the hair and strands are highlighted in 2-3 tones, starting from the middle. The general composition is applied in the shape of the Latin letter V: the sides are painted first, and then the edges. Transitions are made sharp or smooth, without clear boundaries.
 In the world of beauty, there are several methods of hair coloring with similar foreign names. The shatush principle affects individual strands at the ends as a smooth gradient. Transformation from dark to light is carried out by lightening some parts at the ends of the hair. When dyeing balayage, the ends of the hair are also adjusted in a lighter direction.
However, in contrast to the shatush technique, the composition is applied to the entire area, and thus the lower part stands out more clearly. We can consider that balayage is a middle option between shatush and ombre. When coloring in the balayage format, the paint covers the edges of the curls superficially. The approach seems quite easy, but requires maximum precision, so professionals do not recommend painting it yourself.
Modern types of hair coloring
To change the image, ladies often choose hair coloring. At the same time, it is not at all necessary to change radically; sometimes it is only necessary to partially correct the previous image and bring freshness to it. If a girl wants drastic changes, then she can repaint her hair completely, but when she just wants some zest, then it is better to pay attention to modern painting methods using several colors. There are a large number of existing options, so there should not be any special problems with the choice.
 The standard hair dyeing technique means applying dye to curls that are previously divided into zones. There are several types of substances for this procedure: for lightening and for tinting hair, herbal and chemical composition. Classic coloring includes an even layer of paint along the entire length of the hair, without resorting to special professional techniques (separate strands, stencils, etc.). Therefore, the result is quite predictable - the hair gets a single shade.
 The most natural and natural option for hair coloring is a general tone, which sometimes creates the illusion that the hair has not changed color at all. Most often, women resort to this method to quietly eliminate gray hair. Therefore, this method is also popular among men and seems to be a simple procedure that does not even require special experience: buy paint, mix the contents of the box and apply the dye to your hair. But there are also difficulties: tone-on-tone hair coloring technology requires taking into account the natural shade of the strands, eye and skin color. Neglecting these criteria often leads to disappointment with the results obtained.
 A cool platinum color should definitely be selected taking into account the color type, otherwise the image will come out awkward and funny. Regarding the original hair color, the best models come out of fair-haired ladies - the new image makes them brighter, more mysterious and sexier. The main problem is that this option is very difficult to replicate at home. Only an experienced hairdresser will be able to choose the right dye correctly and not end up with a blonde hair color with a yellow tint.
Important! The age of the lady also plays an important role. Platinum shades will suit young girls who prefer cascading or torn haircuts. But for older women, it’s better to take a closer look at natural blonde tones, and leave the platinum in the form of narrow strands.
 An equally fashionable hair color is ash, which has many shades and subtones. Achieving an ashy color on dyed hair is quite problematic, especially if nature has endowed you with a rich red or golden base. It is worth understanding that it will not always be possible to achieve exactly the same shade as on a tube of paint. For the procedure to be successful, you need to lighten your hair and buy dye in a professional store. For those with a warm color type, cool ash tones are perfect.
 At first glance, it seems that bleaching and bronding are similar terms that many women confuse. Creating the effect of burnt hair on curls is called bronzing. This technique refers to the recently widespread multi-stage staining. It means applying hair dye several times (up to 5 or more different tones). Thanks to this hairdressing trick, the color looks very natural even on dark-haired ladies.
And in contrast to this method, blonding is a complete lightening of the strands and the achievement of various shades of blonde (ranging from dark to pure white or ashen). This procedure is also very simple, since it involves applying a coloring composition for a certain time. But here the emphasis is on another nuance: it is important to evenly distribute the mixture and control the correct holding time.
Marble
 Such an unusual marble coloring is a whole algorithm, during which the stylist takes one color tone and additionally lightens individual strands. Each curl is modified to varying degrees, which adds shine, a specific pattern and shimmer to the final result. Usually, the choice is based on the client’s special appearance features: hair length, natural shade, eyes and skin.
Based on the versatility of the method, this coloring looks more beautiful on those with medium or long hair. On a short haircut, marble runs the risk of looking untidy if you choose the wrong colors and do not style it. Also, the tones should not be very different from each other: the main one can be darker, and the other a little lighter.
Important! To get the perfect result of marble staining, it is recommended to visit a high-level professional.
Pixel
![]() Such coloring by sectors can rightly be considered an innovation in the beauty industry. A pattern applied to the hair using this technique allows you to get the effect of a transition of shades with a flexible texture. Now they even produce a separate series of paints designed specifically for multi-layer 3D drawings.
Such coloring by sectors can rightly be considered an innovation in the beauty industry. A pattern applied to the hair using this technique allows you to get the effect of a transition of shades with a flexible texture. Now they even produce a separate series of paints designed specifically for multi-layer 3D drawings.
The main distinguishing feature of this technique is that after completion of the procedure, the strands superimposed on each other should form a clear geometric image, similar to rainbow figures from the game Tetris. This necessarily requires bright acid colors and a mandatory gradient. The ideal hairstyle for pixelation is an asymmetrical haircut and perfectly straight hair. This variation always turns out creative and bright.
 “Footage” or stencil dyeing is a unique technique in which specially prepared templates are used to create designs, patterns and accents on the hair. Therefore, such a creative version of the image implies the use of block coloring and requires a special approach. To achieve a complex shade, original picture or exact proportions, it is better to contact an experienced craftsman.
This method of dyeing curls arose relatively recently: for the first time, models were prepared in this way at a fashion show, where bright coloring gave an effect that was visible from a long distance. In everyday life, bold colors will have a slightly different effect and this is worth taking into account.
 The 3D method will help you achieve a holographic volumetric effect by alternating different shades and professional dyes. The difference from coloring comes down to the fact that the tones used in the process are within the boundaries of the same color and as a result the transition is as smooth and natural as possible.
Additionally, this combination gives the effect of distinctive splendor, as well as depth of color. The key feature of the technology lies in adjacent shades and the principle of the coloring pigment scheme: this implies the presence of a main color on the roots and additional tones.
TOP 5 professional hair dyes
Combining durability and gentle care with frequent dyeing is not so easy. Paints often contain many oxidizing agents, which, with prolonged use, have a detrimental effect on the hair. Well-known manufacturers have managed to achieve a balance in this regard and have earned positive opinions from many clients:
- Estel Only– the product very carefully changes hair color without changing its structure, and a wide variety of shades do not fade under prolonged exposure to the sun.
- C:EHKO Color Explosion– which contains jojoba and almond extract, which softens the effect of oxidizing agents, so the hair is always filled with vitality and shine.
- Palette Deluxe– guarantees easy combing after coloring, has about 24 shades and pearl extracts in the composition, which will give additional smoothness to the hair.
- SYOSS Professional Performance is a German company that produces home coloring products, taking into account all the comments of experienced colorists.
- L'Oréal Recital Preference– offers unusual colors, does not fade and washes out slowly (over 8 weeks), complemented by a restorative balm in the set to restore lost moisture to the curls.
Important! When periodically dyeing, you should always monitor the condition of your hair. Nourishing masks will help restore hair to its previous condition, or split ends.
How to apply paint correctly

It has long been known that achieving the most similar shade is possible only when you follow all the rules of coloring. According to the advice of professional colorists, you must adhere to the following recommendations:
- 1-3 days before the procedure, you should stop applying masks to your hair.– residues of special composition may influence the degree of penetration.
- It is not recommended to wash your hair before starting– the secreted fat will serve as additional protection for the scalp from the action of the oxidizing agent.
- When applying paint, the hairline often gets dirty, so this doesn't happen, you need to apply a rich cream in advance, which is removed with a cotton swab upon completion of the procedure.
- In order to achieve good distribution throughout the hair, it is necessary to separate the hair into strands, and then apply the composition as carefully and quickly as possible.
- After this step follows comb your hair thoroughly with a comb with fine teeth, eliminating lumps of paint in individual areas.
- In case of staining of regrown roots, the paint is first applied to the roots and only after 20 years they continue to work along the entire length.
- When washing off the paint, it is better to wet the hair gradually, foaming the remaining paint and washing it off without haste, and then rinse your hair well with shampoo and apply conditioner.
Otherwise, it is enough to follow the standard instructions that are available on any package, do not forget to use protective gloves and be sure to check the purchased paint with an allergy test before use.
Important! There is no need to wrap your hair or exceed the specified time - there is a high risk of burning the strands, making them more brittle and dry.

It is difficult to navigate the composition of paint without perfect knowledge of chemistry. But this can be judged from the data indicated by the manufacturer on the packaging. One of the indicators is levels of resistance, which are expressed as a scale:
- 0 – temporary(easily applied to blond hair, but completely washed off in 1-3 showers);
- 1 – tint(unstable dyes intended for bright strands that last up to 6-8 water procedures);
- 2 – semi-resistant(guaranteed long-lasting color and can last from 3 weeks to 2 months with proper care);
- 3 – persistent(long-lasting options have a higher price, but also retain the shade for up to 3 months or more).
The abundance of main shades, tones and halftones, as well as the possibility of fundamentally changing hair color, make such dyes very popular. Therefore, it is so important to understand their classification and choose the most suitable copy for yourself.
How to choose hair dye to match your eye and skin color
By nature, every girl is given a certain hair and eye color. Stylists believe that this particular sign should be taken into account when planning to dye your hair. Determining the exact color type will help you understand which option is right for you:
- spring (delicate beige, tan-prone skin, blush, freckles, light brown or light brown hair with a hint of gold, green or blue eyes);
- summer (light, cool-toned skin, dark hair, faded freckles, gray-green, blue or light brown eyes);
- autumn (peach skin color, red or brown hair, freckles to match the curls, brown or gray eyes);
- winter (cold pale skin, dark eyebrows and eyelashes, black hair, brown or blue eyes).
Having decided which season you belong to, you can move on to deciding on the paint color. Typically, classic recommendations that are based on the above characteristics are 100% on target.
How to choose hair dye according to the shade scale
As for choosing a specific shade, you don’t need to rely solely on the photo on the cover or the name. It is better to focus on 2-3 small numbers that are printed next to the beautiful name. After all, it is these data that provide a complete picture of the shade:
- 1st digit– depth of the main color (usually from 1 to 10);
- 2nd digit– fundamental tone (follows a period or fraction);
- 3rd digit– additional shade (30-50% of the main shade).
In case of marking with only 1 or 2 digits, it is assumed that the tone is pure. Also, the decoding of hair dye includes a shade - an additional marking is separated from the first value by a dot or a slash. There are 9 options in total, and sometimes two shades are included in one designation at the same time.
How to choose paint depending on shade and structure

If you have saved the natural color and have not used paint before, then all that remains is to decide what tone you want to repaint. Here it is quite acceptable to take ammonia-free paints or tinted versions that are quickly washed off. For radical experiments, it is necessary to carry out clarification in advance with a professional composition with the addition of an oxidizing agent of the required concentration. But you should not try to lighten by more than 4-5 tones at a time - the hair will be seriously damaged, so this stage should be done gradually.
With already dyed hair, it will not be enough to simply determine the shade; it is also important to take into account the color of the regrown roots and the fact when the curls were dyed. A good result can be obtained if you use professional paint. Experts suggest just avoiding ashy shades, since you can get a frankly gray color. And if the hair has been dyed relatively recently, then the product should be applied from the roots, leaving for a minimum amount of time. Remember that changing the shade too quickly and abruptly can negatively affect the health of your hair.
Despite the deceptive simplicity of the “light” base, only 50% of gray hair cases can be beautifully colored. Here you should use ammonia dyes above level 7, combined with an oxidizing agent, or do highlighting. A single-color dye will help to avoid the effect of overgrown roots. But it’s also better to avoid too bright and dark tones - it’s easier to pay attention to light shades, up to level 8.
Conclusion
Each hair coloring method has its own advantages: the complexity of the technique and the principle of color changing allow you to achieve original results. With such an assortment of methods, you can transform yourself whenever you want. The main thing in this matter is to monitor the condition of your hair and choose only high-quality products. Then the final image will definitely not disappoint.
Have you decided to dye your hair? Then you definitely need to know how to dye your hair correctly! You can learn about all the nuances of this activity in this article. We will tell you how to color your hair correctly.
This article is intended for persons over 18 years of age
Have you already turned 18?
How to dye your hair at home?
It is believed that one of the most correct ways to radically change your image and style is to change your hairstyle or haircut. More precisely, this is the first decisive step, which foreshadows the beginning of something new and unusual. For some, hair coloring is a way to hide gray hair, but for others it is another reason to start changing their life.
If you really understand that you are determined in your desire, then the time has come to act and change!
But before moving on to the painting process itself, it is necessary to consider some points. First you need to understand what the right paint to use, and we are not talking about the color, which you have probably already decided on, but about the type of paint itself, its shade. And in general, not every paint may suit you, even if it seems to you that this is the shade of your dreams. Always remember that after dyeing it may suddenly turn out that the curls have become darker or, on the contrary, lighter. This is often observed in cases of blondes. And yes, such a passage does not always mean that you used bad or low-quality paint; rather, it indicates your simple ignorance.
To avoid the horror or stress of a failed experiment, it is important to prepare everything in advance.
Preparing for hair coloring
The first step in preparing for painting is choosing the paint itself. We have a separate article on how to do this, so here we will present only the basic principles.
There are a number of shades and colors of hair dyes, and there are also different types that differ in their characteristics. To choose the right option, you need to consider the following points:
- paint fastness;
- your skin tone;
- eye color;
- natural hair color and shade;
- presence of gray hair.
These are the main factors that influence the choice of suitable products. However, do not forget about individual characteristics. For example, some may be allergic to certain types of dye, or the curls may be unprepared (brittle and lacking vitality). To accurately determine which paint to purchase, you should first consult with specialists. They will help you choose the right product that will have a visible effect and will not cause problems with your scalp.
The main advice from experienced women who often dye their hair is to buy a little more dye than indicated in the instructions. The thing is that during the process circumstances may arise due to which there may not be enough paint. This happens more often than you think, so if you are planning to apply makeup at home, take this moment into account!
As for the durability of coloring products, here you need to consider your goal for changing your hair color. If you want to hide gray hair, then definitely choose a permanent dye. It can last up to two months even with regular shampooing. Non-permanent dyes are needed for those who do not have much gray hair, but have a great desire to experiment. If you basically don’t know what will suit you, but want to try a new color, the tint option will be just right.
As soon as the paint is selected and purchased, we move on to the next stage, namely the painting itself.
DIV_ADBLOCK292">
There are a few more tips to consider before starting the process:
- you should not apply makeup if you have injuries in the head area;
- You cannot add additional components to the diluted paint, such as balm, oil, etc.;
- Do not use diluted paint more than once.
During the next stage, you need to prepare all the things you need to paint your head. These include:
- the paint itself;
- comb, preferably with fine teeth;
- brush;
- Bowl;
- gloves;
- hairpins or crabs for curls;
- special cape.
It also makes sense to stock up on rich cream. It is necessary for application along the hairline so as not to dye the ears or forehead. In general, this is all we may need for work.
How to apply paint yourself and wash it off?
Now we move on to a description of how to apply paint yourself, but before you start doing this, be sure to do an allergy test. To do this, take the diluted paint and apply it to your wrist or elbow, wait 10 to 15 minutes. If this place does not turn red or itch, then everything is in order and you can start.
d"> How to dye gray hair correctly?
For those who want to know how to properly dye gray hair, it is important to remember that there are some small peculiarities here.
If this is your first time wearing makeup and you only have a little gray hair, cover it first, starting from the roots. In this case, the paint should be kept longer so that the color takes on better. After this, dye your hair evenly along the entire length. How often should you color your roots? As the colored locks grow.
If you already have gray hair, dye your hair in several stages to get the desired shade. We use the same application technique.
How to dye your hair with henna?
Today many people prefer to dye their hair. This is a natural substance that gives beautiful results. How to dye your hair correctly?
DIV_ADBLOCK293">
There is no particular difference from the principle of painting with a chemical analogue, but there are a couple of nuances:
- For shoulder length hair, one pack of henna is usually used;
- You need to fill it with hot water, but not boiling water. There is also a method where henna is mixed with kefir to increase the shine effect and improve the hair structure. Kefir in this case acts as a tonic;
- henna is stirred until it resembles sour cream;
- To enhance the color transfer effect, use a polyethylene cape on the head, usually this can be a pre-purchased cap, but you can also choose the traditional method using a bag. A towel is also placed on top;
- Keeping henna on your head costs several hours; the shade will depend on the duration.
In order to dye your hair yourself, regardless of the chosen color and length of hair, you will need almost the same set of tools:
Hair dye;
A ceramic or glass bowl in which you will dilute the paint;
Rubber or polyethylene gloves;
Shoulder cape;
Comb with large, infrequent teeth;
Special brush for hair coloring.
If your hair is short, then 1 package of dye is enough. For very thick hair, shoulder length or longer, you will need 2 packs. In addition, if you decide to dye your long hair, it is better to stock up on 4 large hairpins or special clips that hairdressers use.
How to dye your hair at home yourself
Those girls who have dyed their own hair know that the process is quite labor-intensive; you have to find ways and poses to dye your entire head. It is especially difficult to dye the hair on the back of your head yourself; you literally have to do it by touch. At the same time, it always happens that one awkward movement leads to paint remaining on the neck, forehead, and temples. Protect yourself from this problem in advance by applying a rich cream to the skin around the scalp or go over these areas with lip balm or hygienic lipstick. You will notice later how easily the paint comes off with skin protected by these products.
You should start dyeing your hair from the back of your head, so use a comb to divide your hair into 4 parts: the front from the forehead to the back of the head, the left temporal, the right temporal and the occipital. The dye absorbs better on damp hair, so it’s a good idea to lightly spray or moisten it.
The hair coloring process itself consists of uniformly applying the coloring composition to the hair. This is done in the following sequence:
Apply the dye to the roots of the hair along the parting;
Paint the front part from the roots to the ends of the hair, do the same with the remaining areas one by one;
Spread the remaining paint again as close to the roots as possible;
Comb your hair with a wide-tooth comb.
Modern hair coloring compounds do not spread, so there is no need to wear a cap on your head. After 30 minutes, simply wash off the dye using shampoo for colored hair.
The package with the dye will most likely contain a bag of balm, which softens the hair, protects it from the aggressive effects of the chemical composition, and makes the hair shiny and smooth. Apply it on your head and rinse with water after a few minutes.
If you decide to dye your hair at home yourself, then knowing some tricks will make the dyeing more effective, correct and as close to professional as possible.
Do not wash your hair at least 2 days before dyeing your hair. Clean hair is more easily destroyed by chemicals. In addition, before dyeing, do not use hair conditioners or 2-in-1 shampoo, otherwise you risk getting undyed strands.
Do not keep the paint on longer than expected. The opinion that if you leave the dye on your hair longer, the color will become more saturated is wrong. Almost every dyeing instruction indicates the active time of the composition, usually 30 minutes. After this time, the composition simply stops working.
The main thing is harmony. If you want to dye your hair at home yourself, keep in mind that it is better not to make radical changes to your look. The hair color should match the eye color and differ from the main color by no more than 2 tones. If your mood requires changes exactly the opposite, go to a master who will do it professionally.
Do not wash your hair the day after coloring your hair. In addition, do not use varnishes, mousses and foams. The components included in their composition can prevent the absorption of dye pigment into the hair.
When coloring your hair, do not use a metal comb. Metal oxidation can play a cruel joke on the color of your hair, so it is better to use wooden or non-metallic combs; at worst, a plastic one will do.
Do not use hair dye when coloring your eyebrows and eyelashes. The temptation to tint your eyebrows and eyelashes with leftover paint can lead to the need to call an ambulance; the composition of the paint is dangerous for eye health. In addition, you risk being left without eyelashes and eyebrows; they will simply fall out.
Dyeing your hair at home yourself is actually not as difficult as it might seem for the first time; you just need to follow all the rules, follow the instructions on the dye package and remember the small but important tricks described above.
The desire to change the image is inherent in all of us. But the cost of the procedure in beauty salons forces many ladies to abandon the idea. From now on you don't need an expensive stylist at all! Knowing how to dye your hair at home, you can do everything yourself!
4 steps for DIY coloring
If you decide to dye your hair at home, follow these steps.
Step 1: Choose the color you want
Any change in style begins with shade. It is very difficult to choose one, since very rarely a lady knows exactly what she wants. Conduct an experiment, especially if you want to change dramatically. You can try on wigs or simply upload a photo to the site and choose a color online. At the same time, you should also take into account your color type, as well as the need to change your entire wardrobe, because what suited a redhead may not suit a blonde.
Stage 2. Buying hair dye
- When choosing a package with the desired color in a store, be sure to read the instructions on the side of the package. It contains points regarding dosage for different lengths of strands. For medium and long hair, you may need two or even three packages;
- All colors of modern paints are divided into three groups - blond, black and chestnut. And each of them can be separately divided into different tones (light and dark). If you need to go dark, try a lighter shade from this color palette first. And one more thing - when coloring your hair at home, give preference to cool shades. Warm colors often behave “inappropriately”, so it would be better to leave them to a specialist;
- If you want to save money, consider additional paint qualities. Some add shine to strands, others cover gray hair. If you don't need it, take another paint - it will be cheaper. The price is also affected by the branded balm included. If you have your own product that suits you, buy paint without balm;
- If you dye your hair regularly, use dyes from the same brand. Even a very small difference in the composition of the dyes can have a bad effect on the health of the hair.

Stage 3. Additional accessories
For painting you need:
- Special brush;
- Comb;
- A protective cape over the shoulders (it can be replaced with an old robe or towel);
- Fat cream. It needs to be lubricated on the skin along the hairline, as well as on the ears, temples, and neck. The cream prevents the paint from staining the skin as well.
Stage 4. Painting
Dyeing your own strands will not be so difficult if you strictly follow the instructions on the package:
- Mix the dye and oxidizing agent thoroughly.
- Comb your strands well. To improve the effect, they can be slightly moistened.
- Divide your hair into four parts - from the forehead to the back of the head, occipital, right temporal and left temporal.
- In each zone, lubricate only the root zone first. The layer should be uniform. Move the brush very quickly, otherwise your hair will take on a different shade.
- Distribute this mixture over the entire length of your hair.
- Leave for half an hour. If you are using dye for the first time, it is better to cut off a thin curl and try the dye you have chosen on it.
- Wash your hair with shampoo.
- At the end of the process, lubricate your hair with the balm that comes with the kit.
The whole painting process looks like this:
How to tint only the roots?
If you only need to touch up the roots of your hair, apply the dye to them for about 20 minutes. Even for a long length, one package is enough. Spread the remaining product over the rest of your hair and wait 10 minutes. Then wet the strands with a little water and lather well with your hands. Wash your hair with shampoo or just water. In the latter case, the color will be more intense.
How to dye a long braid?
The technique of coloring long hair is not as complicated as it might seem at first glance. Paint only the roots first. Then divide the braid into several thin strands, apply a small dose of dye to each and brush it with a comb. This will ensure even coloring. Gather all the dyed strands into one bun and hide your head in a bag. Wait the right time and rinse everything thoroughly. Finally, apply a moisturizing balm.
Attention! If you were unable to dye your strands in the chosen shade yourself, do not try to fix everything with another procedure. Wait two weeks - under no circumstances should you dye your hair again earlier, because the strands will be severely damaged.
- Tip 1. Do not add any other components in the form of balms, shampoos and oils to chemical dyes. This revamped lineup may be unpredictable.
- Tip 2. Don’t prepare the paint for future use, apply it right away.
- Tip 3. Work only with gloves - chemical components are bad for the skin.
- Tip 4. Modern cream paints do not spread over the skin, so there is no need for polyethylene or a warm towel.
- Tip 5. Do not combine perm with coloring.
- Tip 6. Remember, it is better not to leave the coloring composition on than to leave it on the strands.
- Tip 7. Be sure to buy care cosmetics for colored hair (shampoo, conditioner and mask).
- Tip 8. Hair after dyeing should be dried without a hairdryer.
- Tip 9. Do not wash your hair with shampoo for two or three days before the procedure. This will allow the pigment to adhere much better. The main thing is that there are no residues of varnish or other styling products on the strands.
- Tip 10. If there are rashes, wounds, scratches or itching on the scalp, postpone the procedure.

How to apply makeup with henna and basma correctly?
Hair dyeing with henna and basma can also be done without the help of others. It’s enough to remember a couple of simple but very important rules:
- Dilute the henna with hot water - it should look like homemade sour cream.
- Mix everything well so that there are no lumps.
- You can add any essential oil to the composition (literally a few drops).
- To avoid staining your skin, lubricate it with a rich cream (along the hairline, near the ears and on the neck).
- Apply henna to the strands, starting from the back of the head.
- Gently work your way through the rest of your hair.
- Comb your hair with a thick comb so that the mixture is evenly distributed throughout your hair.
- Wrap your head in plastic and a warm scarf or towel.
- Wait 2-3 hours.
- Before washing your hair, do a light massage.
- Rinse off the henna with warm water without using shampoo to allow the pigment to set.
- Now mix basma with water.
- Apply in the same manner.
- Wait the required time - from 15 minutes to 2.5 hours. The longer you keep the basma, the darker the shade will be.
- Wash your hair with water and lubricate your hair with balm.
Hair dyeing with tonic
When you decide to dye your hair with tonic or shampoo, remember an important point - its color can only be one shade darker. Hair tinting occurs according to the following scheme:
- Prepare the painting mixture using the instructions.
- Moisten the strands a little to help the toner adhere better.
- Divide your hair into several equal strands.
- Moisten each with the product using a special brush.
- Wrap yourself in a warm cap.
- When the time is up, wash your hair with water. There is no need to use shampoo.
How to make your own ombre?
Ombre is one of the most popular hair coloring techniques. To dye your hair at home using the fashionable ombre technique, you only need to strictly follow the tips:
- Mix the coloring composition. It can be either permanent or ammonia-free paint. If desired, use a tinted balm.
- Divide your hair into two equal parts.
- Tie two ponytails, placing both elastic bands at the same level and at the desired height.
- Using a special brush, coat each ponytail with the product. Hold the brush vertically. The border can be sharp, or it can be barely noticeable.
- Leave the dye on the strands for about half an hour.
- Wash your hair with shampoo and use conditioner.
Hair coloring with chalks
To do it right, buy a coloring agent at an art salon.
The variety of colors gives you a huge choice, but remember that using these crayons too often can be harmful to your hair. Then follow the instructions:
- Divide your hair into several thin sections.
- Twist each into a rope and secure with an elastic band.
- Paint the strands with chalk without touching the roots. You can apply one or several shades - it’s up to your taste. Blondes can apply the product to dry strands; brunettes are advised to wet their hair with water.
- At the end of the process, shake your hair to remove any remaining chalk.
- To secure the effect, spray your hair with hairspray.

Probably every woman at least once in her life has faced such a task as dyeing her hair. Some people just want to radically change their image, some correct their natural hair color, and others paint over their gray hair. Today we will talk in detail about how you can Dye your hair properly and efficiently at home.
How to dye your hair correctly
First, you must decide on a color.
 The cosmetics and perfumery market offers us a huge number of coloring products - permanent paints, semi-permanent paints, all kinds of tinting foams, balms, shampoos.
Don't go for cheap paint– you shouldn’t skimp on the health of your hair, but you shouldn’t buy the most expensive hair dye. Unless your hairdresser recommended it to you and you heard good reviews. Stick to a more or less well-known brand.
How to dye short, medium or long hair for yourself
You will need:
- hair dye;
- glass bowl for mixing paint;
- hairdressing brush for applying paint;
- non-metallic hairpins and clips (possibly);
- gloves (usually included with paint);
- plastic comb with sparse teeth;
- regular comb;
- a hairdresser's cape or some old clothes that you don't mind getting dirty.

If you have short hair, then one package of dye is enough. If your hair is medium or long, you will need two or three packs of dye. It depends on the thickness and length of the hair.
If you frequently color your hair, you should have a separate container for mixing the dye. It must be non-metallic, and it is better to store it separately from the rest of the dishes.
Painting process:
- comb your hair thoroughly with a regular comb - this will help remove any remaining hairspray or other products you use; in addition, it will be more convenient for you to apply dye to combed hair;

- if it’s more convenient for you to work this way, then use clips to divide your hair into separate zones;

- dilute the paint according to the instructions and mix it thoroughly until smooth;

- apply dye to your hair, starting from the back of the head– it is believed that this part is less susceptible to painting;

- process the crown and temporal parts, as well as bangs, if you have one;
- Now carefully comb your hair with a fine-toothed comb to evenly distribute the dye throughout your hair;

- wait for the time specified according to the instructions for this paint;

- rinse the paint thoroughly with warm water - in some cases it is recommended to do this without shampoo, so read the instructions carefully;

- Apply the balm and massage it evenly throughout your hair;

- Lightly massage your scalp and hair, rinse with warm water.
Usually dyeing is done on dirty hair, so before the procedure don't wash your hair for at least three days. But there are exceptions, so check with your hairdresser or, again, refer to the instructions for use of the paint.
If possible, do not use a hair dryer after painting. Give your hair a chance to dry naturally. Or at least don’t over-dry your hair and scalp with a hairdryer.
How to dye your hair roots
The basic procedure is the same, but there are small nuances:

When lightening or bleaching the roots, distributing the paint along the entire length is not required - read the instructions.
How to dye the ends of your hair
 When coloring the ends of your hair, you need to pay attention to the following points:
- Do not paint split or brittle ends - this will only emphasize their unhealthy appearance;
- if you want the border of the ends to be clearly visible, then use foil - wrap the middle part of the hair in it and paint the remaining ends of the curls;
- To achieve an imperceptible or blurred color transition when painting, you do not need to use foil.
After the procedure, it is better to use the balm that comes with the paint, even if you prefer your usual balm. This will help to properly fix the coloring result.
What not to do when painting:

Reviews about coloring at home
Several of our readers, for whom home hair coloring is not new, shared their experiences with us and left reviews and comments.
Anastasia, 30 years old
I've been doing my own makeup almost since I was in school. My hair was already brown, and red, and black, and various other shades. Therefore, I can say with confidence that there is nothing difficult about dyeing your locks at home. And I didn’t notice much of a difference between expensive paints and mid-price paints. They wash off equally over time. The only thing I can’t understand is why sometimes certain areas of the hair are dyed poorly or unevenly. After all, I use the same paint, and the painting procedure is familiar to me.


