It's rapidly approaching. And it's time to think about your holiday design. Therefore, you can safely start making beautiful crafts not only for yourself, but also as a gift to your family and friends. It’s so nice to make things with your own hands and celebrate, then it seems truly magical.
In the last article we made crafts, today I offer interesting but simple ideas for homemade crafts for kindergarten and schoolchildren. You can make them from scrap materials or visit a craft store. In any case, the work will be excellent if it is done from the heart.
The article offers different options for homemade products according to the level of complexity. There are easy ideas for kindergarten children and interesting options for older children. Choose the most interesting ideas and bring them to life!
I propose to start the selection from products in the form of piglets and pigs, because these are the main characters of 2019. Such works can be presented as a gift to family and friends. And it will be very interesting and fun for the child to create such cool animals.
Paper pigs
Cute flying pigs as a Christmas tree decoration will serve as a real talisman for the coming year. Making them is easy and quick. Therefore, you can involve your children in the work.
Required:
- cardboard;
- white and colored paper;
- pig pattern;
- needle;
- threads;
- scissors.
Stages of work:
1. Draw the outline of the pig on cardboard or trace it using the templates provided below. Cut it out and glue it on both sides.
2. We make the wings from white paper and attach them with glue. We wait until they dry and bend them a little at the ends.
3. Make a loop of thread on the pig’s back and hang it on the tree. This is such a beautiful flying pig. In this way, you can make a few more pieces so that they harmoniously decorate the New Year's tree.
You can also make a three-dimensional pig from strips of paper that will decorate your New Year's interior.
Required:
- colored paper;
- scissors;
- ruler;
- pencil;
- glue;
Stages of work:
1. From pink paper, cut out 4 strips measuring 21 by 2 centimeters. Mark the middle and glue them together in the form of a snowflake.
2. Then we connect the ends of the strips so that we get a ball.
3. All that remains is to draw and cut out the pig’s head with a diameter of 6 cm. Don’t forget to draw the eyes and mouth. We also cut out the piglet from paper and attach it to the head. Decorate with two green hearts in the form of a bow.
4. Now glue the head to the body ball.
The pig is ready!
Pig from a cone
This MK demonstrates step by step how to make the cutest symbol of the year 2019 from an ordinary pine cone. This is a great souvenir in honor of the holiday!
The following materials are required:
- Cone - 1 piece
- Button
- Felt - a small piece of pink color
- Button - future nose
- Black beads 4 mm
- Scissors
- Brush
- Acrylic paint
Step-by-step stages of work:
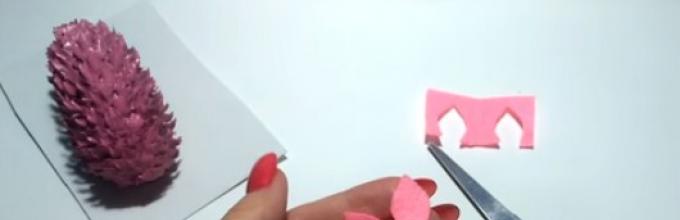
1. Using pink acrylic paint, paint the surface of the cone well so that there are no free unpainted areas left. First we paint one part, then we give time for the paint to dry and we paint the rest of the cone.
If the paint is thick, add a little water and mix well.
2. While the painted body of the pig is drying, fold a piece of felt in half and cut out the ears, resulting in 2 identical parts.

3. Now we glue all the details to the pine cone - the button nose, ears and eyes.
This is such a wonderful little animal

Sock Pig
You can make very cool and amusing little pigs out of socks. This work will be an excellent souvenir for the New Year holidays. In my opinion - a great idea!
New Year's crafts for kindergarten made from paper
In kindergarten, children can make beautiful cards and give them to their parents.
Required:
- scissors
- glue stick;
- colored paper and cardboard;
- felt-tip pen or pen;
- sheet of white paper.
Stages of work:
1. For the base, take red cardboard and fold it in half. Iron it well along the seam.
2. Cut out a small rectangle from green paper. You will need it for the inscription on the front of the postcard. Glue it onto a white rectangle, but slightly larger. Don't forget to write "Happy New Year!"
3. Now we will make three accordions from green paper. We glue each one in the form of a fan.
4. We trim the edges of two fans so that they are all different sizes, and from the remains we make the top of the Christmas tree.
5. Cut thin and short strips from white paper. Glue them together in the shape of a snowflake.
6. At the final stage, all that remains is to connect all the parts together. A beautiful 3D postcard for the New Year is ready!
Here are some more interesting postcard options for 2019:
You can simply make a Christmas tree out of paper and cut out decorations from felt; in my opinion, it turns out to be a cool Christmas tree and it’s not difficult.


But what a miracle of pasta, even kids can cope with this task:

I really liked the wreath

DIY craft: papier-mâché piggy bank
And of course, don’t forget about the piggy bank, which is easy to make using the papier-mâché technique. The result will be a wonderful homemade product, but also a very useful thing in the house.
First, prepare a paste from regular flour:
Required:
- 1 tbsp. sifted flour;
- 3 tbsp. water;
- ½ tsp. salt.
Step-by-step preparation:
1. Pour the flour into a deep bowl. Slowly pour in 1 glass of warm water. At this time it is necessary to stir the mixture. And so on until a homogeneous mass.
2. Add salt. Pour into a saucepan, mix well. Add another 2 cups of boiling water.
3. Place on low heat and cook the paste for 10 minutes, stirring constantly. Cool.
Now you can proceed to making a piggy bank:
Required:
- balloon;
- newspaper;
- paste;
- brush;
- PVA glue;
- acrylic paints;
- sandpaper;
- putty;
- water-based paint.
Stages of work:
1. Inflate a balloon of the same size as the future piggy bank will be. We tear the newspaper into long strips and glue it to the ball using paste. This way we make 8 layers. We wait until it dries completely.
2. Carefully burst and remove the ball from the resulting workpiece.
3. In place of the hole we install cardboard heels. Below are four legs. We also cover them with newspaper. We wait for the future piggy bank to dry and cover it with a layer of foil.
4. Prepare the papier-mâché mixture. Pour boiling water over regular toilet paper. Squeeze and mix with PVA glue.
5. Cover the piglet completely with the mixture and use the same mixture to construct ears and a tail. We are waiting for complete drying.
6. Coat the pig with putty. As soon as it starts to dry, rub the surface of the pig with sandpaper. It should become smooth.
7. Then we paint it with white water-based paint.
8. Now we cover the workpiece with acrylic paints. Draw the eyes and mouth.
9. All that remains is to coat it with varnish, let it dry completely, and the piggy bank is ready.
We will use the pig's nostrils as slots for money.
And a couple more ideas for cute piggy banks:
Salt dough souvenir with the symbol of 2020
Let's make piglets in the form of pendants. They can be used to decorate a wall or Christmas tree. And if you attach a magnet to them, it will be a great decoration on the refrigerator...
Required:
- salty dough;
- water;
- brush;
- plasticine knife;
- acrylic paints;
- foam sponge;
- various decorative elements for decoration.
Stages of work:
1. First, let's prepare the dough. Mix 1 cup flour and 1 tablespoon salt. Add to them 1 tablespoon of vegetable oil (for elasticity) and hot water.
2. Mix everything well until it has a homogeneous plastic consistency. Place the dough in the refrigerator for 3 hours and then you can start making the pendants.
Salt dough must be stored in a plastic bag while working, otherwise it will simply dry out.
3. Roll a medium-sized piece into a ball and flatten it into a flat cake. This will be the body of the pig. We make heels in the same way. We make the nostrils with a pen.
We coat the joints of the parts with a brush dipped in water.
4. Make eyes from small balls. They need to be placed above the heel. We make ears from triangles. We attach them with cuts at the junction with the body.
5. Now from the lower left edge we glue a heart made from a circle of dough. To make the body more voluminous, we make indentations on the sides of the entire piglet.
6.Using a rod, make two holes for the legs and two for the hanging cord.
7. Roll two thin sausage-like handles. We make a cut at the ends of the hoof. We place the handles so that the pig holds the heart in his hands.
8. For the legs, roll two small balls and bring them into a drop-shaped shape. On the wider side we make a cut for the hooves. With a narrow one we make a hole. Since they will be attached to the body using laces.
9. We wait for the craft to dry completely and start painting. First, let's paint the piglet black. This is necessary for the relief of the product. As soon as the paint dries, wash it off the convex parts of the body under the tap.
10. We wait for the pig to dry and now saturate it with white paint using a sponge in those places where the black color has washed off.
11. Now all that remains is to paint, let it dry, attach laces and additional details.
To make the craft durable, it must be painted with acrylic varnish.
As we can see, working with salt dough is very easy. Therefore, several more options with the symbol of the coming year:
Simple and easy felt crafts + patterns and diagrams
Soft crafts made from felt will decorate your festive interior. They are very pleasant to the touch. You can make both volumetric and flat options. We will sew these pigs.
Required:
- felt;
- a thin piece of padding polyester;
- beads;
- buttons;
- threads;
- needle;
- scissors;
- glue moment;
- pattern.
Stages of work:
1. Draw a pattern on a white sheet of paper or cardboard. Transfer the parts to felt and cut them out. Also, don't forget about the ponytail. It can be made in any shape.
2. Sew the two parts of the body together, place a tail and a little padding polyester between them. We will do this by machine, but you can sew it by hand.
3. In the same way we fasten the two parts of the head. Between them we insert the ears and a little filler. And two details of the patch. This is what we got.
4. All that remains is to collect all the details of the pig, and before that decorate it. Sew 2 small white buttons to the heel. And to the place where the eyes will be located - 2 black beads.
5. Glue the ends of the ears to the top of the head with glue. We attach heels under the eyes. And finally we attach the head to the body. The pig is ready.
For decoration, you can tint the pig with eye shadow.
Patterns for New Year's pigs made of felt:
How do you like this pig?

Here are some more interesting ideas and not at all complicated:


I’m sharing simple diagrams and patterns for New Year’s felt crafts:
Santa Claus

Felt Santa Claus


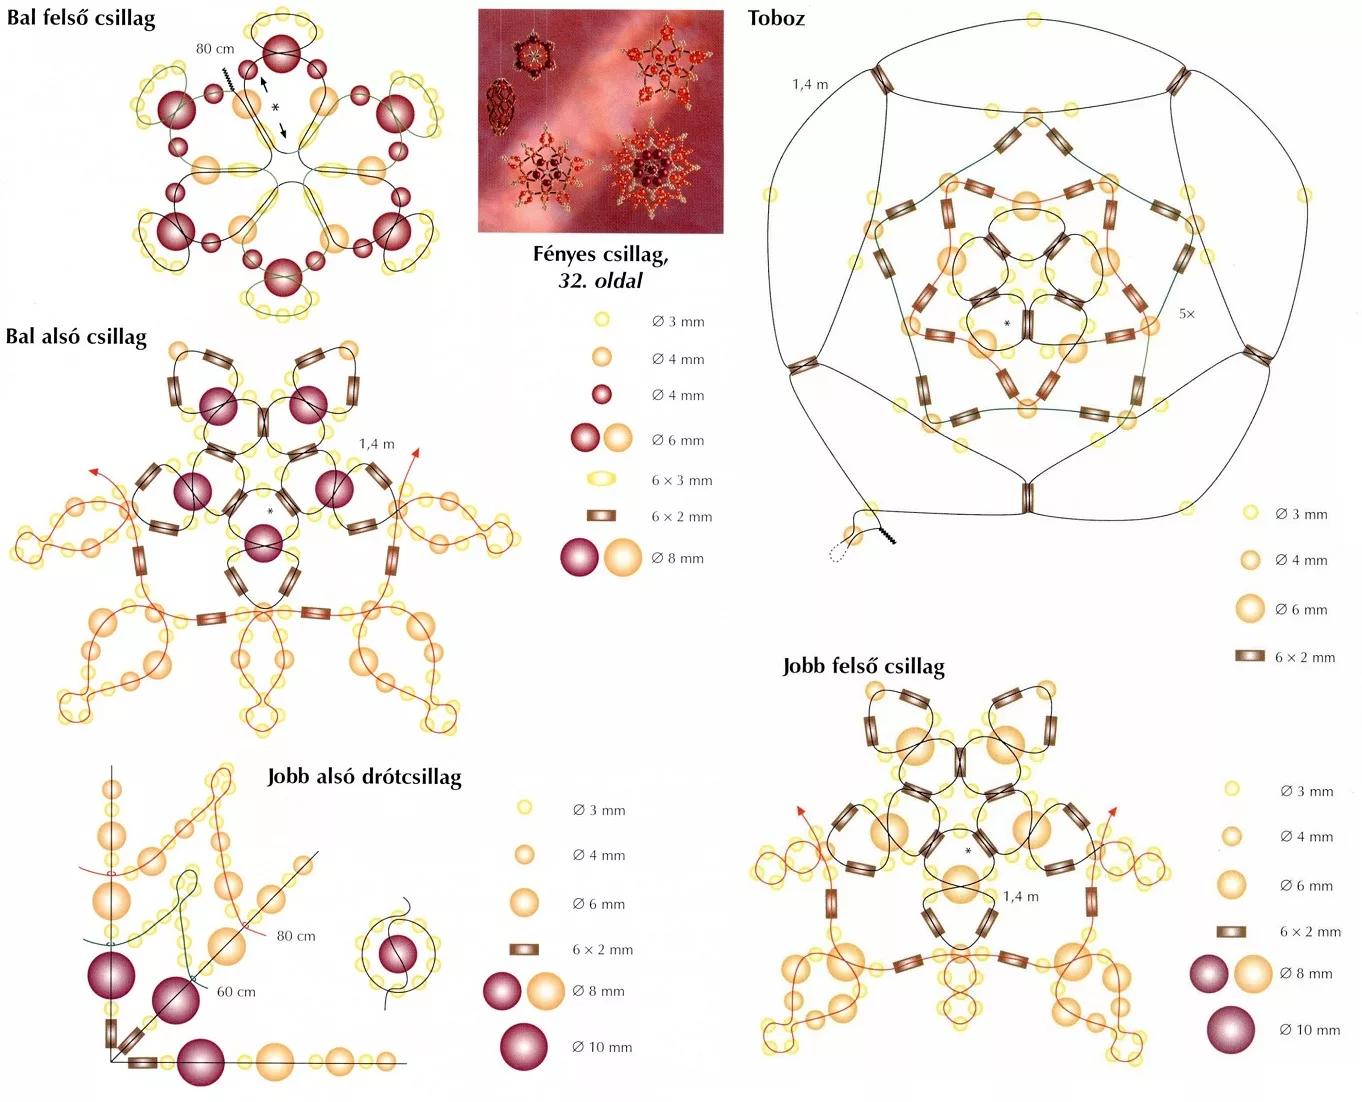
New Year's craft - DIY beaded Christmas tree for beginners
Mini souvenirs for decorating the New Year tree will look amazing. Especially if they are made of beads. For beginners, we have prepared these Christmas trees.
Required:
- beads;
- beads;
- scissors;
- wire;
- Christmas tree stand.
Stages of work:
1. The Christmas tree is woven from loops and then twisted. We string 3 green, 2 gold and again 3 green beads onto the wire. After that we twist it. You will have to stock up on time and patience to make a New Year's tree.
2. Gradually, the branches from the base to the crown decrease - accordingly, the number of loops decreases.
3. Now that all the branches are ready, attach them to the trunk in a circle.
For those who are quite familiar with beadwork, you can use the patterns selected below:
DIY Christmas tree toy in the form of candy
With your children you can make a Christmas tree toy in the form of candy; such a homemade product is not very difficult to make, but the children will be happy, because they have such a sweet tooth! And then they made the sweets themselves. They can be made in different sizes, you can even create a large candy for a street Christmas tree...
You can decorate your home with this beauty for the upcoming New Year holidays.
What ideas did you like? Be sure to share in the comments.
Useful tips
To decorate your Christmas tree or home, you don't have to buy a lot of toys and decorations.
If you have colored paper, cardboard, glue and a few additional simple materials, you can create a huge number of Christmas crafts.
Here is just a small part of the paper crafts for the New Year:
On our website you will also find:
What can be made from paper for the New Year: decoration from tubes

You will need:
2 sheets of cardboard of different colors or 2 sheets of scrapbooking paper
Scissors
PVA glue
Ring with chain attachment (if desired)
1. From one sheet of cardboard, cut 14 squares with a side of approximately 2.5 cm.
2. From the second sheet of cardboard, cut 14 squares with a side of about 3 cm.

3. Start folding opposite ends of the squares as shown in the image - one end over the other. Add a little glue where the ends overlap.


4. Cut a circle with a diameter of 5 cm from any sheet of cardboard. Mark its center.

5. Apply glue to the circle and start gluing the prepared tubes - first the large tubes, and then the small ones - they are glued on top of the large tubes.

* Try to glue the tube evenly to the tube.
* You may not need all the prepared tubes for the craft - this is normal.


* Glue a few rhinestones to the craft as additional decorations (this is optional).
6. Add braid - this can be glued or threaded into a ring attached to the decoration.
DIY New Year's paper cones

You will need:
Colored paper or cardboard
Ruler and pencil
Scissors
PVA glue or pins
Styrofoam ball
* If you can't find a foam ball, you can replace it with a crumpled piece of paper in the shape of a ball, wrapped with thread that secures the shape.
1. Cut strips 2.5 cm thick from paper or cardboard.

2. Cut each strip crosswise into small pieces 2.5 cm wide - you will get several squares.
3. Fold each square as shown in the image - make an arrow by bending the opposite ends.

4. Prepare the ball and start gluing (or pinning) paper blanks to it as shown in the image. Do everything in layers - first the bottom row, then move up, creating new rows.

5. Glue a ribbon to the top of the head so that the tree can be hung on the tree, and you can also add some artificial leaves as decoration.
New Year's paper crafts in quilling style

You will need:
Pages from old magazines or newspapers
PVA glue
Baking cups (if desired)
Thread or braid and bead.
1. Cut strips 4-5 cm wide from paper.
2. Fold each strip in half lengthwise. Lay the strip out and fold it again, but this time each side toward the center, and then the entire strip in half again (see image).
2. Prepare the glue and start twisting the strips into circles, adding a little glue so that they do not unravel.


3. Take another strip of paper and fold it as in step 2. Prepare a baking mold (in this example it is in the shape of a star) and insert the paper strip into it, carefully placing it inside the mold.
4. Now start laying out rolled paper circles inside the mold. Apply glue to them so that all the circles are connected to each other and to the strip inside the mold.


4. When the glue has dried, remove the workpiece from the mold. You can add more glue to make the workpiece even stronger.
5. Thread thread or braid through the craft and add a bead for decoration. Tie a knot.
* For this craft, you can use different molds, a heart, for example.
Wall decoration made of colored paper for the New Year

You will need:
10 paper plates
20 sheets of green paper
Stapler
Double sided tape
Scissors
Cardboard decorations (can be cut from old postcards or drawn and cut out)
White braid (if desired).

1. Cut out large squares from green paper - one square from one sheet. The square should fit inside the paper plate. If necessary, reduce its size.
2. Fold each paper square like an accordion and then in half.
3. Secure the ends of the accordion folded in half to create a semicircle.
4. Repeat steps 1-3 with other paper.
5. Connect two semicircles together using double-sided tape or a stapler to form a circle.
6. Using double-sided tape, attach the circle to the middle of the paper plate. Glue double-sided tape or apply glue to the back of the plate so that you can stick it to a wall or other surface (you can stick it to plywood, a wooden tablet, cardboard and then put it on a shelf or hang it on the wall).
7. Make 10 similar blanks.
8. Start making Christmas tree decorations. Cut out paper Christmas decorations and glue them together to form a circle. After making several circles (3-4 pieces), they can be glued to plates, like Christmas tree decorations.
* You can add white braid to the top of the tree, which supposedly hangs the tree on the wall.
Christmas decorations made of paper: 3D paper drop

INyou will need:
Colored paper
Pencil
Scissors
1. Draw a large drop on cardboard and cut it out.
2. Use the blob template to create a few more - place the cardboard blob on the paper, trace and cut out.

3. Place a few drops into one stack, fold the stack in half and cut a circle in the middle (see image).
4. Start gluing the sides of each drop to end up with one voluminous drop. In this example, it took 16 droplets to make one voluminous one, but more is possible.
*You can add string or braid to hang the ornament on the tree.

New Year's paper toys: cone balls

You will need:
Paper (you can use old magazines)
Scissors
Thread and needle
Double-sided tape or glue.
1. Cut circles of the same diameter from paper (choose any size)
2. Make a cut along the radius in each circle.

3. Make two cones from each circle - twist the paper from one end and the other (from the cut) to the middle, and secure the workpiece with glue or tape (see image).
4. Also make two cones from each of the remaining circles.

5. Prepare a thread and a needle and thread them through each piece so that you end up with 10 pieces making a ball. Tie a knot.

6. Add string or braid to hang the ornament on the tree.

How to make New Year's lanterns out of paper

You will need:
Stationery knife
Pencil and ruler
Thick colored or decorative paper
Needle and thread

1. Prepare a sheet of paper, fold it in half and cut it into two rectangles.
2. Place one rectangle on a flat surface to cut on. Using a stationery knife, make several transverse cuts from one end of the paper to the other - the distance between the cuts is the same, and they should be approximately 1.5-2 cm behind the edges.


*You may need to mark where the cuts will be first. Use a pencil and ruler.
3. Roll the paper into a tube as shown in the image. Secure the ends with tape.
4. Take a needle and thread and begin to thread them alternately over and under the strips that formed after the cuts.
5. When you have wrapped the thread around the entire workpiece, tighten it and tie a knot.

To fully enjoy the New Year holidays, you need to create a special atmosphere and recharge yourself with the pre-holiday mood. We recommend that you take up handicrafts and make excellent crafts for the New Year 2020 with your own hands. You can easily learn simple ways to make interesting figures from paper, plasticine, yarn, cotton pads and even salt dough.
The most anticipated holiday of the year is usually accompanied by bustle and various preparations. On the eve of the special event, we try to choose original gifts for children, colleagues, friends and just acquaintances. But why not make them yourself? We have prepared for you many ideas that can be used to make DIY New Year's crafts for 2020. Make sure that it is not only simple, but also extremely beautiful!
Create many beautiful crafts for the New Year; the master classes offered below will be mastered not only by adults, but also by children 5-6 years old. We will tell you in detail how to make a New Year's toy, craft for a kindergarten or school in the simplest and most accessible way.
Christmas tree made of plasticine
Making New Year's crafts for kindergarten is as easy as shelling pears; it won't take much time, but will give a lot of positive emotions to both children and their parents. So, let's start making a plasticine Christmas tree for the New Year, which the kids can take to the garden.
How to do: 
Bunny and fox made of pine cones and plasticine
If you don’t yet know what crafts you can make for your child in kindergarten, then pay attention to products made from pine cones and plasticine. Easy to make animal figurines will delight kids.
You will need to prepare:
- Two big shots;
- Chestnut;
- Plasticine.

Cheerful Santa Claus
Children's crafts for the New Year can be made not only from colored paper, but also from other available materials, for example, teaspoons, threads and cosmetic cotton pads. You can get acquainted with the features of making crafts from disks for the New Year thanks to the proposed master class.
Progress: 
Now you can confidently say that making New Year’s crafts from cotton pads is fun and easy. This is a great way to create original New Year's crafts for school, take note of it.

Ideas for decorating crafts made from cotton pads:


Wonderful Christmas tree made from salt dough
DIY New Year's crafts can be made from a wide variety of materials, and in particular from dough. For many, working with salt dough will be a novelty. Note that these can be given as a gift.
What you will need:
- Wheat flour – 3 tbsp. spoons;
- Table salt – 6 tbsp. spoon;
- Water – 10 ml;
- Recess for dough - herringbone;
- Paints (gouache);
- The brush is thin.
 As you can see, for such children's New Year's crafts, materials that everyone has are used, everything can be done quickly and easily.
 Unusual Christmas tree made of threads and buttons
If you want to have fun with your own children and create a unique craft for the New Year in kindergarten, then you should pay attention to this master class.
You will need:
- A cone-shaped piece of foam plastic or thick paper rolled into a cone;
- Buttons of various colors and sizes;
- Glue gun;
- Yarn;
- Scissors;
- Pompom threads.
 Using the same principle, you can make different sizes for the New Year.
 Original holiday solutions
If you want to get a portion of the New Year's mood and decorate your home with the “attributes” of the holiday, then turn the ideas proposed below into reality. Anyone can make New Year's crafts, you just need to try a little.Christmas star
Creating bright New Year's paper crafts with your own hands is incredibly exciting; try making a three-dimensional star - it's very simple.
To work you will need:
- 2 sheets of colored paper;
- Scissors;
- PVA glue;
- Pencil.

Making paper New Year's crafts 2020 will give you a lot of positive emotions, fantasize and create!
Snowman made from a sock
Nowadays, not everyone finds the time to make New Year’s crafts with their own hands, but in vain. From scrap materials you will make an excellent holiday accessory, which is not cheap in stores. Well, let's get to work?
You will need to prepare:

What you will need:
- Bow pasta;
- Paints;
- Plastic wine glass or sheet of thick cardboard;
- Glue.

Another option using pasta and tinsel:

Christmas toys made of yarn and cardboard
Crafts for the New Year of the Rat can be created using various materials; the simplest and most affordable are yarn and cardboard. Try making original Christmas tree decorations with your own hands.
What to take:
- Thick cardboard;
- Yarn of various colors;
- Scissors;
- Pencil.

We invite you to learn another exciting way of making New Year's crafts. A large snowman made of thread will become a real decoration for your interior; photo instructions will help you complete the job.
If you've never made Christmas crafts with your kids, be sure to give it a try! Simple and exciting master classes will allow you to discover the world of handicrafts from a completely different side, create and have fun with your children. We wish you creative success!
Interesting ideas for New Year's gifts


There is a huge number of all kinds of jewelry that you can do it yourself, together with the children. Further, these crafts can be used to decorate any room - home, garden, yard, etc. - or to give to others.
You can find out about several simple but original New Year's crafts here. Get inspired, create, use your imagination so that the holiday will be remembered with bright, pleasant moments.
Christmas decorations made from broken light bulbs
You will need:
Old light bulbs
Sequins
PVA glue
Brush
Thin thread (fishing line)

1. Use a brush to apply glue to the light bulb.
2. Start sprinkling glitter on top of the glue-coated light bulb.
3. Leave the craft to dry.
4. Cut a small piece of string and tie or glue it to a light bulb so that the toy can be hung on the Christmas tree.
New Year's paper crafts. Cup of cocoa for the Christmas tree


You will need:
Rolls of toilet paper or paper towels
Plain, colored (brown) and wrapping paper
Paper napkins
Tubes
PVA glue
Water in a plastic cup
Thread to hang on the Christmas tree
Stationery knife
New Year's craft scheme
1. Prepare several paper cylinders. The height of one cylinder will be equal to the height of a mini coffee cup, so choose the size that suits you.
2. Cut out circles from cardboard. For each cup you need 2 circles: one the same diameter as the cylinder (just circle the cylinder), and the other a little smaller to fit inside the cylinder. The large circle will be the bottom of the cup.


3. Prepare some brown paper and cut out a circle with a larger diameter than the small white circle you previously cut out. Glue this piece into the middle of the brown circle. Set aside for now.
4. Prepare a white cardboard sheet. Wrap the cylinder completely with this sheet. Cut off the excess parts, but leave 1 cm at the edges to make small cuts and glue the paper to the cylinder with PVA glue (see pictures).


5. Cut out a circle from a white sheet of cardboard to cover the bottom of the cylinder.


6. Take the reserved brown circle glued on top of the large white circle, apply a little glue to the edges and insert it into the mug, gluing the blank. There will be nothing wrong if the workpiece is glued unevenly.


7. Prepare a needle and use it to make a small hole in the top of the mug so that you can thread it and hang it on the tree.


8. Let's make a handle. To begin, prepare a toothpick and cut pieces of the same width from the sheet (lengthwise).
8.2 Soak the paper tubes in water to make them easier to bend.


8.3 Once you have bent the tubes into a C shape, leave them to dry. To keep them in shape, you can attach them with a button to foam plastic or plywood.
9. Take a utility knife and cut the paper handles for the cups so that they can be easily glued.


10. Let's decorate. Crumple a small piece of paper napkin (you can roll it into a rose shape) and glue it to the cocoa - this will be the cream.
10.1 Also cut a small piece of plastic tube, glue it to a piece of paper first and wait until the glue dries.


10.2 Carefully separate the tube and the paper circle covering it from the sheet. Now it’s very easy to glue the tube to the cup.


The cup is ready, you can decorate your Christmas tree or room with it.
Crafts for the New Year for children. House for sweets

You will need:
House template
Scissors
Stationery knife
Double tape
Ruler
1. Print out the house template.
* You can draw a similar sketch of the house yourself and then follow the instructions.

2. Cut out the required parts. Use a utility knife to cut out the windows of the house.


3. Bend the house along the dotted lines. To make it easier, you can use a ruler and a tool to fold the cards and boxes, but this is not necessary.


4. Connect everything using double tape.


5. Decorate as desired.

6. Add sweets to the house and you can give it to friends, relatives, and guests.
* You can print this house on paper of different colors, and you will get many houses of different bright colors.

New Year's crafts made from felt. Holiday skates.

You will need:
Yarn (thread)
Glue (preferably a hot glue gun)
Scissors
Glitter glue
Padding
1. First you need to draw a shoe and cut it out on paper with a blade.


2. “Separate” the boot from the blade with scissors.
3. Place the boot on the felt and cut out the shape (you need 2 halves of the boot). Repeat the same action with the blade.


4. You can, if desired, make pompoms from yarn. For beauty, you can decorate the pom-poms with sparkles.


5. Add more glitter to the places where the laces should be. Their arrangement should resemble the letter V.


6. After the glitter glue has dried, glue both halves of the shoe together by inserting a felt blade between them.
7. Don't forget to cut and glue the heel.
8. Glue pompoms to the toe of the shoe.


9. Start filling the shoe with cotton wool or universal filler (sewing padding polyester).


10. You can put small surprises, sweets, etc. on top of the shoe.
New Year's crafts master class. Snowflake for Christmas tree

You will need:
PVA glue
Glue gun
Wax paper
Dish detergent
Sequins
Brush


1. Draw a snowflake on paper - you can search the Internet for a simple but beautiful image.
2. Prepare a glue stick, glue gun and wax paper. Place wax paper on top of the snowflake you drew. Coat the paper with dish soap (you can mix it with a little water).
3. Using a glue gun, trace the image of a snowflake (draw a snowflake with glue). Leave the glue to dry.


4. Carefully peel the snowflake from the hardened glue from the wax paper. If some paper remains on the snowflake, try rinsing it under cold water to remove any remaining paper.
* Places where the snowflake may not be firmly secured, add more glue and leave to dry. You can also add a second layer of glue just in case, regardless of whether there are weak spots or not.


5. Using a brush, apply a thin layer of regular PVA glue and sprinkle glitter on top of the snowflake.
6. Glue a loop of string to the snowflake so you can hang it on the tree.


Children's New Year's crafts. Decorating Christmas tree toys


You will need:
Strand (for stuffing)
Acrylic paint
Small brushes
Plain plastic or glass beads (no design or pattern)
1. Fill the ball with a strand.
2. You can color the New Year's ball as you like. In this example, a penguin was made from a ball.
3. To draw a penguin, you need to paint one half of the ball completely with blue paint, and paint the other half as shown in the picture (leaving space for the face and eyes).
4. Draw the eyes. Use thin brushes. Wait for the paint to dry and make your eyes sparkle by adding white paint.
5. Draw the beak (small orange triangle drawn with the top of the head facing down).
6. For the paws, draw another triangle, but larger.


* You can also draw a snowflake.
Crafts for the New Year (photo). Another option for decorating Christmas balls


1. Apply glue to the ball.
2. Sprinkle or "dip" the ball in salt.


3. Leave to dry.


*You can apply glue in the shape of a snowflake.

You can also make a craft for kids from a bottle and gouache, just stuff the bottle with cotton wool, make eyes, a nose and add a scarf. It will turn out beautiful and irresistible, the kids will definitely like it.
Older children can make a snowman out of cotton swabs by gluing the sticks clockwise onto regular cardboard.

Or from decorative ribbons, like this toy for the Christmas tree.


If you are a stick lover, then you can make such interesting New Year's toys for the Christmas tree: 
Or like this:

You can use your imagination and ingenuity and simply use one stick to make any cartoon character, even Santa Claus.

You can also easily build a Christmas tree from paper or satin ribbons. Make a cone and glue the needles.


Crafts for the New Year 2020 from various available materials (paper, pine cones, bottles, cotton pads, cardboard, beads, felt)
Of course, we all love to make crafts from what we always have on hand, in a hurry.
If you decide to make New Year's toys and crafts from paper, then here are the most original ideas, here everything is clear how to make:
Santa Claus and Snowman


Mouse or rat

All kinds of decorations from caps and bottles:

You can also simply make a Christmas tree out of books:

In schools, kindergartens, and institutes, you can design this creation in the form of gloves like this:

But if you like to collect cones in the forest, and then create from them, then you can also get the following ideas for yourself:


Products made from bottles have also become popular, as everyone likes them for their simplicity and originality of presentation, see for yourself in these photos:
Bells

Snowman made from cups


You can create Christmas tree toys from ordinary light bulbs, but of course such souvenirs are not for toddlers and preschool children.

You can even find uses for socks. It really looks very funny and wonderful.

You can generally make paintings and Christmas trees out of cotton pads:


You can also make various creations and masterpieces from cardboard and threads:

But with beads, of course, if you don’t know how to weave, it will be difficult to immediately master this technique. But still worth a try. Keychains are popular with most people, for example this snowman (diagram) or snowflakes.


And of course, made from felt, here the task is of course more difficult, but many cope with it with a bang.


We make crafts with our own hands with the symbol of the coming year in the form of a mouse (rat)
Of course, most of us will make a cheerful and amusing mouse this year, because it is she who will patronize the coming year.
The most accessible and easy to make toy is, of course, sculpted from plasticine.


Or sew it from felt, this pattern will help you.

The kids also love to create things out of yarn, in the form of donuts:

New Year's crafts with patterns and diagrams for children
If there are children in your house, then I suggest you quickly make these toys and crafts with them that will bring joy to everyone.
I provide ready-made layouts and, so to speak, step-by-step master classes from photos, put them into practice, I’m sure it will turn out just great and very cool!
Attention! Do this craft together with your parents!
Believe it or not, the idea came to me to make a candlestick, and imagine from a tangerine, it’s cool and also delicious, so to speak, a natural flavoring)))

I really liked the idea of making a Christmas tree out of plywood or cardboard with my own hands, how charming it looks, a nice New Year’s composition:

If you want the rat to always accompany you during classes at school or in another educational institution, make a bookmark for the book.


Crafts for the New Year for kindergarten with parents and children from all sorts of things
I thought and thought about this question and decided this year to create such a culinary masterpiece in the form of a Christmas tree made from cookies. As a basis, you can take any recipe for your favorite cookies, and then what, make stars out of it and put together a Christmas tree, and then decorate with cream, or candies, mastic, simply:


Well, the most common and fashionable option is a craft made from the hands of a child and an adult:

Photo illustrations, pictures of crafts for the New Year holiday
I would also like to give you a bunch of ideas on this New Year’s theme; you yourself have probably already come up with something unrealistically beautiful in your imagination while you were looking at this article.


Video selection of New Year's master classes with different ideas for toys and crafts
In conclusion, I would like to offer you videos for viewing. I hope that if you have not yet decided what you want to do, they will help you with this, especially since everything is described in detail and shown from A to Z:
You can make a snow globe:
A cool friend made from paper in origami style, after all, this is the symbol of the year:


