There are many ways to make beautiful, unusual Christmas tree decorations with your own hands: from different materials, different colors... But today we’ll talk about how you can make beautiful Christmas tree decorations from paper. Let's look at different options for creating Christmas tree decorations: from the simplest options to more complex origami toys for the Christmas tree.
How to make Christmas toys out of paper for a Christmas tree with your own hands
One of the simplest options that anyone can handle is to make Christmas tree decorations from strips of paper. So, take the colored paper you like, cut strips of the same size and fasten them together as shown in the photo below.
Moreover, in this way you can make paper balls, or you can first bend the strips in half - it will turn out unusual.

In addition, as you already understood, you can use a different number of stripes, and the finished toy can be decorated with flowers, snowflakes made of paper of a different color, or covered with rhinestones and beads - at your discretion.


An equally beautiful paper ball is obtained woven according to the pattern presented below. True, you will have to tinker with it longer.

Another way to use strips: cut four long strips of paper and four smaller ones (this is if you don’t have double-sided colored paper). We glue the strips in pairs, fold them as shown in the photo and simply fasten them with a stapler, glue a ribbon in the middle (in order to hang the toy on the Christmas tree) - you get such a beautiful paper heart. The bottom can be decorated with ribbon and sparkles.

You can also make a star from strips of paper. Cut 12 strips (6 long, 6 short) and glue them together as shown below. It turns out to be a beautiful paper star.
Or you can make a flower (it’s better to use thick paper). And if you are going to paint it, it is better to paint the parts before gluing the flower.


Another option worthy of attention is a Christmas ball made of corrugated paper.

We cut the corrugated paper into strips, coat it with glue and, using a toothpick, glue it into a “rose” (photo No. 3). Next, take a separable ball, wrap each half with cling film, and cover them with our roses. You should end up with 2 parts, which, when the glue has dried, remove from the cling film and carefully glue together.

A paper ball for a Christmas tree can be made in other ways by gluing together the parts of the circles, as shown below. We cover it beautifully with sparkles - and you get an extraordinary New Year's toy.


And if you have time, then you can work hard and make the paper Christmas tree toy presented below, consisting of several parts.


Using a similar method, using different numbers of parts, you can create masterpieces of different shapes.

By the way, a three-dimensional toy can be made without a single drop of glue. It turns out to be a very beautiful origami decoration for the Christmas tree.

In order to make it, you will need 12 parts (the details are presented below - you can make one template, or you can print them on colored paper and then cut them out).

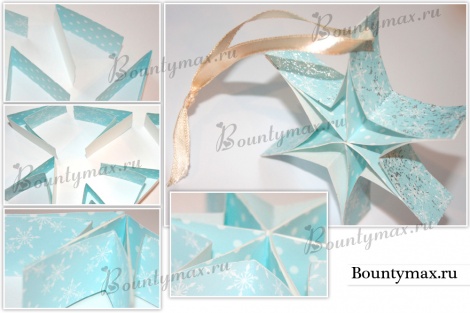
Without glue, you can make a paper star, which will consist of only two parts.

In fact, if you have the time and desire, you can make many different paper stars for your Christmas tree.


By the way, you can make not just a star toy for the Christmas tree, but, so to speak, a luminous star (star lantern). Glue a star out of paper and insert a garland inside.

By the way, about lanterns, you can make paper lanterns from our childhood.

Or a paper lantern in a more modern interpretation.

Let's return to New Year's origami toys for the Christmas tree.
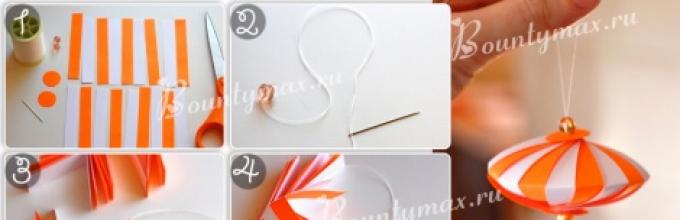
For starters, the most spectacular and beautiful. In order to create such paper beauty, you will have to work hard. To begin, we fold paper flowers as shown in the diagram, then carefully glue them together, and glue a bead into the center of each flower. It turns out very beautiful.

You can create many more beautiful toys from paper and glue.


And finally, we can’t help but think about the leftover toilet paper. You can simply cut out circles from the base of toilet paper, insert a paper star or some kind of toy into them, and decorate the outside with sparkles.


Or you can make such an unusual New Year's toy. We paint, glue on glitter, a beautiful brooch and no one will ever guess what it is actually made of.

And the last inspiring example: an original ice cream toy.

Beautiful toys to you and a happy new year!
The New Year is coming, and this is always exciting. The coming year is the time of reign of the bright, willful, somewhat eccentric and eccentric, but very family-oriented and homely sign - the Rooster. 2017 belongs to the element of Fire, and its color is red. The Year of the Rooster, especially the Red Fire Year, has its own specific characteristics. Time will tell what the next year will bring for each of us, but we must all be well prepared to meet it.
Everyone knows that the New Year tree is the embodiment of celebration, joy and happiness. Christmas tree decorations occupy almost the first place in the formation of a magical atmosphere of expectation of a miracle, and DIY Christmas tree decorations give real, genuine emotions and impressions; they will help you become the creators of this magical mood.
Most housewives prefer to decorate Christmas trees on their own, that is, to make Christmas tree decorations themselves. It is believed that the craftswoman, in the process of work, puts a piece of her warmth, her soul into every toy, into every product. That is why they always turn out much more elegant and prettier than ordinary store-bought balls and cones.
DIY Christmas balls made of thread for the Christmas tree
To make Christmas balls from threads you will need:
- office glue;
- air balloons;
- multi-colored threads;
- PVA glue – 50 ml;
- sugar – 2 teaspoons;
- water – 50 ml;
- disposable gloves;
- scissors;
- ribbons, sequins, sparkles, beads, etc.
Step 1. First you need to inflate the balloons to a slightly smaller size than average. The size of the balls will determine the size of the decorations.
Step 2. In a bowl, mix sugar, water and PVA glue.
Step 3. Carefully lower the threads into the resulting solution and let them soak thoroughly. Slowly wind the threads around the balls in different directions.
Step 4. Now you need to hang the balls to dry for 5-6 hours, and after drying, pierce the balls with a needle and carefully pull them out of the thread shell.
Step 5. Using stationery or other glue, glue bows, ribbons, beads, etc. to the dried surface of the balls. The decoration is ready to delight you and your guests!
Sweet Christmas decorations

To make sweet Christmas tree decorations you will need:
- thick paper of golden color;
- paper of a different color;
- glue;
- wide ribbon;
- narrow ribbon;
- scissors;
- various sweets.
Step 1. Cut gold paper (or any other thick, brightly colored paper) into 15cm squares.
Step 2. Using a compass, you need to mark the shape of a semicircle and cut off the excess along the line.
Step 3. Carefully roll the sheet to form a cone and glue the edges together.
Step 4. Take a wide ribbon and, cutting off 15 cm, glue it along the outer edge of the cone.
Step 5. Make a loop from a thin ribbon so that you can hang the cone on the Christmas tree.
Step 6. Place sweets inside an improvised bonbonniere (cone) and feel free to hang the sweet decoration on the New Year's tree!
DIY Christmas tree decorations made from salt dough

To make toys from salt dough you will need:
- water;
- flour;
- salt;
- cookie cutters;
- rolling pin;
- dye;
- baking paper;
- straw;
- braid.
Step 1. For the dough, take 1 cup of flour, a pinch of salt, and enough water so that the dough does not stick to your hands, but has a fairly dense consistency.
Step 2. Using a rolling pin, roll out the dough to a thickness of at least 9 mm;
Step 3. Now you need to take the baking figures and squeeze out the blanks for future Christmas tree decorations on the rolled out dough. Use a drinking straw to make holes for loops on the toys.
Step 4. Carefully place the cut out shapes on a baking sheet lined with parchment and place in an oven preheated to 250 degrees for 3 hours.
Step 5. When the toys are “ready”, you can paint them in different colors and thread ribbons and threads through the holes to hang them.
Volumetric soft toys for the Christmas tree

To make soft Christmas tree toys you will need:
- fabric pencil or chalk, a piece of soap;
- dense fabric (velvet, velor or felt);
- thin colorful fabric;
- threads and needles;
- various buttons;
- ribbons and lace;
- cotton wool or synthetic winterizer;
- scissors.
Step 1. On thick fabric, draw the shapes of future toys and cut them out. Each toy requires two molds.
Step 2. Now you need to sew two identical shapes. Don't forget to leave small holes for stuffing with cotton wool or padding polyester.
Step 3. After filling the products with cotton, you need to sew up the holes.
Step 4. Sew a thin fabric of a different color or shade to the toy (for a tree toy, a fabric in the shape of a green leaf is suitable, for a house toy - a door and window made of a different fabric, for animal toys - eyes, ears, bows, etc.) .
Step 5. To give the toys more splendor, you can sew fringe or lace along the edges.
Step 6. All that remains is to attach loops to the Christmas tree decorations and you can hang new toys made on the New Year's beauty.
Christmas balls made of cardboard

To make cardboard balls you will need:
- thick colored paper, cardboard or old postcards;
- template or compass;
- pencil;
- glue;
- ruler;
- scissors;
- ribbon or beautiful rope;
- awl.
Step 1. Using a compass or glass, draw and cut out 20 circles of the same size.
Step 2. Inscribe an equilateral triangle into each circle using a ruler (to make things go faster, you can cut out a triangle template from thick paper and trace it on each circle).
Step 3. Now on each circle, along the lines, you need to bend three “petals” that are directed upward relative to the front side.
Step 4. For five circles you need to smear the side “petals” with glue and glue the circles behind these “petals”. This will be the top of the ball.
Step 5. Using an awl, make a hole at the very top and thread the ribbon, securing it with a knot on the inside of the future voluminous faceted ball.
Step 6. In the same way, glue the next five fragments using the “petals”. This will form the bottom of the ball.
Step 7 Using the remaining ten elements, make the middle of the New Year's ball. Gluing the circles by the “petals” in a row, then close them into a ring.
Step 8 All that remains is to glue the three parts of the ball together and the amazing Christmas tree decoration can be hung in a place of honor!
Original Christmas tree decorations - “New Year’s Hedgehogs” with your own hands

To make original Christmas tree decorations you will need:
- foam balls with a diameter of 4.5 cm;
- beads made of plastic or cut glass with a diameter of 5 mm;
- long pins (tailor's);
- silk ribbon;
- glass beads;
- scissors.
Step 1. Thread a small bead onto a long pin, and then a bead, and stick the pin into the foam ball.
Step 2. In this way, you need to “prick” the entire ball so that there is practically no empty space left.
Step 3. Having covered the entire surface of the ball with beautiful beads and seed beads, attach a ribbon loop to it. To make the “hedgehog” look impressive, the ribbon can be pre-tied with a bow.
Christmas decorations made from pasta

To make unusual Christmas tree decorations you will need:
- a wide variety of pasta (shells, spirals, tubes, etc.);
- dye;
- glue;
- ribbon or braid;
- scissors;
- sequins, beads, beads, gold or silver sprinkles.
Step 1. Let your imagination guide the process from beginning to end. Think over the design of the future decoration and start gluing vermicelli.
Step 2. You can add chic to a decoration already painted in your chosen colors by adding sparkles, beads and sequins in any order or according to a pre-planned pattern.


You can also paint the pasta first, and only then glue them into fancy shapes, or you can glue the pasta first, and leave the painting for dessert.
From pasta you can make snowflakes, garlands and flowers, as well as cute little angels by arranging different types of pasta. A decorative Christmas tree made from pasta tubes will also look great. Such a Christmas tree can be placed next to a living New Year's beauty, or you can give it to a dear guest as a souvenir.
Children can also be invited to join the exciting process of creating original Christmas tree decorations. An entertaining pastime will help not only create a New Year's mood, but also develop children's imagination.
Hi all! Nowadays everyone wants to decorate the Christmas tree with handmade toys! And this is not only a tribute to fashion, because such crafts carry a special atmosphere of kindness and comfort). They are unusual, unique and only yours. Memories and expectations are associated with them, because while you were making them, you were dreaming of a holiday, comfort, and a happy future.
Last time we did it ourselves. Now let's make some wonderful jewelry. You will be surprised how interesting the crafts are and how easy it is to make them. And the materials for creativity are available and the most unexpected.
With such toys you can decorate both indoor and outdoor New Year's beauty. And if there is a homemade competition at school, your child is guaranteed a prize!
Light bulbs, plastic bottles, scraps, buttons, dried fruits... But let's start with the simplest thing - paper.
The first thing you can make from corrugated paper is Christmas balls. They are made according to the same principle as the Christmas trees in the previous master class. The difference is that the toys are based on a foam ball. It can also be made of wood or papier-mâché. Such blanks are now sold in any craft store or on the Internet.

The paper is cut into narrow strips 1 cm wide and 3-4 centimeters long. Next, the paper is rolled into a rosette.

Having made the required number of such flowers, we begin to glue them to the foam ball. If you add more beads, you will get a very elegant toy.

Here's another decor option:

You can make snowflakes in a similar way. We cut out a shape from cardboard according to the template. We twist roses or buds from corrugated paper in any way and glue them onto the snowflake blank. We make a loop to hang the craft on the Christmas tree and get a wonderful toy.

Using a foam egg, you can make such an interesting cone with candies.

To begin with, we will paste the blank with brown paper. We cut out rectangles from corrugated paper measuring approximately 5x3 cm.

Glue them together and cut out an oval. You will need about 70-80 such blanks. It all depends on the size of the foam blank. We roll up the finished scales and glue them to toothpicks.

Now, starting from the very top of the egg, we pierce the foam with toothpicks and attach the scales. We arrange them in a checkerboard pattern. We make several scales without toothpicks to cover the lower part of the egg with them. You can take lollipop candies and insert them between the scales.
Here is another option for pine cone toys made of corrugated paper:

But, if you don’t have paper on hand, but have a lot of plastic bottles, you can make New Year’s crafts from them.
How to make a Christmas tree toy out of paper - step-by-step master class
And now we will make such a wonderful angel out of paper, which you can either hang on a Christmas tree or give as a New Year’s card.

Everything is done quite simply. Take a sheet of paper. The color depends on your imagination. You can use white and then color it, or you can take colored one. Now we bend it in even strips into an accordion. The result will be corrugated paper. Cut the sheet in half.

We decorate the bottom edge of the craft with adhesive colored tape, and glue the top edge. The result will be a skirt. I pressed the top to let the glue set well.

While the bottom is drying, we make wings for the angel. To do this, take the second half of the paper, cut it in half and carry out the same actions as with the first large half.

That is, we glue the adhesive tape and glue the top part.

Now all that remains is to assemble the angel. Glue the narrow part of the wing and the wide one (shown by arrows in the figure) and attach the wing to the figure.

We do the same with the second wing. All that remains is to make the head. To do this, take a strip of paper 20 centimeters long, maybe longer, and 1 cm wide. Roll it into a roll and glue it so that the paper does not unravel. We make a strip of colored tape that we glue to the head. It plays the role of both a halo and a pendant. Glue the head to the angel.

All. the craft is ready. It took a little time. And the result is wonderful.
Making a Christmas tree toy from a plastic bottle
The easiest option is to make snowflakes, which only require the bottom of a bottle. Toys made from this material are suitable for both a street Christmas tree and an apartment New Year’s beauty.
Everything here is quite simple. Cut off the bottom. It is better to take bottles of different sizes, then the snowflakes will be of different sizes. Next, draw a snowflake on the plastic. This can be done with felt-tip pens, or a marker, or paints - whatever you have on hand.

We make a hole, pass the thread, and the toy is ready. Can be hung on a Christmas tree.

More schemes and snowflake templates are available.
A Christmas tree cannot be complete without bells. It won't be difficult to make them from bottles. Watch the video master class:
Here are some more ideas for inspiration:

If you cut off the top of the bottles and insert LED lamps into it, you will get a garland.

If you have an old garland in which the caps are broken or lost, you can replace the missing ones with homemade ones. Cut off the bottom of the bottle, make a hole in it for the lamp, and cut the edges and unfold them like petals.

In addition, by painting bottles you can also make beautiful crafts, such as this house:

Or these wonderful penguins.

If you need Santa Claus for your Christmas tree, don’t rush to run to the store for him. Take a plastic bottle and make it yourself. This Santa Claus under the tree will look much better.

And here is a version of snowmen, also under the Christmas tree:

Even this beauty can come from unnecessary bottles:

So, use your imagination and everything will work out.
Homemade toy for the New Year tree 2020 from pine cones
Cone is a wonderful material from which you can make various crafts. If you attach a thread to them, then such crafts can be hung on the Christmas tree as New Year's decorations. It will be quite creative.

We collect such balls from several small cones. We decorate with ribbons, colored paper and, as a result, we get a Christmas tree decoration.
If you use modeling dough, you can make various funny figures, for example, this Santa Claus.

And color them.

Here is another original and simple decoration. A ring of pine cones in which a snowman sits.

You can make a snowman this way:

And finally, you can make several Christmas trees from pine cones, which can be placed as decorations in different rooms, so that the New Year can be felt everywhere.

A holiday with such homemade products will be unforgettable!
DIY corrugated paper Christmas tree step by step
In case you don’t have the opportunity to put up a real Christmas tree at home, I’ll leave you with a video with a master class of 5 step-by-step options for making a New Year’s tree from corrugated paper:
You'll like it!
DIY Christmas tree toy made from a light bulb - master class
An unexpected material for manufacturing is an ordinary glass light bulb. Its pear-shaped shape is reminiscent of many factory-made Christmas decorations. They are used by painting various figures of animals and New Year's characters. For example, you can make a snowman like this.

Or these fabulous animals.

Here you can watch a detailed master class on how to make a penguin Christmas tree toy out of a light bulb, which looks better than one bought in a store:
But if you don’t know how to draw, don’t despair. Take colorful glitter and glue. We coat the light bulb with glue, then immediately sprinkle it with glitter before the glue has time to dry. As a result, we get such a beautiful decoration.

Using the technique of drawing and appliqué, you can create Santa Claus.

And this is a fairly simple drawing that anyone can handle.

You can also just draw some patterns.

In addition to painting, you can remove the base of the light bulb, leaving only the bulb, fill it with colored pebbles, confetti or colored sand (fill it in layers) and get a nice decoration too.

There are many options, try it, use your imagination.
DIY Christmas tree toy for kindergarten or school
If you have a small child, you will certainly have to deal with the theme of New Year's toys for kindergarten or junior school. If suddenly a child participates in a school crafts competition, such toys will provide him with prizes!
You can make, in principle, any craft from the above. However, I would like to draw attention to another unusual, but which has become quite popular material - pasta. The store sells a lot of different types, shapes and configurations, which really inspires creativity. For example, you can make a Christmas tree like this.

But I would like to show you an easy-to-make craft - a snowflake. Both from paper and from pasta – there are a huge number of design options!

We start by drawing a snowflake diagram ourselves, or finding a suitable one on the Internet. Next, put the pasta as in the diagram and glue them together. All that remains is to paint it with spray paint and make a loop to hang the toy on the Christmas tree.

This is such beauty).

And all this was done by hand!
DIY paper Christmas toy
You can make a fairly simple but beautiful craft from paper strips of different colors.
We start by taking several sheets of paper of different colors and cutting out strips. In total you need to make 8 such stripes.

The width is 4 cm, and the length can be different and depends on the size of the future figure.

We fold the strips into a stack, bend them in half and make small cuts along the edges at the bend.

We do the same on the opposite side. Then we open the folded strips and tie them with thread in the middle and at the bend.

Then coat the center of the workpiece with glue and take a strip at the beginning from one edge. We bend and glue. Then we glue the second strip, the third.

We hold the glued strips and glue the remaining ones.

Having done one side, we move on to the second half and do everything in the same way.
When we finish gluing all the strips, we will get such a figure.

Straighten it and get a round craft.
We make a pendant and get a Christmas tree decoration. You can also decorate with rhinestones and ribbons. In general, this is up to everyone’s creative discretion.
Symbol of the New Year 2020 – do-it-yourself rat
Well, in conclusion, the craft symbol of this year is the rat. Without her. The symbol of the year must be on the Christmas tree, on a table or shelf. It doesn’t matter where, the main thing is that he is there.
So let’s watch, do and prepare for the main holiday of the year. Good luck!
New Year is probably the most favorite holiday of adults and children. A beautiful Christmas tree exuding a fresh pine aroma, all kinds of toys, and even a festive feast - all these are attributes of a wonderful celebration, symbolizing the onset of a new, promising year. That’s why the mood during the holidays is special; the whole world is waiting for something wonderful.
New Year is coming to us
He brings laughter and joy,
Christmas tree decorations glitter
And sparklers...
Moreover, the pre-holiday bustle captivates us no less than the holiday itself. What a long-awaited and desired activity this is, decorating a Christmas tree. It is especially loved by children, who strive to hang their favorite Christmas tree decorations - those made by themselves - in the place of honor.
But making toys with children is a most exciting activity. If you haven’t done this yet, be sure to try it, and we’ll tell you how to make a New Year’s toy so that it is no worse, and even better, than the usual store-bought ones.
How to make New Year's toys with your own hands?
As you understand, the material for making Christmas tree decorations can be different, as well as the toys themselves. Therefore, there cannot be a definite scheme for how to make New Year’s toys with your own hands.

Let's take one look at how and what New Year's toys can be made from paper, beads, pine cones, plastic bottles, felt and buttons, thread and glue.
New Year's paper toys
Surely many remember how in kindergarten and school they made various applications and crafts from paper. That is, we already have experience working with this material. Today we will learn how to make a New Year's toy out of paper. You can too.
New Year's paper toys are the easiest and most economical way to decorate your home for the holiday. Using one of the simple diagrams or instructions, even a beginner in this type of creativity can make cute decorations.
Template does not mean ugly
One of the easiest ways to make paper crafts is to cut out decorations according to certain patterns or patterns. Even elegant ornaments or silhouettes simply attached to the window will become a real interior decoration, templates for which can be found in the section and printed. Such decor is attached to the window using tape, paste or water - after the holidays are over, there will be no traces left on the glass.

When working with templates with a large number of small parts, the cutting of which will require filigree precision, it is better to use a breadboard knife and place the template itself on a special rigid base that protects the working surface from damage.


In addition to chains, garlands can be made from any images: repeating or united by the same style or color scheme.
Master class on making
To make New Year's toys in the form of corrugated balls, you will have to work hard, but the result will exceed all expectations. Paper balloons collected in a garland will decorate any celebration, and balloons made in pink are perfect for... Making such balls is a very labor-intensive and complex process that requires strict adherence to the pattern. For beginners, another step-by-step guide that does not require special training is suitable.
To create a simple garland you will need:
- 1 roll of corrugated paper of the desired color;
- scissors;
- glue.
Progress:
- You should cut off part of the roll so that the width of the cut part is 3 cm. Do not unroll the roll before doing this.
- From the mini-roll thus obtained, you need to unwind a small amount of paper, while twisting the strip every 3-4 cm. The integrity of the tape should be maintained, preventing it from breaking.
- The paper between the places of twists should be straightened and given a slightly convex shape.
- Repeat the required number of times until the desired length of the future garland is achieved. Glue or fasten the joints of large fragments with glue.


Decorating the doors
The custom of decorating your home is becoming increasingly popular. On sale you can find both jewelry made from real pine needles and a variety of options made from artificial materials. Traditionally, the Christmas wreath is attached to the front door, which is associated with some inconvenience, since store-bought wreaths are quite heavy and difficult to attach to a usually metal front door, which cannot be nailed or drilled into. New Year's wreaths made of paper are very light, so they can be secured to the surface of the door even with tape.


How to do it?
You can make and decorate a New Year's wreath yourself. For this you will need:
- a sheet of double-sided green A4 paper;
- pencil and ruler;
- scissors;
- glue;
- decorative elements.
Manufacturing:
- Fold the sheet in half.
- From the fold, draw lines with a pencil so that the distance between them is 1.5 cm, and the lines themselves do not reach 2 cm to the edge opposite the fold.
- Without straightening the sheet, cut each line starting from the fold.
- Unfold the sheet and glue the edges along the long side of the sheet (its uncut parts).
- Connect the ends of the resulting cylinder to each other and glue them.
- Decorate the wreath with beads, sequins, bows. You can also use decorations cut from paper of other colors.

The process of creating a wreath from a cardboard plate will be very easy. You should cut out the bottom of the plate, and cover the remaining rim with green paper strips of the same or different lengths.

Fabulously beautiful toys for children
Creating beautiful fairy-tale figures will be a fun pre-New Year activity for children. One of the many paper toy layouts should be printed, cut out and glued in the places indicated on the template. If the child is still too small to cut out with scissors, then adults should cut out the parts of the toy in advance so that the child can later glue them together.


Paper as a reason for fantasy
The appearance on sale of a large assortment of paper for handicrafts with a wide choice of not only colors, but also textures, allows modern craftsmen not to limit their imagination. A huge number of techniques, as well as the availability of patterns and patterns for products for every taste, paved the way for the almost daily creation of small masterpieces that carry not only the elegance of execution, but also the warmth of their master.


A festive interior decorated with crafts becomes very homely and cozy. Often, handmade New Year's toys become real family heirlooms.


