CHILDREN'S WINTER HAT WITH EARS
The hat is double, without seams, with long “ears” - in my opinion, an ideal option for our winter.
So, we will need:
1) threads
– absolutely any that you enjoy knitting with; I knitted with Italian wool blend"Nuance" ; edges and pompom - from the usual "Semenovskaya";
2) knitting needles
stocking needles and, if desired, circular knitting needles;
3) hook
for processing the edge of the cap.
- Since the hat will be double, we will knit two of them - an outer one and an inner one. I recommend starting with the inner one - knitting it along the baby’s head, and knitting the outer one along it, a little larger in size.
- The hat is knitted in the round (no seams!), from bottom to top.
- I knitted this hat for my daughter - for a head of 45 cm, but it is too big for her. So it’s suitable for both one-year-olds and older children.
01-02. Cast on 7 stitches on knitting needles
and knit several rows, adding 2 loops on each side of the fabric in each front row.
03. Knit the eye until the upper part is 19 stitches. We break the thread and knit the second “eye” in the same way. The lower part is 7 loops, the upper part is 19 loops.
04. On the knitting needle of the last knitted eye (where the thread was NOT broken) we cast on 10 loops
and continue knitting, tying the second eye.
05. We turn the knitting over and knit it with purl loops, we also knit the yarn overs with purl stitches. This is the back of our cap.
IMPORTANT: Don't forget to add 1 loop from each edge of the cap!
06. We knit several rows (I have 8), try them on the baby’s head - you will see for yourself when you need to form the supra-frontal part of the cap. We make yarn overs on the knitting needle - 16 loops - and knit. I ended up with 72 loops: 19p. (eyelet) + 19p. (eyelet) + 10p. (back) + 16p. (front) + 8p. (rounding the cap at the front).
In the photo, the loops are placed on two knitting needles - for ease of photographing, then I switched to circular knitting needles, but you can also knit with stocking needles - whichever is more convenient for you.
07. We knit the hat in the round, upwards, for at least 17 rows, after which we begin to decrease the loops evenly. I divided the chain stitches into 7 wedges and made decreases at the beginning of each wedge. Here's what happened, top view:
When there are 4 loops left on the knitting needles, you need to tighten them with thread.
08. We knit the second hat in the same way - since it will be external, we increase the number of loops everywhere by 2. And we also knit a little more in height.
09. We put the caps one inside the other (don’t forget to turn the inner cap inside out!) and to avoid seams, we simply crochet the edges of the cap. For me these are ordinary single crochet stitches, you can use a cross step.
The trends and fashion trends of the coming season allow you to put together an amazing zoo in your wardrobe. Animal hats and wolf hats are for adults. And for kids, the designers have prepared cute cats, dogs, bunnies and Mickey Mouse.
Fashionable hats with ears in the winter of 2019 will be popular both among very young audiences visiting nursery schools, and among teenage teenagers who strive to imitate older ladies in everything. They can be purchased ready-made, or you can experience the pangs of creativity and create a headdress from wool yarn, felt or insulated fleece with your own hands. A beautiful hat with ears can be quite simple. It is enough to knit two square blankets and sew them in such a way that ears are formed on the sides.
Easy to sew, even easier to knit or crochet. The ideas proposed in the photo will help you choose a suitable model and turn it into reality. For a standard knitted hat with ears for a girl, you will need 100 grams of wool yarn with a thread length of 250 m/100 grams. For an adult model, 50% more of the same yarn will be required. A children's hat with ears for a girl can be pink, dove, lilac, white or gray. For boys, it is recommended to choose rich blue, green, brown and chocolate shades. With the right choice of color, a children's hat with ears will go perfectly with other types of baby's outerwear. Responsibility for this lies entirely with the parents. So be careful and try to dress your children beautifully, stylishly and fashionably.
Look at the children's hats with ears in the photo, where styles for girls and options for women's hats for teenage girls are presented:

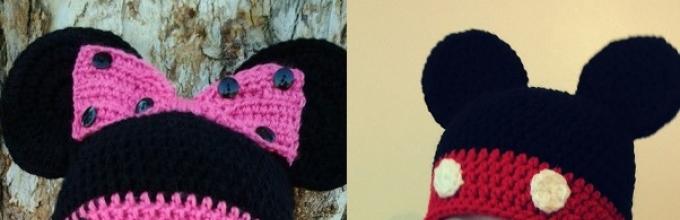
Knitting hats with Mickey Mouse ears are suitable for both boys and girls.

Hats with ears for babies can be bright and quite strict, but in any case soft and pleasant to the touch
Cozy and warm: children's knitted hats with ears (with photo)
Any knitted hat with ears can be both an accessory and a warm headdress. It all depends on the manufacturing technique. If you take a thin hook and “Iris” threads, you will get a wonderful summer panama hat that partially protects from the sun’s rays and nothing more. Therefore, please note that a children's knitted hat with ears must correspond to the season and climatic conditions, primarily depending on the type of yarn chosen. For spring, we can recommend cotton. For the summer, you can knit openwork patterns from silk and acrylic. But for autumn and winter, you need to choose either natural wool or angora with a small percentage of added synthetic fiber, which allows the finished product to better keep its shape.
Look at the photos of children's hats with ears - all the ideas are quite simple and can easily be brought to reality with the help of an experienced craftswoman: 


THE BASIC KNITTING PATTERN FOR A SIMPLE HEADSWEAR OF THIS TYPE CONSISTS OF THE FOLLOWING STEPS:
- measure the circumference of your head, placing the measuring tape in the same way as the hat will “fit” in the future;
- cast on 10 loops on the knitting needles and knit several rows;
- measure the resulting sample, divide the resulting head circumference by this number of centimeters, and multiply by 10 - this will be the required number of loops for knitting a hat with ears;
- cast on the knitting needles with fishing line this number of loops;
- knit 7 cm with an elastic band alternating 2 knit and 2 purl loops;
- then knit with a simple stockinette stitch or a pattern you like to the height required;
- complete the knitting by casting off all the loops;
- sew the hat at the back with a hidden seam;
- sew the poles together, forming the ears.
Using this pattern, you can knit both a children's and an adult's hat with ears of different types. Next, all that remains is to decorate the product with pompoms, tassels, embroidered or glued eyes and antennae. 


Knitted women's hats with ears for teenage girls (with photo)
A fashionable women's hat with ears is in demand among modern youth. Animalistic moods dominate not only on the catwalks in the form of luxurious coats and prints on all types of clothing. A suitable hat with ears for a girl can be fur and leather, suede and felt, fleece and knitted. But the most important trend still remains handmade. Therefore, knitted women's hats with ears will be especially popular in 2019, especially since headwear manufacturers offer them for sale today in a huge variety of models and styles. 


You can puzzle a teenager with needlework, buy a ball of thread of the color you like and knitting needles or a crochet hook for the girl. A few evenings of creativity developing fine motor skills and a beautiful headdress in an individual style will be ready. The general knitting pattern is described in detail in steps above on the page.
It is worth paying attention that hats with ears for teenagers must be consistent in a certain color palette. So, pink and blue colors are completely excluded. In teenage fashion, purer shades with deeper filling dominate. These are all shades of gray, white, black, brown. Yellow should be used with caution, because although it is in fashion in winter 2019, it does not suit everyone. 


Look at the photo of knitted hats with ears in various colors - among them you will probably find those models and styles that can be taken into account when planning a seasonal wardrobe for a teenage girl: 

Another current trend of the current fashion season is the large-scale use of decor using voluminous embroidery, applique and patches of various plastic and wooden parts. This can all be used when decorating the finished product.
Look at women's hats with ears in the photo of models for teenage girls - they allow you to choose a headdress for any urban look: 


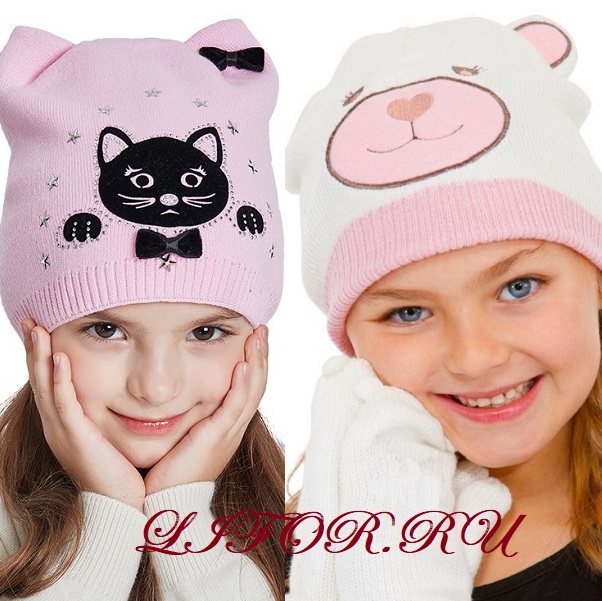
The hit of the season for girls is winter hats with cat ears
Style trends change. Children's fashion is not left out either. The hit of the upcoming winter 2019 season is animal prints and animal images wherever possible. Hats are no exception. A stylish winter hat with ears for a girl can be in the shape of a funny little animal and at the same time reliably protect from the cold and frosty wind.
The most popular animals among girls are bunnies, cats and bears. In second place are foxes, squirrels and Mickey Mouse.
A black hat with cat ears is more suitable for teenagers. It can be fur or knitted from fluffy yarn. There are also simple knitted beanie-style models (fitting the head) and decorated with sewn cat ears. You should also pay attention to the felt bowler hats with small rounded cat ears and an appliqué in the shape of a Cheshire cat’s smile.
Bright multi-colored (pink, blue, yellow, beige, light green) hats with cat ears are suitable for preschool girls or elementary school students. They will be happy to wear such hats if they are matched with voluminous scarves and soft fluffy mittens.
A warm winter hat with faux fur ears is a trend for the coming winter. High-quality internal filler in the form of thermal insulation material will serve as excellent protection for the head. These hats for children come in a wide variety. We recommend choosing hats for the winter that are securely fixed (at least this requirement is relevant for children under the age of 10 inclusive), and cover the back of the head and neck. 


Fur hats with ears for the winter
Hats for the winter with ears can be different in their cut. If you take hats for very young children, then you should pay attention to long ears, which can be easily tied under the chin and thereby save the ears from the freezing wind and prickly snow. For older children, it is worth choosing thicker hats that fit securely on the head and do not move off at the slightest turn of the head. Loose-fitting hats can only be recommended for children over 10 years of age.
note that a fur hat with ears is not always the best choice for infants. An allergic reaction may occur to fur microparticles. Therefore, for children under the age of 3 years, it is better to choose hats with ears exclusively from quilted materials. There should be hypoallergenic insulation inside.
A wider selection of fur hats with ears for teenage girls. There are a huge number of models of animal hats presented here. Thanks to a well-chosen headdress, a girl can look like a real Amazon. As an additional detail to your everyday look, you should choose fur vests, which can be stylishly worn in combination with a wide leather belt with a massive decorative buckle.
Fur hats with ears can be made from fluffy Arctic fox or smooth-haired mink. But it is much more humane to teach a child to respect nature from early childhood. Moreover, modern artificial furs are not much inferior in their consumer characteristics to natural ones. 


Simple hats with pompom ears for children
In fact, any knitted, fleece or fur headdress can be turned into a stylish designer item in no time. Stylists suggest using various pom-poms to the maximum this season to decorate hats, accessories and outerwear. For children this is real chic.
Even the simplest hat with ears will help make a child’s image memorable and extraordinary, standing out from the crowd of children. A beautifully designed hat with pom-pom ears goes perfectly with down jackets, quilted overalls, ski jackets and sheepskin coats. In general, this is a universal item that should be in the wardrobe capsule of every modern child.
Look at the various hats with ears for children in the photo, where a lot of different models and styles are offered: 

Models of hats with ears: scarf, snood, beanie and others
A variety of styles allows you to solve the functional problems of providing reliable protection for the child’s head and neck from frost and freezing wind. Models of hats with ears cope with these tasks better than other hats only if the style is chosen correctly. So, a stylish felt cap or baseball cap for a teenage girl will not solve the problem. It will be used solely for decorative purposes. But a beanie hat with ears for a girl will be an excellent headdress for late autumn and early winter. At least some kind of headdress. After all, for the most part, it is very difficult to force teenagers to wear a hat.
For younger schoolchildren, the ideal everyday option would be a snood hat with ears - it is fashionable, beautiful and very warm. Moreover, the choice of such snoods today is very large. A craftswoman mom can knit this model in a couple of evenings. And you need very little thread - 150 grams.
A practical hat and scarf with ears is suitable for both preschoolers and girls who adhere to a certain style in everyday street clothes. The scarf is suitable both for the look on the meringue of a fashionable parka and on the platform of a quilted jacket. For a sheepskin coat or fur coat, it is better to choose a different style of headdress, for example, a beanie. 

Hats with ears of an owl and a bear, a bunny and a fox, Mickey Mouse and a cat
A hat with bunny ears, popular among toddlers, gradually becomes less relevant by the age of 3-4 years. At this time, the child is already beginning to be interested in the world of animation and he has completely different heroes, ideals and role models. There is no point in resisting this. It's just a process of developing your own taste.
A hat with Mickey ears, a funny and nimble mouse from the Walt Disney cartoon, comes onto the stage. There is a lot of choice here. Manufacturers offer hats with Mickey Mouse ears for every taste, color and budget. This could be a very simple fleece or knitted hat. For the cool season, a knitted model is suitable. And for harsh winters, we can recommend a fur style. 

The addiction to Mickey Mouse goes away by about 5 years of age. At this age, the child begins to imitate adults and gives preference to more strict and realistic forms in designs on clothes. A hat with fox ears with appropriate decor in the form of applique or embroidery would be appropriate. The realism of the image can be complemented by a matching scarf that imitates a fox's tail.
Closer to the age of 7-8 years, the child begins to give preference to slightly different directions. He becomes interested in new species of animals, and at the same time strives to be like his classmates. And this season certain looks will be in fashion. Therefore, with a high degree of probability, we should expect that the child will ask to buy a hat with owl or bear ears, since this is a real trend of the season.
A hat with cat ears is a dream for middle school girls. Teenage girls in the winter of 2019 will unconditionally give preference to animalistic trends. This will apply to both makeup and the choice of prints for everyday clothes.
A beautiful and comfortable children's hat is an indispensable item in a child's wardrobe. Every needlewoman can do such a thing, but it is important to remember that the child’s skin is delicate and sensitive, so the yarn for work must be of good quality and preferably woolen or wool blend, so that the child is warmer. Knitting will not take much time, the main thing is to purchase materials for work and focus on the pattern.
Children's hat knitted with a pattern
In order to knit a hat for a child with a jacquard pattern, you will need yarn of two colors, for example, white and blue, assuming that the head circumference is 48 cm, and the child’s age is 2-3 years, as well as circular knitting needles No. 4.5.
You need to knit according to the pattern: first you need to cast on 73 loops with blue thread and connect them into a ring, knitting the two outer loops together, then knit eight rows, alternating two front loops with two purl loops, then two rows should be knitted with front loops.
In order to make a jacquard pattern, you need to knit seven rows of facial loops with a blue thread, then you should reduce the number of loops. To do this, all the loops must be divided into four groups, each with 18 loops, marking the boundaries of the groups with a thread of a contrasting color.
In each row, two stitches should be knitted together before and after the border. When only eight loops remain, they need to be pulled together and secured to the wrong side of the hat. You can also decorate the hat, for example, with a pompom.

Hat with ears
Hats with ears are perfect for children in frosty winter weather.
To work, you will need yarn of several colors, as well as knitting needles and a hook. Since the hat with ears will be double, you first need to make the inner hat, and then the outer one, slightly larger than the inner one.
First of all, you need to cast on seven stitches and make several rows, adding two stitches in each front row on each side. In order to get the “eyelet” element, you need to knit so many rows until the top row consists of 19 loops, after which you can break the thread and knit the second eyelet in the same way.
After the second ear is knitted, there is no need to break the thread, but rather cast on 10 loops and knit so as to connect the ears. Then the product should be turned over and continued to be knitted with purl loops, adding one loop from each edge of the cap.
Then you should knit the required number of rows according to the circumference of the child’s head and proceed to knitting the supra-frontal part of the hat. To do this, you need to cast on 16 loops and knit in a circle, you should get 72 loops, 17 rows are knitted according to this pattern.
After this, the number of loops in each row must be reduced by dividing all loops into seven wedges and reducing the number of loops at the beginning of each wedge. When there are only four loops left on the knitting needles, they need to be tied together with thread.
The outer cap is formed in a similar way, only the number of loops is increased by two, and it needs to be made a little larger in height. Then you need to turn the caps right side out, connect and crochet the edges. You can also decorate the hat with a pompom, ties or other elements.


A children's hat knitted with knitting needles can be decorated with either an interesting pattern or supplemented with decorative elements. Possible options will be demonstrated in videos in which needlewomen will not only present their models of children's hats, but also reveal some secrets about how to knit a hat correctly.
Video on the topic of the article
Knitted hats for girls. Types, features, diagrams and descriptions.
The period of motherhood is a responsible and amazing time when a young mother discovers or returns to forgotten hobbies and hobbies. One of them is knitting for your children.
With the cold weather approaching, I especially want to create a warm and cute hat for my daughter with my own hands.
And how can you not drown in all the variety of models and patterns for the future headdress for your princess? Let's take a closer look at the nuances in continuation of the topic about
How to knit a hat with ears for a girl for beginners?
ready-made knitted winter hat with ears for girls with snowflakesBeginning needlewomen are nervous about the first step and are afraid of complex descriptions of knitted hats. Since you have decided to pick up knitting needles and have already bought beautiful yarn, feel free to start working.
First pay attention to the preparatory stage:
- knit a sample of the fabric with the pattern you chose. Cast on 30 stitches and perform 20-25 rows,
- try not to over-tighten the loops,
- using a ruler, measure the density and height of knitting, that is, the number of loops/rows in 10 cm of fabric
- Before measuring, stretch the bound work slightly,
- determine the volume of your daughter’s head in centimeters by replacing it with a soft meter or thread, which you then attach to a ruler,
- Write down on a piece of paper the required number of loops for the future hat, one piece for the ears and back of the head and two for the forehead. If you end up with an odd number of stitches, round them up. For example, instead of 17 loops, cast on 20,
- choose knitting needles that are equal in thickness to the threads of yarn.
Let's look at the procedure for knitting a double hat with ears. This method will be the most understandable for beginning craftswomen. It consists of knitting two hats that differ in size. That is, the inner one fits well on the girl’s head, and the outer one is 2-3 more loops.
Operating procedure:
- cast on 7 loops on two knitting needles and knit in garter stitch, adding two loops on both sides in each front row. Continue until you reach the desired number of loops equal to 1 part that you counted on a piece of paper, and cut the thread,
- Repeat the same steps with the other eye, but do not reverse the thread, but cast on air loops in the amount of 1 part and connect to the finished eye. You have the back of the head and sides of the future hat,
- continue to knit everything together for another 8-10 rows, depending on the size of the girl’s head. Continue adding stitches on both sides in knit rows for rounding,
- select the required number of loops for the frontal part of the hat, taking into account the loops added for rounding,
- knit the entire fabric at least 10 cm upward on circular knitting needles,
- divide all the loops into 7 wedges and at the beginning of each wedge, surprise with one loop in each row,
- Pull the final 7 loops together with yarn.
Repeat all the steps for knitting the outer hat, only increase the number of loops in each piece.
Sew both hats together, with the inner one facing down, crocheting along all the edges.
Either crochet the hole on top of the headdress or attach a pompom.
Knitted cat hat with ears for girls

 cute cat hat with ears on a girl
 Depending on the skill and individual preferences of the needlewomen, a girl’s cat hat can be knitted in several ways:
- hat with ears plus cat ears sewn onto it
- fabric sewn along one or two seams or knitted in a circle with the eyes highlighted/pulled with bobbin threads
- cap with cat ears sewn on top
Let's consider the first option. The basic work of knitting a hat is similar to that discussed in the previous section.
The only difference is to form not 7, but 6 wedges for reduction on the top of the head. Then it will be easier for you to mark the places to sew on the cat ears.
Link the cat attribute like this:
- cast on 17 stitches and knit 4 rows with knit and purl rows alternately
- decrease on both sides one loop per row
- Shape the sharpness of your ears to your taste. If you like protruding corners, reduce the loops until there is only one left, if softer lines - up to 5-7
Sew the ears onto the top of the hat using a hook and trim their edges over the entire surface.
How to knit a fashionable, beautiful hat for a girl: new models, patterns
 beautiful knitted hat with a flower on a girl
 Classic models of knitted hats will always be in fashion for girls:
- berets
- hats with and without ears
- earflaps
However, the following have also proven their attractiveness and practicality:
- hoods
- helmets
- hoods
They all have common features:
- plain fabric or with an embroidered/knitted pattern
- decorations in the form of beads, beads, ribbons, patterns
- additions in the form of mittens, scarves, snoods
Below we insert several examples of descriptions and diagrams of new models of knitted hats for girls.

 fashionable knitted hat for girls, example 1
 fashionable knitted hat for girls, example 2 fashionable knitted hat for girls, example 3
 fashionable knitted hat for girls, example 4 fashionable knitted hat for girls, example 5
Warm winter knitted children's hats for girls: patterns and descriptions

 warm yellow knitted hat on a girl
 In winter, it is important for you to provide warmth to your child, so choose the model of knitting hat carefully.
Please note a number of points that affect heat retention inside the headdress:
- yarn - natural threads protect the head from the penetration of cold
- thickness of the thread - the thicker it is, the warmer the head
- lining, or inner layer - can be fleece or a second hat sewn on
- extensions in the form of ears, cuffs on the neck
- pattern - for example, multiple weaves of braids always remain in the trend of winter hats
Below are several drawings describing how to knit winter hats for girls.

 warm knitted hat for girls, description 1
 warm knitted hat for girls, description 2 warm knitted hat for girls, description 3
 warm knitted hat for girls, description 4
 warm knitted hat for girls, description 5
 warm knitted hat for girls, description 6
 warm knitted hat for girls, description 7
Beautiful fashionable hat for girls knitted for autumn and spring: diagram and description
 pink knitted hat with a flower on a little girl
 For cool, but not frosty weather, the girl should wear a thinner hat. Knit it from a thread in one fold and without lining.
Choose any of the patterns except openwork. For example, a simple 2x2 or 3x3 elastic band with a cute decor of crocheted flowers and leaves will tie beautifully around a girl’s head.
To knit it, prepare:
- knitting needles and yarn of the same thickness
- hook
- flexible meter
- scissors
Operating procedure:
- Having measured the head circumference and knitted a control sample of the fabric with an elastic band, cast on the required number of loops,
- tie the first row with knit stitches, then with an elastic band,
- at a height of 10 cm, depending on the size of the head, begin to decrease the loops at the beginning of the wedges,
- Determine the number of wedges yourself. It is convenient if there are 5 or 7 of them,
- Pull the last loops equal to 5 or 7 with thread. The hat is ready.
- Next, cast on 30 chain stitches. The second row is single crochet, the next row is double crochet, the last row is double crochet.
- Roll the finished openwork cord into a spiral and lay it out in the shape of a flower.
- Attach it with a hook or a needle and thread.
- Repeat the steps of crocheting openwork laces and forming flowers/leaves.
For an alternative version of a knitted spring/autumn headdress for girls, see the picture below.
 diagram and description of a knitted spring hat for a girl
Knitting beautiful fashionable hats for teenage girls

 fashionable knitted hat for teenage girl
 Teenage girls are especially demanding when it comes to hats. They like original and beautiful things, while mothers worry about warmth and comfort. Knit a headdress for your daughter that she will wear with pleasure.
Hats are in fashion among teenagers:
- with ears and long ties with pom-poms attached at the ends
- fur
- from thick threads
- openwork berets and with a lot of braids
- hoods
- helmets
- hoods
- in the form of a cap, for example, like Little Red Riding Hood
- sock with open top for hair
- with slanted brim, the wide part of which is decorated with a large original button
- cap-shaped
- with visors
- with a simple pattern of thick threads and fur pompoms on the top
We will consider the knitting features of almost all of them below.
Knitted beanie hat for girls
 The girl is wearing a gray fashionable beanie hat, knitted with knitting needles.
 Beanie has won the love of girls for its convenience and the ability to wear it with almost any clothing.
If you have good knitting skills, then creating it yourself will not be difficult. Beginning needlewomen should carefully read the job description a couple of times and carefully follow each point.
Features of knitting a beanie hat:
- it's longer than usual
- consists of wedges that are knitted alternately without breaking the thread
- the first two rows are performed on an additional thread, which is unraveled upon completion of the work
Operating procedure:
- cast on loops with auxiliary thread along the length of the hat, for example, 50 pieces
- knit 2 rows in garter stitch and cut the thread
- go to the main thread and also perform 2 rows of knit/purl stitches
- Knit the next row according to the pattern, but leave the outer 6 stitches on the left knitting needle
- bring the thread through the sixth loop and turn the work to continue knitting
- go to the end of the row, tighten the edge
- turn the work and leave 5 loops unknitted
- repeat until you have threaded the last stitch
- knit a row. You will get a wedge with a narrowed side. She will be the top
We continue to knit a new wedge from the front side according to the pattern described above. In total you need to form 12 wedges.
Unravel the auxiliary thread and connect the edges of the product using the loop-to-loop method. If you prefer to sew with a crochet hook or needle and see the seam, bind off all the loops before joining the hat panels.
If desired, decorate with a pompom, large button or brooch.
How to knit a hat and helmet for a girl with knitting needles?

 ready-made original hat-helmet, knitted
 We suggest using the “heel” technique to knit a hat-helmet for a girl.
The operating procedure is as follows:
- cast on stitches equal to a fourth of the volume of the girl’s head and knit in knit rows and purl in purl rows,
- at the level of the crown on both sides along the finished fabric, raise the edge loops and switch to three knitting needles,
- continue knitting the same patterns up to the level of the chin,
- On the fourth knitting needle, cast on the same number of stitches as you did when knitting the hat at the beginning,
- continue working in a circle with a 1x1 or 2x2 elastic band to the height of the neck,
- for the shirt front, expand the fabric by adding a loop to each purl stitch,
- further 4-6 rows knit in the round,
- close all loops.
To decorate the helmet use:
- beads
- brooches
- threads with lurex
- bead embroidery
- pompom made of knitted fabric 7 cm high, gathered into a rosette on the top of the head
- a braided braid made of yarn in a contrasting color or to match the girl’s hair color
For an alternative version of a knitted hat-helmet, see the picture below.
 knitted hat-helmet for girls, description
Beautiful hat and snood for a girl, knitted: diagram
 smiling girl in a hat and snood knitted with knitting needles
 Snoods are more comfortable to wear than a classic scarf because of their ability to stay in place and cover the neck. This is extremely important to provide for girls.
Knit a beautiful set of hat and snood for your daughter using the same technique and patterns as suggested in the pictures below.

 pattern diagram for knitting a hat and snood for a girl
 description of knitting hats and snoods for girls
 Warm double knitted hat for girls

 beautiful white double knitted hat for girls
 After completing the preparatory steps listed in the first section and choosing the yarn for the future hat, get to work.
We suggest knitting a double warm hat with a braid pattern with a cross on its front part. If the strand of yarn is thin, fold it in two before creating the headdress.
To calculate the number of loops, knit a sample of the elastic band and pattern. For this:
- cast on 20 stitches on auxiliary thread
- 1 row - knit 1, 1 yarn over - repeat until the end of the row, but do not knit a yarn over before the edge,
- 2nd row - remove the edge and back without tying, 1 front, remove the back - repeat until the end of the row
- 3-12 row - repeat 2 rows
- Row 13 - remove the edge, two together, two together, purl, knit - repeat until the end of the row
- 15 row - edge, 7 purl each, between which 12 knit
- Row 16 and all further even rows - according to the drawing
- 17-21 rows - according to the drawing
- Row 23 - on the front loops, perform 2 crossings in different directions
- Rows 25-31 - according to the drawing. Next, knit repeats of the pattern
- unravel the auxiliary thread from the sample and determine the knitting density of the hat on the elastic band and pattern
The procedure for knitting the outer layer of a hat on 2 knitting needles:
- perform casting and knitting double elastic as in the sample
- remove the auxiliary thread and proceed to the drawing
- for a 5 year old girl you will get 5 rapports
- at a height equal to 4 crossings and 3 rows, begin to decrease the fabric, closing a loop on both sides of each braid
- repeat decreasing stitches after 4 rows, continuing to follow the pattern
- continue this way for 2 more crossing braids
- reduce the number of loops after the edge 2 knit, 2 together, 4 knit, 2 together, 2 knit and then repeat until the end of the row
- make decreases in every second row until the front inserts are rounded
- last row - three loops together
- tighten the loops with thread
Do the inner lining as follows:
- lift the loops from the top row of the elastic
- first row - purl, then alternately knit and purl
- knit a straight fabric, applying it to the main
- repeat decreasing stitches on the inner lining in a mirror image
- Pull the final loops with thread
- connect both parts of the hat
The decorative elements of a warm hat will be the ears, connected by the raised loops of the top row of elastic on the inside. For this:
- Knit 14 loops 12 rows with straight fabric
- decrease in every second row on both sides by loop
- on the final 2 loops, crochet laces, 15 cm long
Attach a ready-made or made pom-pom to the top of your head.
Knitted hat for girls 2 - 3 years old, two-color

 two-color knitted hats for girls 2-3 years old
 Universal and feminine colors for a hat for the cold season are white and pink. The little princess will especially like a headdress with ears with ties, on the front of which you can embroider a snowflake, for example.
In this case, knit the ears that you knit first on 11 loops. Make them with white and pink stripes in 2 rows.
Leave the rest of the hat white and the snowflake pink. Instead of a design, make a pom-pom from both colors so that they occupy half of its circumference.
See the picture below for the snowflake pattern.

 snowflake pattern for knitting on a baby hat for a girl
 The knitting process was presented in detail in the first section of the article.
Let us dwell only on the estimated number of loops for reference.
- start knitting ears on 11 loops, reaching 21,
- proceed to the main knitting - cast on 17 loops, add one eye, cast on 44 loops, add a second eye, cast on 17 loops again and close the edges into a circle. Total 120 loops.
Make the ties from 3 threads a little more than half a meter long, threaded through the middle of each eyelet at the bottom. Fold the threads in half and braid the entire length.
Knitted earflap hat for a girl

 cute knitted earflaps on a little girl
 According to the knitting technique, a hat with earflaps is similar to a hat with ears. The difference is in several points:
- ears - initially knit them wider and add loops to expand in 3-4 front rows. Above, knit a straight fabric of the desired height,
- the back of the head is higher, so after collecting the ears and lifting the loops between them for the back of the head, perform at least 10 rows,
- insulation is a mandatory attribute. And not only inside the hat, but often also on the outside of the forehead. Fleece and faux fur have warming properties,
- ties - they are thinner and longer.
Examples of knitted earflaps for girls are below.

 description of knitting a hat with earflaps for a girl, example 1
  honeycomb pattern description
 If you like the absence of seams, knit the hat with garter needles. If the presence of identifying details in the form of a seam is important to you, then use two.
Please note that the pattern attracts attention with its originality, so do not decorate the hat with it.
Knitted bonnet hat for girls

 knitted bonnet with ears on a girl
 The procedure for knitting a hood is as follows:
- First make the strip framing the face. Usually this is a garter stitch on 11-17 loops with a length of 120-150 rows,
- knit the main part on a number of loops equal to the length from one earlobe to the other. In the area of the crown, divide the fabric into 3 parts and knit only the central one, alternately picking up one loop in each row of the other two. The technique is similar to heel knitting,
- form a strip on the neck from the loops of the main and first parts of the hat. Some craftswomen extend this strip by 15 cm on each side. These will be the ties on the hood.
Knit a hood for the cold season with the following patterns:
- corn
- braids with garter stitch inserts
Decorate the seam of the main hat above the face and on the crown with knitted ruffles. To do this, raise the loops in the designated places, knitting two from one. Work 9 rows in stockinette stitch and bind off all the stitches, pulling them tightly so that the ruffles hold their shape.
We knit a hoodie hat for a girl with knitting needles
 bright hood-hat for girls
 Features of this type of hats:
- their width at the bottom of the neck is half as wide as at the top of the head,
- the area of the cap on the neck can be solid or separate, connected with buttons or a brooch,
- space that is suitable for voluminous hairstyles,
- comfort when the hat falls on the shoulders.
Interesting hood models:
- two-tone, when a lighter tone is present at the end around the face,
- with interlacing braids, zigzags, rhombuses, cones,
- made with three-dimensional patterns, for example, pearl.
Start knitting a hooded hat from the narrow part, gradually adding loops according to the previously selected pattern.
- In the peak position, continue knitting and decrease the number of loops in a mirror sequence.
- Sew the hat along the back of the head.
- Either knit the neck part of the hood separately from the main fabric, and then sew it on. Or think of loops along its entire length and knit on circular knitting needles.
Let us add that this attribute is appropriate to add for any model. The ties act as both a fastener on the head and a decorative element. In the second case, their ends are decorated with pom-poms made of yarn or natural/faux fur.
For clarity, see the order and pattern of knitting a hat with ties below.
 knitting pattern for a hat with ties for a girl
So, we looked at the features of knitting various models of warm hats for girls. It's getting colder outside, which means it's time to do some handicrafts.
Inspiration to you and original hats for your daughters!
Video: knitted warm double hat for girls
Good afternoon, dear reader and needlewoman!
This spring I knitted a baby hat with ears, ties and a pompom. I admit, I and my grandson’s mother liked the result 🙂 Therefore, I decided to talk about luck in more detail.
You may say, where is the pompom in the photo? Indeed, the hat was photographed BEFORE joining the pompom - so that it does not distract from the main process. 🙂
Choosing yarn for a hat
My grandchildren live separately from us, so the choice of yarn for knitting the hat was entirely up to me. To avoid mistakes, I took a photo of the jacket on my phone. This simple technique was very helpful in choosing the color of the yarn.
As a result, I bought 2 skeins of 100 grams of Alize MIDI mosaic yarn (100 grams = 170 meters, 25% wool, 75% acrylic). The yarn is quite voluminous and incredibly soft. The light tweed effect also captivated me.
Of course, 200 grams is a lot for a children's hat. More than 100 grams of them went to knitting a scarf :). But more on that separately.

The manufacturer recommends using knitting needles with a diameter of 5 to 7 millimeters. At first I did just that, but the canvas seemed loose and “holey.” In order not to knit the lining, I changed the knitting needles to three-millimeter ones. And everything suited me :)
We knit ears for a hat
We will knit from the bottom up, so the first story is how to knit ears.

Cast on 4 loops. We knit in stockinette stitch: we knit the front rows (first, third and all odd ones) with knit stitches, and the purl rows with purl loops.
In each front row, at the beginning and at the end of the row, add one loop - make a yarn over. In purl rows we knit yarn overs. And so on until there are 16 loops on the knitting needle. Edge loops also participate in the pattern - we knit them, and not just remove them).

When the first eye is ready, do not close the loops, transfer them to a spare knitting needle and begin knitting the second.
The finished ears need to be connected).
Connecting the ears
We connect the ears together and knit the back of the hat:

We start from the 1st ear, from the front side:
- 1st row: 1 knit loop, yo, 15 knit loops, cast on 18 loops for the back of the cap, take the second eye: 15 knit loops, yo, 1 knit. a loop,
- 2nd row: purl all the loops and yarn over;
- Row 3: knit 1, yarn over, knit 50 loops with a 2x2 elastic band, starting with purl 2, yarn over, knit 1. a loop;
- 4th row: knit with a 2x2 elastic band;
- We knit the 5th and 6th rows with a 2x2 elastic band.
Starting from the 7th row, we knit in the round (with five knitting needles or using circular ones - whichever you prefer) :)
To complete the circle, cast on 30 stitches and knit approximately 3 cm with a 2x2 rib. There are exactly 84 loops on the knitting needles and they are perfectly divided into 12 (the number of loops in the report).
Let's start knitting the main pattern!
Knitting the main pattern
Dear reader, please note that rapport begins with two purl loops. This means that you need to start knitting the main pattern with two purl loops of the elastic band, then the braids will smoothly “grow” out of the front loops of the elastic band, and this looks great.
Basic pattern diagram:

In this diagram, I forgot to explain that cells with vertical lines indicate knit stitches, and cells with horizontal lines indicate purl loops.
Forgive my "joint", please!
Our hat consists of seven repeats in width (84 loops/12 loops = 7) and three repeats in height.
Having knitted the repeat three times, we begin to decrease the loops, knitting two loops together.
Reducing loops - forming the crown
We will decrease the loops, trying not to harm the main pattern. We repeat the actions between the signs *.
1st row - P2, k2, p2 together, k6.;
2nd row -* 2 purl., “harness” pattern, 1 purl., 6 knits.*,
3rd row - 2 together, knit 2, purl 1, knit 6.;
4th row - 1 purl., “harness”, 1 purl., 6 knits.*;
5 row - P1, k2, p1, k6.;
6th row - P1, k2tog, p1, k6;
Row 7: * P1, k1, p1, k6*;
8th row - P1, k1, p1, braid;
9th row - P1, k1, p1, k6.;
10 row - P1, k1, p1, k2tog. loops behind the back wall, knit two, knit 2 together. behind the front wall of the loop;
11th row - P1, k1, p1, k4.;
12 row - P1, k1, p1, k2tog. behind the back wall of the loop, k2 together. behind the front wall of the loop;
13 row - P1, k1, p1, k2tog.;
14 row - Purl 1, knit 1.
Using a hook, pull the thread through the remaining loops and pull the loops together. Pull the remaining tail with a hook to the wrong side, fasten and cut it shorter. Now you can wipe the sweat from your forehead - the hat is almost ready. All that remains is to knit or crochet the ties and, if you want, make and sew a pom-pom (by the way, you can look here,


