2 years ago
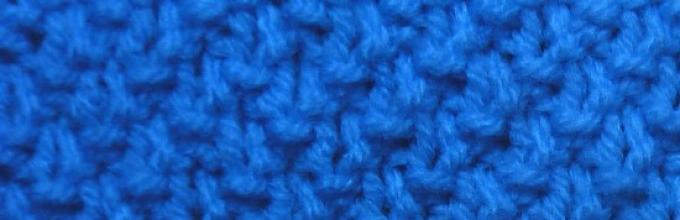
The rice pattern refers to double-sided patterns. This means that the front side can be any, both front and back. The rice pattern has several names, for example it is also called putanka, moss or pearl. The pattern got its name from the fact that the finished canvas produces small oblong bulges. This pattern is most suitable for knitting warm winter clothes, as it itself is quite dense and warm. In addition, stripes knitted with rice on a shawl fabric look quite interesting. What types and methods of knitting a rice pattern are there?
There is a classic way to knit a rice pattern, and its description is given below. However, craftsmen were able to make adjustments to this pattern, and at the moment there are several versions of this pattern. Let's look at them all.
First option. Classic rice
- Row 1 - knit, purl, and so on until the end of the row.
- Row 2 - purl, knit, repeat until the end of the row.
Second option. Double rice
The double rice pattern with knitting needles involves a set of loops that is a multiple of 2 + chrome. loops.
- Row 1 - knit, purl...
- Row 2 - knit, purl.
- Row 3 - purl. persons
- Row 4 - purl, knit.
- Row 5 is identical to row 1.
Third option. Bulk rice

- 1st row - 1 loop is removed as knit. with double cape, front.
- 2nd row - 1 loop is removed, purl-wise. with 2 double crochets, knit stitch.
- 3rd row - 1 loop is removed as knit. with 3 yarn overs, front.
Fourth option. Pearl rice
The pearl rice knitting pattern differs from the usual rice pattern in the more rounded shape of the grains of rice obtained on the finished canvas.
- Row 1 - knit, purl, knit.
- Row 2 is identical to row 1.
Fifth option. Half rice
The pattern involves a set of loops, the number of which is odd + edge loops.
- Row 1 - purl, knit, knit.
- Row 2 - all knit stitches.
- Sixth option. Broken rice.
- 1st row - all loops are knitted.
- Row 2 - purl, knit, knit.
Seventh option. Large rice
For this pattern, you need to cast on the number of loops, which is divided into 4 + edge loops.
- 1st row - k2, purl 2.
- 2nd row and all even - all loops are knitted according to the pattern.
- Row 3 – purl 2, knit 2.
- Row 5 is identical to row 1.
We considered several options for making the drawing in Fig. In order to determine which one you like best, and which one is most suitable for knitting the product you have chosen, it is worth knitting a preliminary sample. Then you will be able to see with your own eyes these drawings themselves, how they turn out in finished form. In addition, the knitted samples will be useful for you to count the required number of loops for working on a future item.

Knitting rice pattern is very suitable for knitting hats. The pattern is small, which allows the finished product to look neat. Also, such a hat will not visually make facial features larger. Among other things, the rice has a dense pattern, without openwork, which means it is quite suitable for a winter hat, which will turn out to be very warm. Let's try to knit a hat with a rice pattern for a head circumference of 46-48 cm.
To work, you will need warm yarn, preferably acrylic in combination with wool or pure wool. Mohair is also suitable. With a thread length of 150 m, 100 g of yarn will require 1.5 skeins. Take circular knitting needles No. 4.5 and No. 6.
On 4.5 knitting needles we cast on 70 stitches and close them in a circle. Next, we knit with an elastic band 1 by 1 up 7 cm. You can also knit with an elastic band of 2 by 2, but 1 by 1 will look more appropriate with a small pattern. As soon as the required length is knitted up, we switch to needles No. 6, and add one more to the total number of loops to make 71 loops. We continue to knit the fabric with a large rice pattern until the length of the product without elastic reaches 17 cm. As soon as the work is done, we tighten all the loops using a working thread, while trying to form a neat, beautiful crown. That's all! The work is finished, the product is ready to wear!

Recently, so-called snood scarves have become very popular. They are a ring that wraps around the neck once or twice. However, a product that has a seam is not very comfortable to wear, because every time you put on a scarf, you need to make sure that it does not come into view. But you can knit a seamless snood scarf and forget about this problem!
To work, you will need yarn consisting of 75% acrylic and 25% wool.
With a thread length of 100 m, 100 g of yarn will require 2 skeins.
The knitting needles should be circular No. 5.
To begin, we cast on 88 loops, close them into a ring, and mark the beginning of the row with a marker. Next we knit according to the pattern below.
Row 1 - knit, purl.
Row 2 - knit, purl.
Row 3 - purl, knit.
Row 4 - purl, knit.
Row 5 is identical to row 10.
Using the above method we knit 70 rows. Once the work is done, close the hinges in the standard way! That's all, as you can see, nothing complicated!
Another basic knitting pattern that every craftswoman should master is the pearl pattern. There are other names - putanka, rice, rice, pearl. Essentially, these are the same matings with minor differences. In this lesson we will look in detail at how they are similar and different.
Scheme and description of knitting a pearl pattern (tangle) on knitting needles
This is a completely simple and at the same time beautiful pattern that even a beginner knitter can knit. It consists only of knit and purl loops, which alternate with each other. The knitting is similar to a scattering of pearls or rice, hence the name. The pearl pattern is attractive because it is double-sided, very dense and holds its shape well, does not stretch or curl. Therefore, pearl knitting is often used for parts that should look the same on both sides. For example, for trims, pockets, collars. But even things completely knitted with tangles on knitting needles look advantageous due to the volume and relief of the surface of the fabric. There are many different patterns where the putanka is combined with braids, arans and other knittings. It is often used to strengthen stocking stitches so that the fabric does not curl.
Small pearl pattern (tangle)
There are several types of pearl knitting:
small;
large;
two-color.
Let's look at all the options in order.
Knitting a small pearl pattern (tangle) on knitting needles means that you need to alternate the front and back loops, and in the next row make an offset: knit a purl over the front one, purl over the back. n. - facial. It is absolutely impossible to get confused when knitting and you can start learning with this knitting. You can knit many different products: cardigans, jumpers, hats, scarves, blankets, pillows and much more.
Description of small pearl pattern:
Row 1: *K1, P1* - repeat until the end of the row;
2nd row: *above purl.st. - faces.p.; above the faces.p. - purl*
Explanations: you don’t have to look at the knitting pattern, but be guided by the work: if the loop on the knitting needles is knitted, then knit it purlwise and vice versa.
Scheme of tangles on knitting needles:

Video master class on how to knit putanka (pearl) and rice (rice) patterns:
Round:
When knitting in circles, the method of doing it on knitting needles is exactly the same, but there is one nuance - for symmetry.
you should cast on an odd number of loops. If you make the correct set, the drawing will not
will shift, and you will be able to look at the work and knit the required loop.
Large or double pearl pattern (rice, rice)

A large putanka pattern is often called rice or a rice pattern. The knitting pattern is very similar to the previous description, but differs in that the faces are offset. and purl. It is necessary to do not every row, but every other row. Externally, the knitting is more elongated, reminiscent of grains of rice, which is where the name comes from. To avoid confusion when to perform offsets, follow this advice:
Make a mark on the front side of the product in the form of a pin or thread. You will always know: where the pin is, there you need to make a transition. This way you will never make a mistake, even if you are watching an interesting film at the same time. It is possible to work automatically without breaking away from the plot.
Description:
Row 1: *k1, purl 1* - repeat until the end of the row;
2p.: according to the drawing;
3p.: *P1, k1*
4p.: according to the drawing.
Rapport consists of 4 p.

Large rice knitting on knitting needles in the round:
Cast on an odd number of stitches.
Rows 1 and 2: *K1, P1*
Rows 3 and 4: *P1, k1*
When knitting a large rice pattern, be sure to mark the beginning of the row with a marker so you can see where to start the transition.
Rice knitting (tangle, pearl) is perfectly combined with other patterns, which is often used to create original models. See what an unusual stole you can knit using rice and.

For a children's spring hat, only the elastic is knitted with a pearl pattern. The knitting pattern can be viewed at the link below the photo.

Scheme .
In recent years, products made from large yarn have been gaining popularity. It can also be used in the manufacture of hats or other models with pearl patterns. The stylish design is suitable for a young girl who follows fashion.

Description .
On the site you can go to an article that describes in detail how to knit 5 designs of women's caps and hats with putanka, pearl and rice. The options are completely different, and you can choose according to your taste: voluminous, embossed, sporty or feminine.

Read more.
Of two colors
You can knit with rice not only in one color, but also in two. This type of knitting is called knots and belongs to the patterns that have received the funny name lazy. You can read the description.

How to knit a rice pattern?
Double pearl pattern, tangle, large pearl pattern, columns, rice pattern, rice - this is how this pattern is called in different ways. And indeed, on the knitted fabric you can clearly see small bouclé, reminiscent of rice grains. If you look at it, this pattern is a type of pearl pattern. It is knitted in the same way, only the loops are shifted not in each next row, but every other row.
The knitting is quite simple, even a novice needlewoman can do it and, nevertheless, it turns out to be spectacular, and besides, it is double-sided. If you are just starting to create your first things, but want to knit fabric not only with knit or purl stitch, then feel free to choose this pattern.
“Rice” is very suitable for knitting children's blouses and sweaters. Rice knitting looks beautiful as a background for other patterns when finishing the product with strips. Often this pattern is used instead of purl stitch or garter stitch in the middle of diamonds. The loops of the rice pattern look very prominent when the product is knitted from thick yarn, for example, when knitting a scarf. In men's garments, the rice pattern is perhaps the most popular of the double-sided knitting patterns (along with the pearl pattern).
Description of knitting rice pattern
The pattern is knitted with knitting needles. It’s very simple – we alternate knit and purl stitches in a row. The number of loops for the sample is a multiple of 2:
1st row: 1 knits. loop, purl 1 loop.
2nd row: 1 knits. loop, purl 1 loop. (that is, according to the drawing)
3rd row: Purl 1 loop, 1 knit stitch (swap loops)
4th row: Purl 1 loop, 1 knit loop (knit according to the pattern)
5th row: repeat the pattern from the first row
The rice pattern is easier to understand when you knit it according to the pattern. Even for those needlewomen who don’t like patterns, in this case everything will be clear:

Often in such simple patterns only knit rows are indicated and therefore the knitting pattern of the rice pattern is sometimes confused with the pearl pattern. Compare, pay attention to the row number:

It would seem that the patterns are the same: the only difference is that in the pattern of the pearl pattern both front and back rows are indicated, and for the rice pattern - only the front ones. But the knitting pattern turns out different.
Rice pattern (Figure 1):


Read the pattern descriptions carefully. If it is written: “alternately knit 1 knit stitch, 1 purl loop, shifting the pattern every 1 row (or after every 2nd row, or in each knit row) by 1 loop,” then this will be just a rice pattern (Fig. 1) .
On our website you will find different models for women, men, and children, where a rice pattern is used. Here, for example, are some of them:


Here the centers of the rhombuses are connected with a rice pattern


Different knits are combined with the “rice” pattern

Here the pearl pattern is used as a background
Combination of braids with rice pattern

You can knit many beautiful patterns with knitting needles. Not all of them are as difficult as beginner knitters think. For example, The pattern of the “Rice” pattern consists of only two types of loops. Having learned how to knit and purl, you can already create real masterpieces of knitting art.
The “Rice” pattern has several other names – “Moss” and “Pearl” pattern. Therefore, in some descriptions of circuits you may find other terms.


This pattern has several common names. In the literature you can find videos and descriptions of such patterns as rice, pearl, and columns. If you look at them, you will see that the scheme is the same for all. In fact, these are different names for the same pattern.


Why this name? The canvas produces original convexities, shaped like rice.
Where to use the rice pattern? It is indispensable for knitting children's clothes. Despite the texture, the product is soft and pleasant to the touch. The child will be comfortable in it. Blouses, sweaters, jackets - it is ideal for them.
“Rice” goes well with other types of knitting (patterns). Scarves with side trim with this pattern look beautiful. If you are knitting diamonds, try this pattern instead of garter stitch in the middle. The diamonds will take on a more voluminous appearance and will transform before your eyes.


Don't forget that the pattern is double-sided. It looks exactly the same on both sides of the finished canvas. Therefore, it can be used as a base for scarves and vests. Knitted hats and berets using thick yarn look elegant and harmonious. 
How to knit a rice pattern
- We start knitting with a cast-on row. Using knitting needles, cast on the required number of loops and immediately move on to the main pattern.
- The point is that we will have to alternate purl and knit stitches. That is, in the next row we will knit the front one opposite the purl one and vice versa.
- Since rapport is built on only 2 loops, you should cast on a multiple of 2.
If you still doubt the simplicity of the pattern, consider its schematic representation. Here is a diagram for beginning craftswomen: 
- 1R: 1 knit, 1 purl.
- 2R: continue knitting according to the pattern.
- 3R.: change the location of the loops. We knit 1 purl, 1 knit.
- 4R: we carry out according to the drawing.
- 5R: we start work from step 1.
You should get a picture like this. 
Video: Rice pattern small and large
Volumetric "rice"
Like other knitting options, rice has its own variations in execution.  A slightly modified scheme allows you to obtain a more voluminous canvas. A jacket knitted with such grains of rice looks incredibly beautiful.


Before knitting a product, prepare a control sample. Not only will you use it to count the stitches, but you will also understand which of the two options is right for you for the item.
How to decrease stitches and maintain the pattern
When working on hats, you will be faced with the need to decrease stitches. At the same time, it is necessary that the thing looks harmonious in any place. How to do it?
We begin decreasing in the row where we change stitches from one to another. We do this in pairs.  You will end up with a picture like this on the canvas.
  When you decrease in rows 5-6, it will look like this.
  Despite the fact that the decrease itself is almost imperceptible, there are much fewer loops on the knitting needles. We continue working until we reach the number of loops required to close.
Video: Knitting the “Rice” pattern in the round
Patterns describing knitting products with a “rice” pattern


One of the most popular patterns among knitters, made with knitting needles, is “pearl”. The structure of the canvas he designed resembles small pebbles, which actually explains the origin of its name. Many needlewomen recognize this pattern by other names - “rice”, “1x1 tangle”. In this article we will discuss methods of knitting such a pattern, and talk about in which products this motif can be used.
Learning to knit a pearl pattern with knitting needles (small stones)
For an example of this pattern, cast on an even number of stitches on the knitting needles. We knit small pearls according to the description.
Knit the 3rd row and all odd rows the same way as the 1st row, and perform all paired rows according to the description of the 2nd row.
Same name, different effect. Option No. 2
From the following description you will learn how to make a large pearl pattern with knitting needles. The fabric decorated with it has a more pronounced structure; the knitted “pebbles” are oblong. You can see this for yourself by looking at the photo.

We put the loops on the knitting needles and knit the first row according to the instructions. The description uses the symbol "asterisks" (*). This means that the sequence of stitches indicated between these icons should be repeated until the end of the row. So, let's learn how to knit a pearl pattern with knitting needles (large).
1st row: edge stitch (remove), *knit 1 stitch, purl 1*.
2nd row: edge, *knit a knit stitch above the knit stitch, purl stitch over the purl stitch*. So far the pattern looks like a 1x1 elastic band. Next comes change.
Row 3: edge stitch, *purl stitch over knit stitch, knit stitch over purl stitch*. The stitches shift relative to the previous row.
Row 4: edge stitch, *knit a knit stitch over the knit stitch, and a purl stitch over the purl stitch*. In the next row, repeating the pattern begins from the 1st row.
Pearl (half-English) elastic band: beautiful and original
This version of the pattern is used to design cuffs on products. This elastic band looks interesting and elegant. How to knit a pearl pattern with knitting needles of this type? Study the description.
To complete the pattern, cast on 10 stitches.
Row 1: edge stitch, *knit 1, purl 1*, purl the last stitch.
2nd row: edge, *remove the purl loop of the previous row unknitted, making a yarn over over it, knit the next loop (knit)*.
3rd row: edge stitches, perform knit stitches, knitting them together with the yarn overs of the previous row. Remove the purl stitches without knitting, while making yarn overs.
Knit all even rows according to the description of the 2nd row, and odd rows as described in the 3rd row.

Where to apply?
You have learned three ways to knit a pearl pattern. The canvases made with these patterns have a smooth and dense structure. “Rice”, also known as “wicker”, also known as “pearls”, looks good in items such as jackets, sweaters, and coats. Whatever item you knit, this pattern will give it additional beauty and originality.


