Mittens have always been the most practical and comfortable for cold winters. Today there is a huge selection of mittens in stores for the whole family, but it is much more pleasant to wear things that were created with love with your own hands.
Having learned to knit, you can create entire sets: hat, scarf, mittens. They will harmonize beautifully with each other if they are made in the same style with the same pattern.
I propose to go directly to the discussion of the topic: “how to knit mittens with knitting needles - step-by-step instructions.”
How to knit mittens with knitting needles (step by step for beginners)
In order to learn how to knit beautiful stylish mittens, you need to learn how to knit the simplest ones, on the basis of which you can create the most original models for the whole family.
Seamless mittens - master class with detailed description (photo)
The most interesting thing is that even the lazy can cope with this model. They can be plain, but the author suggests adding a few red stripes for variety.
Popular articles:
For work we will need wool thread (70 g), 5 double needles No. 3.
The product is knitted from top to bottom on five needles, as a result of which it will turn out without a seam. Calculation of the number of loops: 20 x 1,7 = 34 loops. Distribute 34 stitches onto 4 knitting needles. I suggest rounding up and casting on 36 loops, so we get 9 each.
To make the explanation easier, let's give each knitting needle a serial number. Closing the circle, we knit four loops of the 1st knitting needle together with the end of the yarn remaining on the 4th knitting needle from the set of loops, so that the circle closes tightly around the edge.

The thumb will be knitted on the 1st needle, for the left - on the 2nd. To do this, knit the first loop on the 1st knitting needle with a thread of the main color. All other loops, except the last one, are knitted with colored thread. Then we return the loops connected with the colored thread to the 1st knitting needle and knit again with the main thread. We get a colored stroke. This will be the hole for the thumb in the future. Next, we simply knit up to the little finger (about 8 cm).

Then we proceed to decreasing the loops on the toe of the mitten. On the 1st and 3rd knitting needles, at the beginning, we knit the first two loops together with the front one in the second way (at the back walls), having first turned over the 1st loop. On the 2nd and 4th knitting needles we knit two loops together at the end of the knitting needle using the first method (behind the front walls). So we decrease the loops through the circle until each knitting needle has half the number of loops (in our case, when the number of loops on each knitting needle is odd, we decrease the smaller part through the circle - 4 loops), then we decrease the loops in each circle (5 loops). At the same time, on the 1st and 3rd knitting needles, in those rows where we do not decrease the loops, we also turn the first loops over and knit them in the first way. When there are 2 loops on each knitting needle, tighten the loops and secure them on the wrong side.
Now let's get started thumb tying. To do this, carefully pull the colored thread out of the thumb hole. Then we insert two knitting needles into the free loops, we get 7 loops on the lower knitting needle, 6 on the upper knitting needle. We begin to knit the finger, distributing the loops on 4 knitting needles: 4 loops on the first, 3 on the second and pull one loop from the side edge of the hole, on the 3rd and the 4th knitting needle will also have 4 loops (3+1 from the side edge of the hole). To make it more convenient, the end of the working thread can be lowered into the hole (on the wrong side of the product).

We continue to knit the finger in a circle until the middle of the nail, and then begin to decrease the loops in the same way as when knitting the toe of the mitten: on the 1st and 3rd knitting needles at the beginning, on the 2nd and 4th knitting needles at the end, but decreasing We do it in every row. When there is 1 loop left on each knitting needle, we tighten the loops and fasten them on the wrong side.
Left mitten knitted similarly to the right one, but in a mirror image: we knit the hole for the finger on the 2nd knitting needle.
Step-by-step instructions for knitting on two needles
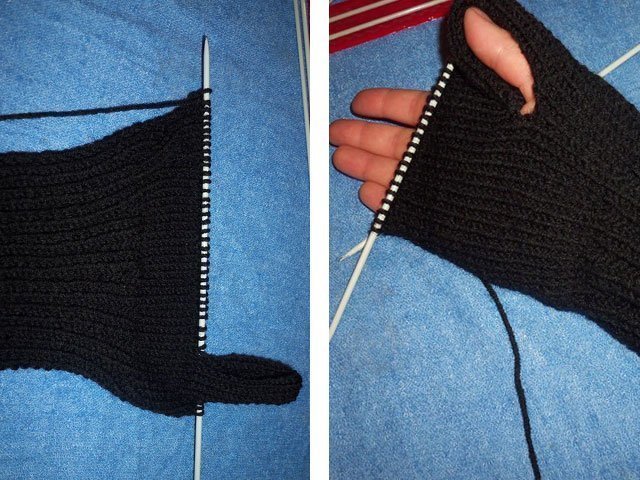
These long mittens can also be knitted on two knitting needles. You can knit two parts separately and then join the halves, but we will consider the option where you only have to make one invisible seam (this will be correct and visually more beautiful).
Needed: yarn, knitting needles, regular and knitting pins, measuring tape, hook, needle.

Let's start with the right part.
We measure the circumference of the wrist, the length of the palm and thumb. It is also necessary to measure the knitting density by knitting a little. We measure how many loops there are per 1 cm. My girth is 20 cm, there are 2 loops in 1 cm. You need 40p-4 = set of 36p + 2 edges.
We start from the bottom with a 2x2 elastic (knit 2, purl 2). It turned out to be approximately 10 cm (15 rows).

Next, we move on to the main fabric, where you can choose knitting needles of a smaller diameter. In the second row, add 4 stitches evenly. Next we simply knit 7 rows to the base of the thumb. You can try on and knit more/less if necessary.
The finger in the mitten is not on the side, but somewhat closer to the palm, so for the right mitten we knit as follows.

- A. - edge, 2p. We knit according to the drawing and remove it with a regular sewing pin.
- B. - For a finger, take 6-7 loops. Depending on completeness. We knit 7 loops according to the pattern, and remove all the remaining ones with a pin.
- V. - we only have 7 thumb loops left on the working knitting needle.
We knit in height with the main pattern, without edges!!! We multiply the length of the finger by 2. My finger is 6 cm * 2 = 12 cm in height. 21 rows came out. WE KNIT THE FIRST AND LAST ACCORDING TO THE DRAWING!!! We return the loops from the large pin to the knitting needle.

We divide all the loops into 2. We remove one part with a pin.

Let's start cutting down.

We knit the purl row according to the pattern. I don't have 20 stitches on my knitting needle. I knit like this: edge, knit 1, knit 2 together, knit 12, knit 2 together, knit 1, purl 1. Total 20 stitches. We shorten this way in each front row until there are 6-8 loops left on the knitting needle. I have 7.

Close the loops and do the same procedure with the second half. To finish correctly, simply knit two stitches together, transferring the knitted one to the main needle.


From these lessons we can conclude that knitting is not that difficult. Knitting mittens requires basic knowledge and a little free time.
Knitted mittens with a pattern (diagrams and description)
Having learned to knit the simplest patterns, you can dilute them with beautiful patterns, giving free rein to your imagination. In the article “” you will find them in large quantities.
And now I suggest switching to more complex mittens with knitting needles (diagrams and descriptions will help you understand this difficult task).
How to knit beautiful mittens with braids for women
Mittens with braids, knitting patterns and descriptions for lovers of the classics.
The braid will be the main decoration. We chose a simple braid, but if you are not afraid of difficulties, you can choose a more complex and original option.
Yarn - acrylic (can be made from angora), approximately 70 g; stocking needles No. 3.5.

Elastic pattern: K2, P2.
Knitting a braid pattern: 8 loops cross to the left (leave 4 loops on the auxiliary needle before work, knit 4 and knit loops from the auxiliary needle).
Cross 8 loops to the right (leave 4 loops on the auxiliary needle while working, knit 4 and knit loops from the auxiliary needle).
Cast on 48 stitches and distribute them onto stocking needles, resulting in 12 stitches on each needle. Knit with a 3.5 cm elastic pattern (if the elastic is not enough for you, knit more than cm).
Then, we start knitting the main pattern. For the convenience of knitting the “braid” pattern, I transfer the loops from the 1st and 2nd knitting needles to one knitting needle. Those. I have the loops distributed over 3 knitting needles (not 4 knitting needles), on the first knitting needle there are 24 loops of the main pattern, and on the 2nd and 3rd knitting needles from the palm side there are 12 loops each.
So, the first row after the elastic begins with a knitting needle with 24 loops, we begin to knit the main pattern.
Rows 1-6: K1, P2, K8, P2, K8, P2, K1, knit stitches on 2 knitting needles from the palm side.
7th row: K1, P2, 8 loops cross to the left, P2, 8 loops cross to the right, P2, K1, loops on 2 knitting needles from the palm side we knit. Repeat rows 1-7 throughout the entire work.

At a height of 10 cm from the beginning of knitting (you don’t have to have 10 cm, everyone’s hands and fingers are different), we form a hole for the thumb. Let's start with the left mitten. On the knitting needle from the side of the palm (3rd knitting needle) we knit 4 knits, remove 6 sts on a pin, put 6 sts on the knitting needle (so that there are 12 left, as before), k2.
We knit the hole for the thumb of the right mitten symmetrically, i.e. on the second knitting needle from the palm side: knit 2, knit 6, slip onto a pin, cast on 6 sts, knit 4.
Toe formation carried out after the little finger on the hand is closed.

For a rounded toe, knit two middle stitches together on each needle.
Decrease stitches in each row until only 1 stitch remains on the needles (4 in total). After this, tear off the thread of the ball and thread it into the needle. Use a needle to pick up all 4 stitches, pull them off and fasten them from the inside of the mitten.
After the two mittens are knitted, we begin knitting the thumb. To do this, remove 6 sts from a pin onto a knitting needle, cast on 6 sts on a parallel row and cast on 4 sts on two side rows. In total, we got 20 stitches, distribute them onto 4 knitting needles (5 stitches per knitting needle).
And we knit circular rows of faces. to the required finger length. We form the toe of the finger similarly to the formation of the toe of the mitten.
Knitting mittens for children
Children really love it when their mother creates, for example, beautiful foxes or bears with her own hands, which they can put on their hands and go play in the snow.
Knitted children's mittens with owls
There is nothing more interesting for a child than mittens with a pattern. He wears such things with great pleasure, so I propose to please the child with wonderful owls.

Materials and tools:
1 skein;
stocking needles No. 1.5;
additional knitting needle or special stitch remover;
yarn needle;
four beads;
thread and needle for sewing on beads.
The mittens are knitted in two threads.
So, we cast on 32 loops, distribute them onto 4 knitting needles (8 on each).
Rows 1 - 10: knit 1 rib. x 1 purl.
11th row: faces.
Row 12: knit; add 2 persons from the broaches. on every spoke
13 - 18 rows: faces.
Row 19: we begin to knit the “owl” on 12 loops of the third and fourth knitting needles. The first knitting needle is knitting; second knitting needle - knitting needle; third needle - knit 4, purl 6; fourth needle - purl 6, knit 4.
Row 20: same as row 19.

21 row: first knitting needle - knit.; second knitting needle - k2, slip 6 stitches onto a pin for the thumb hole, cast on 6 additional stitches, k2; third needle - k4, p2, k4; fourth needle - k4, p2, k4.
22, 23 rows: first knitting needle - knitting needle; second knitting needle - knitting needle; third needle - k4, p2, k4; fourth needle - k4, p2, k4.
Row 24: first knitting needle - knit; second knitting needle - knitting needle; third knitting needle - knit 4, purl 2, remove 2 loops for additional stitches. knitting needle at work, knit the next two knit stitches, then knit stitches. spoke - persons; fourth knitting needle - remove two loops for extra. knitting needle before work, knit the next two knits., then loops on extra. knitting needles, knit 2, knit 4.
25 - 31 rows: first knitting needle - knit, second knitting needle - knit, third knitting needle - knit 4, purl 2, knit 4; fourth needle - k4, p2, k4.
Row 32: same as row 24
33 - 35 rows: first knitting needle - knitting needle; second knitting needle - knitting needle; third needle - k4, p2, k4; fourth needle - k4, p2, k4.
36th row: same as 24th and 32nd.
Row 37: first knitting needle - knit; second knitting needle - knitting needle; third needle - k4, p2, k2, p2; fourth needle - p2, k2, p2, k4.
38 - 41 rows: first knitting needle - knitting; second knitting needle - knitting needle; third needle - knit 4, purl 6; fourth needle - purl 6, knit 4.
Row 39: we begin to decrease. First knitting needle - knit the first 2 stitches together. behind the back wall; second knitting needle - knit the last 2 knit stitches. behind the front wall; third needle - knit the first 2 stitches together. behind the back wall; fourth needle - knit the last 2 knit stitches. behind the front wall. Knit the remaining loops according to the pattern (knit and purl)

When there are only 8 loops left on the knitting needles, tighten them with a needle. For the thumb, transfer the 6 loops removed on the pin to the knitting needle, and cast on 2+6+2 loops from the edges onto three knitting needles.

We knit 12 rows in a circle. Then we transfer all the loops to two knitting needles and begin to decrease: on each knitting needle we knit the first 2 loops together behind the back wall, the last 2 - behind the front wall. We knit the second mitten in exactly the same way - only we leave the hole for the thumb not on the second knitting needle, but on the first.

Sew on bead eyes and enjoy this wonderful new product for winter.
Ideas with bullfinches (embroidery)
Having simple mittens on hand, you can decorate them with original embroidery, which will look great in a children's set.


Video lessons from the best masters
YouTube today has become a real treasure trove where you can find a huge number of educational videos. For example, on Svetlana Bersanova’s blogs you can watch a video lesson for free. And there are quite a few such good authors. You can find a mentor to your liking and receive valuable knowledge absolutely free.
Original mice or white hedgehogs for kids
How to knit mitts
Warm openwork for girls (double mohair)
Interesting two-color minions for a boy 7-8 years old
Jacquard products (video tutorials)
Jacquard with a winter theme is a classic that will always be relevant, so I suggest moving on to the most complex options that require maximum time and attention to detail.
Original knitting with ornaments (Norwegian patterns)
For girls with deer
If you want to learn how to knit a complex but very original “deer” pattern, this lesson with a detailed description will help you.
Men's mittens with arans for little men
If you learn all the lessons we offer, you will be able to fantasize and create products of any complexity: women's gloves without fingers, with a folding top, with a false pattern, from thick yarn and embroidery. Good luck in your endeavors. Try, experiment and pamper your family with pleasant fagots.
Thumb knitting is one of the key points when knitting mittens. There are several ways to knit it.
Knitting the thumb on five needles (mortise hole for the finger)
This method of knitting a finger is suitable for either raised patterns on the mitten on both sides.
After knitting, several rows have been knitted to the beginning of the base of the thumb, we proceed to knitting the thumb.


To form a hole for the thumb, we knit stitches on the first, second and third knitting needles. On the fourth knitting needle we knit 1 loop.

We put 8 crossed loops on the knitting needle.


Thus, a hole for the thumb was formed between the second knitting needle (there are 10 loops on it, including 8 crossed) and the loops collected on the pin (there are 8 loops).

Continue knitting in the round with knit stitches to the top of the mitten. We close the top of the mitten in a way known to you.
Knitting the thumb on 4 knitting needles. 2nd method
This method of knitting a thumb is suitable for knitting mittens with plain or melange thick threads.
After the elastic band is knitted, it is necessary to add loops evenly so that the width of the mitten is equal to the width of the palm of the hand. In our case, 2 loops were added evenly on each knitting needle. That is, there were 44 loops, and after adding - 52 loops (13 loops on each knitting needle).

To knit a finger you will need 2 pins. For the finger, you need to knit the first 8 loops on the 1st needle and transfer it to the pin. Next we continue knitting in the round.

We knit stitches on the 2nd and 3rd knitting needles. On the 4th knitting needle we knit 5 loops, and transfer the remaining 8 loops without knitting to a pin.

And then we continue knitting the mitten itself in the round. In this case, the loops can be evenly distributed on 4 knitting needles. in our case, these are 9 loops on each knitting needle. To avoid holes in the fabric at the junction with the finger, we take a crossed loop from the broach and knit it together with the next loop.

We tie the mitten to the top and close the loops in a way known to you.

Transfer the stitches from the pins onto 4 knitting needles evenly. To avoid holes in the fabric at the junction of the mitten finger with the mitten itself, we cast on crossed loops from broaches. In our case, we had to cast on 4 loops from broaches.

Distribute the loops evenly on 4 knitting needles (in our case, 5 loops on each knitting needle). We continue knitting the finger on 4 knitting needles until approximately the middle of the nail plate of the thumb.

Decrease loops on the thumb: at the beginning of 1 knitting needle, knit 2 loops together; at the end of the 2nd knitting needle, knit 2 loops together; at the beginning of the 3rd knitting needle, knit 2 loops together, at the end of the 4th knitting needle, knit 2 loops together. We also continue to decrease in subsequent rows. Close off the remaining last 2 loops.

Knitting the thumb on 2 knitting needles
Having knitted an elastic band of the height we need, we knit the main fabric to the base of the thumb. On our mitten, the height from the elastic to the base of the thumb is 3.5 cm. The number of loops is 44 (11 loops on each knitting needle). To knit a finger on a mitten for the left hand, we knit the loops on the first knitting needle completely, on the second knitting needle we knit five loops and put them on the first knitting needle. We knit the remaining 6 loops on the second knitting needle and 6 loops on the third knitting needle.


We combine these twelve loops on the second knitting needle for convenience and knit the fabric in height only on the second knitting needle. The length of the canvas is approximately equal to the length of the thumb to the middle of the nail.


Close the loops this way. One loop at the beginning and end in the first and second row (that is, two loops in each row - two rows in a row), and then bind off all the remaining loops. Then the toe at the finger of the mitten will be neat.


Next, we sew the knitted fabric for the thumb from the wrong side and turn it right side out. We continue to knit the main fabric of the mittens. To avoid holes at the junction of the thumb with the main fabric due to stretching of the loops, loops can be pulled out from the broaches. Distribute the stitches evenly on four needles. We got 34 loops - 8-9 loops on a knitting needle.


Knitting the thumb on 2 knitting needles. 2nd method
This method, like the one above, is useful when knitting an ornament or a relief pattern on the finger itself. It is more convenient to knit an ornament on 2 knitting needles than on 4 knitting needles with a small number of loops.
After knitting the mitten cuff, cast on additional stitches evenly so that the mitten fits your palm well.

The finger is knitted in height. In our case, for the thumb, knit 10 loops on the 1st needle.

Turn the knitting and purl these 10 stitches.

We continue knitting in height to the middle of the thumbnail (higher is possible).


Then we restore the number of loops to 10 in our case and add loops, making 2 crossed yarn overs at the beginning and at the end of the row. We repeat through the row. Then we knit the finger to the desired height.


After knitting the finger, we continue knitting the mittens in the round. That is, on the first knitting needle we knit the first 10 loops that fall on the thumb, and continue to knit the remaining three loops. Next we knit in the round on 4 knitting needles. Fold the finger in half and sew along the sides.


Knitting the thumb using a small wedge (knitting an anatomical finger)

This method of knitting a wedge is suitable for knitting the thumb of a mitten with thin or thin threads. This finger is sometimes called a raglan finger.
To knit a thumb, a small wedge is knitted on 5 knitting needles, thereby increasing the width of the mitten in the place where the thumb is located. This ensures a good fit of the mitten and freedom of movement for the thumb. In the photo below, the connected wedge is located on the right. This method of knitting the thumb of a mitten can often be seen on “factory” mittens.

Cast on a stitch on the needles (40+1) (this loop is used to close the row into a circle). Tie the cuff of the mitten, for example, with a 2x2 elastic band. Knit 2-3 rows of the intended pattern.

To begin forming a wedge (expanding the mitten fabric for the thumb) on the right mitten, knit loops on the 1st and 2nd knitting needles. Then on the 3rd knitting needle we make a crossed yarn over, 1 knit yarn over, 1 crossed yarn over, and also knit the remaining stitches. Next, knit stitches on the 4th needle.

Knit 2 rounds. Then increase again on the 3rd needle: 1 crossed yarn over, 3 knit stitches, 1 crossed yarn over. Knit two circles according to the pattern. Another increase on the 3rd needle - 1 crossed yarn over, 5 knit stitches, 1 crossed yarn over. And again knit 2 rounds without adding. The final increase for the wedge on the 3rd needle is 1 crossed yarn over, 7 knit stitches, 1 crossed yarn over. Knit 2 circles (rows). As a result, there are 9 loops per wedge.

Remove these 9 wedge loops with a pin or two pins for convenience.

Restore 7 stitches on the 3rd needle with crossed yarn overs.


Decrease through a row of two loops. That is, at the beginning of the 3rd knitting needle we knit 2 loops together, then 7 knit stitches, 2 loops together, then knit according to the pattern. Then knit a circle (row) without decreasing. Decrease again: 2 stitches together, knit 5, 2 stitches together. The next decrease is through the circle. Decrease until one loop remains from the wedge. Next, we continue to knit the mitten in height.

Scheme for knitting a mitten wedge


To knit a finger, transfer the loops from the pin to two knitting needles. On the opposite edge, cast on stitches on the other two needles. Cast on 1-2 loops from the gaps so that there are no holes in the fabric at the junction of the thumb with the mitten. You should end up with 5 loops on the knitting needle.

Knit the finger up to about the middle of the thumbnail.

Then decrease two loops at a time, knitting together from each edge.

Knitting the thumb on the left mitten is carried out similarly to knitting the finger on the right mitten, with the only difference being that the wedge is formed on the 4th knitting needle.


Thumb knitting using a large wedge (Indian wedge)
The thumb of the mitten, knitted in this way, fits well, thanks to the anatomical arrangement of the parts of the mitten. The Indian wedge is suitable for knitting with thick, fluffy threads. The wedge is knitted on the palm and therefore the ornament is usually not knitted on this side.
After knitting the mitten cuff, knit several rows. Then start knitting a large wedge. In our case, 11 loops were initially cast on each knitting needle. There are 14 loops per wedge. These 14 stitches will later be transferred to knitting needles for the thumb. Therefore, for the mitten itself it will be necessary to restore 14 loops. We will add them one at a time in 14 rows.
A wedge is formed approximately in the middle of the palm of the mitten. To knit a wedge (adding stitches), knit the stitches of the 1st needle without changes. All stitch additions will be made on the 2nd needle for the right mitten. Therefore, on the 2nd knitting needle we knit 3 loops, and then from the 4th loop we knit 2 knit stitches. We knit the remaining loops on the 2nd needle. We knit the loops on the 3rd and 4th needles without changes.


We knit the next row in the same way. Namely, the loops on the 1st, 3rd, 4th knitting needles are knitted without changes. And on the 2nd knitting needle - knit the first 3 loops, from the 4th loop - knit 2 knit loops, knit the remaining loops. We make additions in 14 rows. This will create an additional 14 loops.

We transfer the wedge loops (loops on the 1st knitting needle and the first 3 loops on the 2nd knitting needle, for a total of 14 loops) onto pins.


To knit a finger, remove the stitches from the pin and redistribute them onto 4 knitting needles. Additionally, cast on crossed loops from the broaches at the junction of the finger and the mitten. In our case, the total number of loops will be 20 - 5 loops on each knitting needle.

We knit a finger on 4 knitting needles just above the middle of the thumbnail.

Bind off the thumb stitches by decreasing evenly.


Hi all!
Wait three years for the promised one? But no! I promised - I’ll show you!
Huge request! If you grab it and post it somewhere later, don’t forget to include the author’s name and an active link to the message!
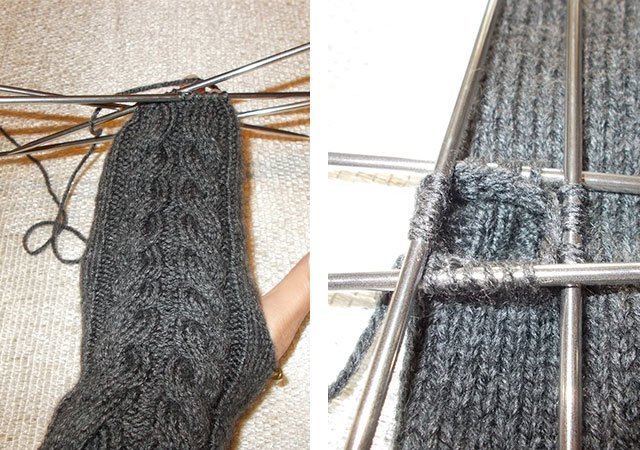
I have knitted a lot of mittens over my long knitting life, no, of course, not as many as the grannies who sell them at the market and knit them themselves, of course, yayyy. But I have my own achievements, which I will share with you today.
Here is my semi-finished product, Alize Lanagold yarn.
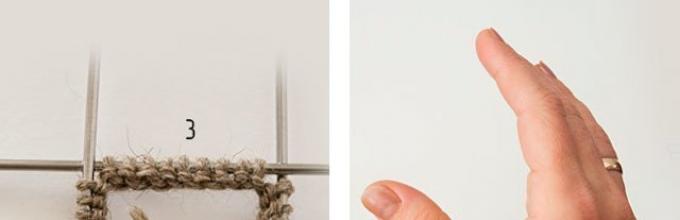
Closer photo of the wedge: 
Now about how I knit wedges. The principle is simple: we begin to knit the wedge at the base of the tubercle of the thumb, knitting 5 loops purlwise, while on the side of the mitten (on the side on which the finger will be knitted), there should be another 1-3 loops left. In the next row we make increases, knitting a loop from the previous row from the broach into the next row. We knit the added loop in the row with a crossed knit stitch so that there are no holes. Knit: P1, k1, increase, k1, increase, k1, p1. I made the next increase after 3 rows. The number of increases depends on the fullness of the hand and the thickness of the yarn. More often my increases go through a row or two, I add up to about 13-15 loops. In this case, I didn’t have to add much - only 3 times, i.e. I got 6 increase loops. We place all the knit stitches on the knitting needle, with the exception of the outermost purl stitches. So, 9 loops are set aside, I cast on 2 loops less than the set aside - 7. I knit 1 row, then the decreases begin: I knit 2 cm of the front one with an inclination towards the center of the wedge in every second row until 3 loops remain from the wedge. In the next row we knit the outermost ones with knit stitches.
Finger. Cast on 7 stitches along the top edge of the finger hole. 
I distribute the loops for the finger on 3 knitting needles: I distribute the postponed loops on two knitting needles, cast on again on one knitting needle. Well, it’s convenient for anyone.
Most often I cast on 1-2 more loops on the sides, but this depends more on the thickness of the yarn. To ensure that there are no holes on the sides of the base of the finger, I knit two knit stitches together. extreme loops of the lower knitting needle, grabbing the thread from the side: 

We knit 3 rows. Then we make decreases on the sides of the finger: we knit 2 cm each. knit 4 times, along the edges of the lower loops (those that were put aside) and along the edges of the knitting needle with newly cast on loops. Continue knitting straight until almost the entire nail is covered (for those who like long nails, it’s the same, just the mittens will be longer). In the next row we knit all 2 stitches. facial. We tighten the loops, cut off the thread and hide it. All! 

In real life there are no holes, and the hand is not visible - the flash “highlighted” it.
That's all, I guess. I hope I was able to convey and not confuse.
I'll post photos of the finished mittens later))).
Many of us wear mittens. Now you can knit them in different ways. Particularly interesting is the knitting method mittens with wedge for thumb. This is the extension that comes right after the elastic band. And in this master class we will knit such mittens.
Mittens, finger wedge
To knit mittens we will need:
- Yarn;
- Knitting needles;
- Needle.
We cast on thirty-six loops on the knitting needles. And we distribute these loops onto three knitting needles (possibly four).
Then we knit several rows in a circle with a regular two-by-two elastic band. That is, we knit two loops with knit stitches and the next two with purl stitches. We knit an elastic band at the desired height.
To make it more interesting, you can change the color of the yarn and knit the elastic in stripes.
Photo 1
After we have finished knitting the elastic band, we will continue knitting in the round using stockinette stitch.
But we will immediately start knitting a wedge for the thumb. And to do this, we knit the first four loops on the first knitting needle. Then we put a mark and knit two more loops. We put the mark again. We tie the remaining loops and the entire row.
Photo 2

We start a new row and knit our first four stitches to the mark. We transfer the mark to the right knitting needle.
Then we'll make an increase. We knit a knit stitch from the broach. We continue to knit all the loops up to the second mark. And here again we tie the front loop into a broach. We change the mark to the right knitting needle. And we finish the row with stockinette stitch.
We now have four loops from mark to mark.
Photo 3

We simply knit the new row in the round without any increments.
Then in the next row we will again knit a knit stitch after the mark, that is, we will perform an increase. Then we knit all the loops to the second mark and again knit a loop (increase) in the broach.
We will already have six loops from mark to mark. We simply knit all other loops to the end of the row.
We knit a new row without increments.
That is, we will alternate a row with increases and a row without them. We always make an increase after the first mark and before the second mark.
In total we need sixteen loops from mark to mark.
Photo 4

Next we knit the first four stitches in the new row. And we lower sixteen loops from mark to mark onto an additional thread. We'll come back to them a little later.
Photo 5

We cast on an additional three loops on the right knitting needle and knit the mitten further in the circle using stockinette stitch.
Photo 6

We must distribute the stitches onto four needles.
And we tie it to the end of the little finger.
Photo 7

We remove the first loop from the first knitting needle, knit the second one and thread our first unknitted loop through it. We simply knit all other loops from the knitting needle.
We knit the loops from the second knitting needle, leaving two loops at the end. We knit the first one and return it to the left knitting needle. We pull the last loop through this loop and lower it. And we transfer the loop from the left knitting needle to the right one.
Next, we knit the loops from the third knitting needle in the same way as from the first. And we knit the loops from the fourth needle as we knitted from the second. And so we knit until there are two loops left on each knitting needle. We collect these loops on a needle and tighten them.
You can reduce it easier.
To do this, we knit the first two loops from the first knitting needle together.
From the second needle we knit the last two stitches together.
From the third needle we knit the first two loops together.
From the fourth needle we knit the last two stitches together.
And so on in every row.
Photo 8, 9


Let's return to the finger. We put eight loops on one knitting needle and eight on the second. Take the third knitting needle and cast on two loops on it from the bottom of your finger.
Then we knit in a circle with stockinette stitch up to the nail. We distribute the loops equally on three knitting needles.
Photo 10

We tie it to the nail and begin to decrease it.
Photo 11

To close the finger, we will knit the first two stitches together on each needle in all rows.
At the end we will tighten the thread and hide it in the knitting.
Like these ones mittens with wedge they work!
Photo 12

I really like knitting mittens. Until recently, I knitted the thumb hole in the usual way, but today there are an incredible number of gorgeous patterns with a thumb wedge, I had to master it. It turned out that everything was much simpler, and the mitten fits more comfortably on the hand, and the pattern on the finger turns out beautiful.

To make a thumb wedge, we determine the middle line of the wedge, which can consist of one or several loops - depending on the thickness of the threads and the size of the mitten. It is wiser to place your finger on the inside of the mitten, along the line of connection of the set of loops, at the level of the lower phalanx of the thumb.

In every third row we add one loop to the right and left of the line. By adding loops, the wedge of the thumb will increase.

We make additions as follows:
First row - on the first knitting needle we knit half the stitches (to the point of the middle of the wedge line), then yarn over. Next row we knit with facial loops.
The second and third rows are performed with facial rows.
Fourth row - knit in the round again, then yarn over, knit 1, and yarn over again. Together with the yarn overs, we got three loops for the future wedge of the thumb.
The fifth and sixth rows are knitted.
Seventh - knit in a circle, yarn over, knit three, yarn over, knit.
Thus, in every third row two loops are added, which in the future will become the wedge of the mitten’s thumb.


The number of additions depends on the thickness of the threads and the size of the product; in some cases, additions are made in every second row.

At the level of the base of the thumb, remove the wedge loops onto a pin or thread of a different color, and continue knitting the mittens in the round.


We knit the finger in the usual way.


The photo (above) shows that when adding loops using yarn overs, holes are formed, which is not desirable when knitting mittens, but our goal is to keep our hands warm. At the end of the article, watch the video that shows how to knit additional loops without creating holes.

Knitting the thumb of a mitten with a wedge is not at all difficult. Now, having mastered all the intricacies of this science, you can start knitting mittens with beautiful patterns. Here is a wonderful diagram for you (from free access on the Internet). Notice what a beautiful pattern is knitted on the thumb wedge, to me it’s just an amazing pattern!

Now you can safely take on knitting mittens of any complexity, it’s no longer scary))).

They can become a worthy decoration for any wardrobe and a wonderful holiday gift. Friends and family will appreciate even basic mittens, especially in this cold winter. So grab your knitting needles and get to work.
Wishing you inspiration and creative success!


