A beautiful and comfortable children's hat is an indispensable thing in a child's wardrobe. Every needlewoman can do such a thing, but it is important to remember that the child's skin is delicate and sensitive, so it is necessary to choose good quality yarn for work and preferably woolen or half-woolen, so that the child is warmer. Knitting will not take much time, the main thing is to purchase materials for work and focus on the pattern.
Children's hat knitting with a pattern
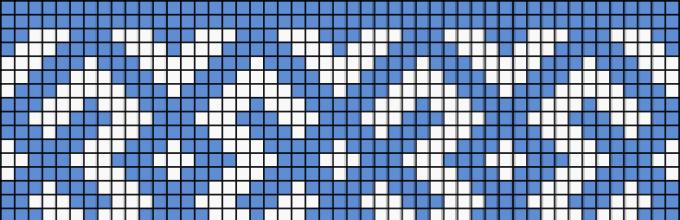
In order to knit a hat for a child with a jacquard pattern, you will need yarn of two colors, for example, white and blue, on the basis that the head circumference is 48 cm, and the child is 2-3 years old, as well as circular knitting needles No. 4.5.
You need to knit according to the scheme: first you need to dial 73 loops with a blue thread and connect them into a ring, knitting the two extreme loops together, then knit eight rows, alternating two front loops with two purl loops, then two rows should be knitted with front loops.
In order to make a jacquard pattern, you need to knit seven rows of facial loops with a blue thread, then you should reduce the number of loops. To do this, all the loops must be divided into four groups, each with 18 loops, marking the boundaries of the groups with a thread of a contrasting color.
In each row, two loops should be knitted together before and after the border. When only eight loops remain, they must be pulled off and secured on the wrong side of the cap. Also, the hat can be decorated, for example, with a pompom.

Hat with ears
Hats with ears are perfect for children in frosty winter weather.
To work, you will need yarn of several colors, as well as knitting needles and a hook. Since the hat with ears will be double, you first need to make the inner hat, and then the outer hat is slightly larger than the inner one.
First of all, you need to dial seven loops and make several rows, adding two loops in each front row on each side. In order to get the “eye” element, you need to knit as many rows until the top row consists of 19 loops, after which you can break the thread and tie the second eye in the same way.
After the second eyelet is connected, the thread does not need to be cut off, but you need to dial 10 loops and knit in such a way as to connect the ears. Then the product should be turned over and continue to knit with purl loops, adding one loop from each edge of the cap.
Then you should knit the required number of rows according to the circumference of the child's head and proceed to knitting the frontal part of the cap. To do this, you need to dial 16 loops and knit in a circle, you should get 72 loops, according to this scheme, 17 rows are knitted.
After that, the number of loops in each row must be reduced by dividing all the loops into seven wedges and reduce the number of loops at the beginning of each wedge. When only four loops remain on the knitting needles, they need to be pulled together with a thread.
The outer hat is formed in the same way, only the number of loops is increased by two, and it needs to be made a little more in height. Then you need to turn the hats on the front side, connect and crochet the edges. You can also decorate the hat with a pom-pom, ties or other elements.


A knitted children's hat can be decorated with either an interesting pattern or supplemented with decorative elements. The possible options will be demonstrated in the video, in which the needlewomen will not only present their models of children's hats, but also reveal some secrets about how to knit a hat with knitting needles.
Video on the topic of the article
Good afternoon, dear reader and needlewoman!
This spring I knitted a children's hat with ears, ties and a pom-pom. I confess that I and my grandson's mother liked the result 🙂 Therefore, I decided to tell you more about luck.
You say - where is the pompom in the photo? Indeed, the hat was photographed BEFORE connecting with the pompom - so that it does not distract from the main process. 🙂
Choosing yarn for a hat
Grandchildren live separately from us, so the choice of yarn for knitting hats was completely on my conscience. In order not to be mistaken, I took a picture of the jacket on the phone. This simple trick helped a lot in choosing the color of the yarn.
As a result, I bought 2 skeins of 100 grams of Alize MIDI mosaic yarn (100 grams = 170 meters, 25% wool, 75% acrylic). The yarn is quite voluminous and incredibly soft. Bribed me and light tweed effect.
Of course, 200 grams is a lot for a children's hat. More than 100 grams of them went to knitting a scarf :). But about this separately.

The manufacturer advises using knitting needles with a diameter of 5 to 7 millimeters. At first I did just that, but the canvas seemed loose, “leaky”. In order not to knit the lining, I changed the knitting needles to three-millimeter ones. And everything suits me 🙂
We knit ears for a hat
We will knit from the bottom up, so the first story is how to knit the ears with knitting needles.

Cast on 4 loops. We knit with the front stitch: the front rows (first, third and all odd ones) are knitted with front loops, the wrong rows - with wrong loops.
In each front row at the beginning and at the end of the row we add one loop - we make a crochet. In the purl rows, we knit the nakida with the purl ones. And so on until there are 16 loops on the needle. Edge loops are also involved in the pattern - we knit them, and not just remove them).

When the first eye is ready, do not close the loops, transfer to a spare needle and start knitting the second.
Ready ears need to be connected).
We connect the ears
We connect the ears together and knit the back of the hat:

We start with the 1st ear, from the front side:
- 1st row: 1 knit loop, yarn over, 15 knit stitches, cast on 18 stitches for the back of the hat, take the second eyelet: knit 15 stitches, yarn over, knit 1. a loop,
- 2 row: we knit all the loops and yarn over;
- Row 3: Knit 1, yarn over, knit 50 stitches in rib 2x2, starting with purl 2, yarn over, knit 1. a loop;
- 4 row: we knit with an elastic band 2x2;
- We knit rows 5 and 6 with a 2x2 elastic band.
Starting from the 7th row, we knit in a circle (with five knitting needles or using circular ones - as you like) 🙂
In order to close the circle, we collect 30 loops and knit about 3 cm with an elastic band 2x2. There are exactly 84 loops on the needles and they are perfectly divisible by 12 (the number of loops in the report).
Let's start knitting the main pattern!
We knit the main pattern
Dear reader, please note that the rapport begins with two purl loops. This means that you need to start knitting the main pattern from two purl loops of the elastic band, then the braids will smoothly “grow” from the facial loops of the elastic band, and this looks great.
The scheme of the main pattern:

In this diagram, I forgot to explain that the cells with vertical lines indicate facial loops, and with horizontal lines - purl.
Forgive my "bump", please!
Our hat is seven repeats wide (84 stitches/12 stitches = 7) and three repeats high.
Having knitted a rapport three times, we begin to decrease the loops, knitting two loops together.
Reducing loops - forming the crown
We will reduce the loops, trying not to harm the main pattern. The actions enclosed between the signs * are repeated.
1 row - 2 out., 2 persons., 2 together out., 6 persons.;
2 row - * 2 out., pattern "tow", 1 out., 6 persons. *,
3 row - 2 together out., 2 persons., 1 out., 6 persons.;
4 row - 1 out., "harness", 1 out., 6 persons. *;
5 row - 1 out., 2 persons., 1 out., 6 persons.;
6 row - 1 out., 2 persons together., 1 out., 6 persons;
7 row: * 1 out., 1 persons., 1 out., 6 persons *;
8 row - 1 out., 1 person., 1 out., "braid";
9 row - 1 out., 1 persons., 1 out., 6 persons.;
10 row - 1 out., 1 persons., 1 out., 2 persons together. behind the back wall of the loop, two facial, 2 faces together. behind the front wall of the loop;
11 row - 1 out., 1 persons., 1 out., 4 persons.;
12 row - 1 out., 1 persons., 1 out., 2 persons together. behind the back wall of the loop, 2 persons together. behind the front wall of the loop;
13 row - 1 out., 1 persons., 1 out., 2 persons together.;
14 row - 1 out., 1 persons..
Pull the yarn through the remaining stitches with your hook and pull off the stitches. Crochet the remaining tail to the wrong side, fasten and cut shorter. Now you can brush off the sweat from your forehead - the hat is almost ready. It remains to knit or crochet the ties and, if you want, make and sew on a pompom (by the way, you can see here,
This is the third part of the master class on knitting a kit for a newborn (and up to 3 months). In the previous parts, I showed how to knit a slider with knitting needles and a blouse for a baby. In this part, I will show you how to knit a hat with ears with knitting needles for this set. As a result, we get a beautiful knitted set that can be worn in early autumn and late spring.
Before knitting a baby hat with ears, you should take two measurements:
head girth
and the distance from the eyebrows to the crown.
The girth of the head is measured by the maximum circumference passing in front through the superciliary arches and behind through the protruding part of the occiput. The distance from the eyebrows to the crown indicates how deep the cap should be.
Since we are knitting a set for a child from 0 to 3 months, the size of things should be a little for growth.
Children's hat with ears and ties, knitting needles - a diagram and a step-by-step description:
On average, for a three-month-old child, the head circumference is 42 cm, and the depth of the cap is 14-16 cm. Taking into account the fact that the cap should fit snugly, but not tight, on the baby’s head, it is necessary to dial 95 sts with green yarn on knitting needles No. 3, which corresponds to 41 cm. Next, you should knit 8 rows with an elastic band 1 × 1.
After that, go to the knitting needles No. 4 and knit with the “columns” pattern, always performing the 2nd and penultimate loops of the front in the front rows and purl in the purl. In the first row, the gum field needs to be reduced so that the canvas does not become too wide.
1 chrome., 9 p pattern "columns", starting with the faces. sts, 3 sts together, *15 sts, 3 sts together** × 5 times, 9 sts, 1 chrome. At the same time, 3 p together should be knitted with a rearrangement and the central person. p: Swap the 1st and 2nd loops on the left needle, and then knit them with the front together with the 3rd loop. 

Next, knit a flat fabric 8.5 cm from the typesetting edge. After that, you need to start rounding the cap. To do this, in each 4th row, knit 3 stitches together (with a permutation) according to the scheme:
Knitting pattern

Only individuals are shown in the diagram. ranks. In out. rows, all loops must be knitted according to the pattern. Rapport repeat 4 times.
Legend:
When the height of the fabric from the typesetting edge reaches 17 cm (after tightening, the depth of the cap will decrease), and 25 sts remain on the knitting needle, pull the working thread through them with a long hook and tighten.


Knitting ears for a hat. In order for the hat to reliably protect the child from the wind and not slip on the face, it is recommended to supplement it with ears and ties. To do this, 95 p of the typesetting edge of the product must be divided into 5 equal parts of 19 p each: 2 frontal (19 + 19 = 38), 2 for the ears (19 p each), 1 behind (19 p).
Since the back of the cap will be divided into 2 halves by a seam, its loops should be divided in half, and the remainder should be added to the frontal part.
19:2 = 9 (remainder 1)
38 + 1 = 39
Thus, the loops are distributed as follows:
right back - 9 p;
right ear - 19 p;
frontal part - 39 p;
left ear - 19 p;
left back - 9 p.
Along the typesetting edge, mark the borders of all parts with markers or pins. Then, with knitting needles No. 3, cast on the loops of both ears. 
Knit 3 cm with a “columns” pattern. 
After that, make a decrease in every 2nd row from the right and left edges of each ear 7 times, 1 p. 
When there are 5 sts left on the needle from the ears, cast off all the loops. 
At the ends of the ears, fasten ribbons or long pieces of yarn woven in the form of a pigtail. Sew the edges of the cap with a vertical knitted seam. At the end, crochet or use a needle with a large eye to hide the remaining ends of the yarn. 
Double winter hat
Competition work No. 38 - Double winter hat (competition conditions)
The double winter cap is connected according to the description from the site of the Country of Mothers. Cap Description
The hat is knitted.
For knitting, I used NAKO bambino threads (25% wool and 75% acrylic, 50 grams / 130 meters) in 2 colors - white (top of the cap) and pink (inner cap). Knitting needles No. 2.5 yarn consumption per cap is less than 100 gr.
Description and scheme
I started with ears, with one shell, in the next rapport, an increase along the edges, shells from 3 loops, the third rapport is 3 full shells. After the ears, I got the loops on the forehead and the back of the head. The pattern was knitted with straight knitting, 4 rapports without decreases, the 5th of five loops - four, the sixth of 4-three loops, then two together and pulled off. 6-7th and 12-13 row knitted with pink threads. Around the cap, I typed loops on the circular knitting needles and knitted several rows of the wrong side with a pink thread. Turned out to be a wheel. I made a pom-pom out of threads of two colors, sewed to the hat. The ties are connected with the wrong side of the 3rd row, a rudder is also obtained. The inner cap is crocheted of pink threads with front stitch and sewn to the outer cap.
Hat for a girl. Spokes.
I propose to learn how to knit a children's openwork double hat:
This model is related to the age of 1.5-2 years.
Used: ALIZE yarn 100% wool, knitting needles No. 2.5, hook No. 2.5, knitting needle.
Start - Italian set for one knitting needle - 194p.
2.
We continue with a double elastic band (hollow inside) 20 rows (it turns out 10 rows in the inner and outer canvas).
Now you need to combine a double elastic band into one canvas, we do it this way: 1 chrome.p. , we knit the front loop of the outer fabric with the wrong loop of the inner fabric together with one front loop, and so on all subsequent loops., 1 chrome p. As a result, we have a single canvas of 96 + 2 chrome on the knitting needle. loops.
Then 1 row - facial loops.
3.
2 row - purl loops
We start knitting the 3rd row according to the scheme, only in this row we make yarns, but we do not decrease the loops, it turns out - with yarns we add 48 loops = 146 loops of the fabric (144 = 8 rapports from the scheme + 2 chrome.) rapport = 18 loops.
Then we knit everything according to the scheme, purl rows-loops according to the pattern, nakida-purl.
At a height of 15 cm from the elastic, we begin to reduce the loops for the top. We continue to knit according to the scheme, only now we decrease the loops, but we do not make yarns. And the middle of the rapport, where the sections of the front loops, we knit 3 sts together with the front. The top turns out to be a beautiful flower.
4.
5.
The top openwork hat is finished.
Let's start working on the inner hat.
On the inside of the product, along the upper edge of the double elastic band, we collect 98 loops on the knitting needle. Next, we knit with the front surface - the front side - the front loops, the wrong side - the wrong loops. At a height of 13 cm from the elastic, we divide the canvas into 6 equal parts (6 by 16 loops \u003d 96 + 2 krom.p.), we knit the middle of each sixth part in 2p. together the front one, after one row we knit the same centers 3 sts each. together the front one and so on until the loops are completely reduced, 8 loops remain on the knitting needle - we collect them with a needle and fasten the top with a thread.
6.
Let's start making a bubo: From thick cardboard we cut out two circles with a diameter of 10 cm, inside each circle we cut a hole with a diameter of 3 cm, put both resulting rings together and wrap them with thread so that the inner hole is completely filled. Then we cut the threads around the circumference so that the rings of cardboard become visible. We slightly push the rings apart so that it is possible to fasten the threads with a cord (we crochet a pigtail, or a thread in two additions), we tie it securely with two knots. Remove the rings carefully. Shake the bubo to straighten the threads and adjust the shape with scissors. We fix the bubo on the top hat. Everything - the product is ready! I wish you creative success! Author Julia.
knitted hat for girls

Size 51-52
Candy threads (Vita), 100% wool, knitting density 10 cm X 22 p, 10 cm X 32 rows, about 200 grams without pompom, stocking needles No. 3.
Pattern 1: 
Pattern 2:
* Knit 2 together, yarn over * repeat from *
On knitting needles No. 3, cast on 112 loops with an additional thread of a contrasting color, distribute knitting on 4 knitting needles, 28 loops on each. After that, with the main thread, knit an inner cap with a 2x2 elastic band. At a height of 3 cm, knit a row with pattern 2, leaving holes for the ears in this way: knit 16 loops with pattern 2, then close 16 loops with an additional thread, turn knitting and cast on 16 loops with an additional thread, then knit the cast-on loops with the main thread and continue pattern 2 for another 48 loops to the second eye. Make a hole for the second eye and continue knitting with pattern 2 on the remaining 16 loops.
Next, we knit the outer elastic band 2x2, at a height of 3 cm, go to pattern 1 while adding one loop of each 7th loop. It turns out 128 loops. At a height of 10 cm of pattern 1, we begin to decrease. We decrease evenly, 2 loops on one knitting needle through a row. So that the decrease is not noticeable, we knit 2 loops together with purl loops, alternating "before the braid" and "after the braid". After there are 2 purl loops between the braids, decrease the loops on the braids evenly, leaving a total of 4 loops in the braid. Pull off the remaining loops.
After completing the top hat, knit the ears. Remove the extra thread, distribute the loops on 4 knitting needles, 8 loops on the knitting needle. At a height of 5 cm, start decreasing on the sides, in the manner of mittens. On the remaining 4 loops, knit the ties, on 2-hose knitting needles, facial loops, without turning the knitting.
After the ears, we remove the additional thread of the typesetting row, distribute the loops on 4 knitting needles, 28 loops on each, and knit the inner cap with the front surface. Considering that pattern #1 of the top cap tightens the knitting, there is no need to add loops on the inner cap. Knit 10 cm in stockinette stitch, divide knitting into 8 parts and start decreasing in each part. In this case, it should be borne in mind that the width of the inner cap is 16 loops less, so you need to decrease not through the row, but less often, constantly comparing the inner cap and the outer one. At the end of the inner cap, pull off the remaining loops.
Making and sewing on a pompom
SPOKED: MODEL OF A CAP WITH EARS WITH A PATTERN FROM LARGE BRAIDS
Hat for a girl with knitting needles: a model of a hat with ears with a pattern of large braids
On cold autumn days, a cozy warm hat is indispensable.
Please your baby with a bright knitted new thing, especially since even a beginner needlewoman can easily master this model.
To do this, you will need needles 2.5, circular needles 2.5 and 3.5 and some yarn (about 75 grams is a little less than one skein).
When choosing yarn, you should pay attention to the composition, it should not prick and at the same time be warm and comfortable to wear.
The pom pom is made from leftover yarn, but you can use a fur pom pom instead, which is very fashionable this season. See below for a detailed description of the model and knitting pattern.
SPOKED WITH BRAITS I HEART CABLES
Knitted baby hat with braids I heart cables
Hats with braids are relevant not only in women's fashion, but also among little dandies and fashionistas, and the knitted braid pattern looks equally beautiful on both girls and boys.
We suggest you knit a baby hat with knitting needles of a universal and very beautiful style, which will suit both a boy and a girl.
The children's hat with knitting needles is presented in two versions: with ears on ties and the usual classic form.
So we buy yarn, everything you need to knit this model from the list, and go ahead!
Let your kids be the most fashionable this winter!
Children's hat knitting pattern and description:
Children's hat knitting with a pattern of curls
A cute knitted hat with an unusual pattern will become a real decoration of the winter wardrobe of a little princess.
Pick up yarn in delicate shades in pink and lilac tones so that the curl pattern is clearly visible, and start knitting!
In such a hat, you can walk with your child for a long time and the ears will always remain closed.
Knitted hat for children: diagram and description
SPOKE: HAT MODEL WITH SPIRAL BRAITS
Looking at the model of this hat, it is simply impossible not to fall in love with it!
No matter how you look at it, it's just perfect!
White color and spiral braids make this hat simply charming, and thanks to the soft yarn, the child will always be warm and comfortable in such a hat.
Knitting children's hats for every mother is always a pleasant experience, and we wish you patience and inspiration! We look at the description of knitting hats, and get to work.
sourceKnitted hat with ears
Warm and elegant hat, and most importantly covers the ears - ideal for your child.
Hat size for head circumference 55 cm.
Description of knitting hats
Hat for girls "funny pom-poms" knitting
It is slowly but steadily getting colder every day, it's time to think about knitting such a cute hat for your daughter that will reliably warm her ears from the cold.
To make it, we need (head circumference 52-54): pink Troitskaya yarn (135m / 50g) - about 200 grams, however, you can choose the color you want; knitting needles No. 3 and No. 2.5 - for ears and gum; a few beads.
Description of work
The outer part of the cap: we collect 122 loops on the knitting needles (120p - drawing, 2p - edge)
1 r: edge, * 4 LP, 7 PI, 1 LP, 6 PI, 1 LP, 7 PI, 4 LP *, repeat from * to * 4 times, hem.
2p: according to the drawing.
3p: edging, * 4 LP, 3 PI, 2 knit together with a tilt to the right, 5 LP, yarn over, 2 LP, yarn over, 5 LP, 2 knit together with a tilt to the left, 3 PI, 4 LP *, repeat from * to * 4 times, edge.
4 p: according to the drawing.
5p: hem, * 4 LP, 2 PI, 2 knit together with a tilt to the right, 5 LP, yarn over, 4 LP, yarn over, 5 LP, 2 knit together with a tilt to the left, 2 PI, 4 LP * repeat from * to * 4 times , edging.
6p: according to the drawing.
7p: edging, * 4LP, 1 PI, 2 knit together with a tilt to the right, 5 LP, yarn over, 6 LP, yarn over, 5 LP, 2 knit together with a tilt to the left, 1 PI, 4 LP *, repeat from * to * 4 times, edge.
8p: according to the drawing.
9r: edge, * 3 LP, 4 loops are removed on the right knitting needle, 3 loops are removed on an additional knitting needle before work, we transfer 3 LP from the right side to the left and one to an additional knitting needle, we knit two together with the front one with an inclination to the right and the remaining loops with an additional knitting needles, knit 3 with the main needle, yarn over, 8 LP, yarn over, remove 3 loops on an additional knitting needle before work, knit 3 knit from the main knitting needle, knit 2 from the additional knitting needle, remove the remaining loop on the left knitting needle, knit two knit together with a slope left, 4LP * repeat from * to * 4 times, edge.
10 r: edge, * 4 PI, 6LP, 10 PI, 6 LP, 4 PI * repeat from * to * 4 times, hem.
11 p: hem, * 3 PI, 1 LP, remove 3 loops on an additional knitting needle before work, knit 3 purl loops from the main knitting needle, purl 3 from an additional knitting needle, 1 PI, 8 LP, 1 PI, remove 3 loops on the right knitting needle , remove 3 loops on an additional knitting needle before work, return 3 loops from the right knitting needle to the left and knit them purl, 3 purl loops from the additional knitting needle, 1 LP, 3 PI * repeat from * to * 4 times, edge.
12 p: according to the drawing.
13 p: edge, * 1 LP, yarn over, 5 LP, 2 knit together with a tilt to the left, 3 PI, 8 LP, 3 PI, 2 knit together with a tilt to the right, 5 LP, yarn over, 1 LP * repeat from * to * 4 times, edge.
14 p: according to the drawing.
15 p: edge, 2 LP, yarn over, 5 LP, 2 knit together with a tilt to the left, 2 PI, 8 LP, 2 PI, 2 knit together with a tilt to the right, 5 LP, yarn over, 2 LP * repeat from * to * 4 times, edge.
16 p: according to the drawing.
17 p: edge, * 3 LP, yarn over, 5 LP, 2 knit together with an inclination to the left, 1 PI, 8 LP, 1 PI, 2 knit together with an inclination to the right, 5 LP, yarn over, 3 LP * repeat from * to * 4 times, edge.
18 p: according to the drawing.
19 p: edging, * 4 LP, yarn over, remove 3 loops on an additional knitting needle before work, knit 3 knit from the main knitting needle, knit 2 from the additional knitting needle, remove the remaining loop on the left knitting needle, knit 2 knit together with a slope to the left, 8 LP , remove 4 loops on the right knitting needle, remove 3 loops on an additional knitting needle before work, transfer 3 front loops from the right knitting needle to the left and 1 to the additional knitting needle, knit 2 together with the front one with a slope to the right and the remaining loops from the additional knitting needle, 3 LP with main, yarn over, 4 LP * repeat from * to * 4 times, edge.
20 r: edge * 5 PI, 6 LP, 8 PI, 6 LP, 5 PI * repeat from * to * 4 times, hem.
21 p: hem * 4 LP, 1 PI, 3 loops slip to the right side of the knitting needle, slip 3 loops to an additional knitting needle before work, return 3 loops from the right knitting needle to the left and knit from the wrong side, 3 wrong loops from the additional knitting needle, 1 LP , 6 PI, 1 LP, remove 3 loops on an additional knitting needle before work, knit 3 purl loops from the main knitting needle, purl 3 from an additional knitting needle, 1 PI, 4 LP *, repeat from * to * 4 times, edge.
22 p: knit according to the pattern.
Rows 23 to 42: Repeat Rows 3 to 22.
From 43 to 58 row: repeat rows from 3 to 18.
59 r: edge, * 4 LP, yarn over, 5 LP, knit 2 together with a tilt to the left, 8 LP, 2 knit together with a tilt to the right, 5 LP, yarn over, 4 LP * repeat from * to * 4 times, hem.
60r: knit according to the pattern.
61st and 62nd row: repeat 1st and 2nd rows.
Next, we switch to knitting needles No. 2.5 and knit with an elastic band (2x2) for another 16 rows, and then with an elastic band (1x1) for another 2 rows we close the loops with the front ones on the front side.
The inside of the cap: on the wrong side of the closed edge of the outer side of the cap, we collect 121 loops along the ribs on knitting needles No. 2.5 and knit with an elastic band in the reverse order. That is, 2 rows with an elastic band 1x1 and 16 rows with an elastic band 2x2, then we switch to knitting needles No. 3 and knit 24 rows with front stitch, while in the first row we evenly decrease 8 loops.
Next, we knit tightening rows: hem, 3 knit together to the end of the row, 1 hem. Reverse row - all purl so we knit two more times, and we tighten the remaining loops.
Assembly: we sew the cap along the entire length, turn the inner part inside out and fasten the upper edge of the elastic band of both parts of the cap. And, for a more reliable fixation of the layers of the cap, we fasten them by sewing on beads. We tighten the crown of the upper part.
Ears - ties: at a distance of 12 loops from the middle seam, we collect on the wrong side of the cap (under the pigtail of the closed edge) with knitting needles No. 2.5 24 loops and knit with an elastic band 2x2 14 rows. We close on each side of the ear 1 loop 2 times. Next, we knit another 25 cm on the remaining loops. Two tightening rows and close the loops.
We knit the second ear symmetrically.
Next, you need to make 6 pom-poms and two flagella about 20 cm long. At the same time, we attach two pom-poms to the ends of the ear-strings, and fasten the remaining four to the flagella and sew the hats to the crown.
All the hat is ready in it. Your child will feel warm and cozy even in severe frosts.
Scheme and symbols.
Original entry and comments on
A hat with ears looks great and original at any time of the year, which means you should learn how to knit it and stock up on such hats. It is best to crochet a hat with ears from soft yarn and preferably if 100% wool is used. There are a lot of good yarns on the market right now that don't prickle at all and hold their shape well throughout the season. The main thing is not to save on yarn, because a do-it-yourself crocheted hat with ears will cost in any case cheaper than purchased in a store.
Dear needlewomen and those who are just starting to get acquainted with this ancient art of knitting. You have a difficult (but quite achievable) path to mastering this craft, after which you will be able to create real masterpieces in the fashion world!
The modern world today offers a lot of interesting ideas for decorating a knitted hat. Consider the newest and trendiest options that will be worn this year:
- Hat-toy with ears. This hat is perfect for kids too. It can be made in the form of a cartoon character, or any animal. They are worn by both teenage girls and older ladies. The original thing can be done quite simply. A little imagination, and a new exclusive model flaunts on your head.
- Hat with ears and pompom. A very popular item these days. For girls and older girls will be a great option. Large pom-poms have been at the top of popularity for several years and are not going to lose ground. They can be at the top, even at the very base of the cap. By the way, pompoms can be either two or three.
- Classic hat with ears. Such models fell in love with both the youngest and adult girls. Even ladies in years are happy to try them on. "Cool" ears can be triangular and round.
- Cap-helmet with ears. Great idea for crochet. Recently, it has become increasingly popular. If in the late 80s and early 90s only boys wore such hats, then modern needlewomen skillfully adapted them for girls as well.
Hats with ears, models from our website
Hat with ears
The work of Anastasia ams-kmv75. We start knitting cap from the crown, we collect several loops - a chain, we connect in a circle and then we knit according to the attached scheme.

Hat with ears for a girl
The work of Olechka Kuts. Hat for daughter crochet with cat ears. The hat is knitted from 100% cotton Semenovskaya LILY 400m/100g, almost the entire hank is gone. I used the hook No. 1.5 to make the cap tighter.

Knitted hat with Teddy ears
The work of Alena T. Let me introduce you to the Teddy hat. Once upon a time I saw the same one on the Internet, but unfortunately I don’t remember where, so I decided to write a description myself. I knitted from Nako yarn (in my opinion, Sirius), in itself a yarn from a double thread, but I knitted it twice, that is, in four threads, hook 4. It took about one skein for two hats.

Children's hat with Leo's ears
The work of Galina Lukerina. Children's hat Lyova for a boy with a lining. Head volume 46 cm. Yarn: main Alize baby (100% acrylic) took a little more than 50g; for finishing I used the remnants of black, mustard, orange and brown yarn (unfortunately I don’t remember the names); white yarn Pekhorka “Children's novelty” (100% acrylic). Hooks 2.5mm, 2mm, 4.5mm.

Hat with ears and crochet snood
Works by Anna Kuznetsova. A cap and snood. Are connected on the girl 1, 5 years. Threads “Diamond” - it took 1.5 skeins of gray and a little pink, as well as a little pink fleece for the lining.

Children's hat with Minnie's ears
Anastasia's work Hat "Minnie" for a girl is crocheted based on the Disney cartoon. Hand knitted yarn Nako Bambino 50 g/130 m was used for the product.

Crochet animal hats with ears
Works by Galina Lukerina. All hats are knitted from children's acrylic, hook No. 2.5. One hat took about 100 grams of yarn. I knitted the basis of the hats according to one pattern 1. I knitted the mouse hats as a gift for twins for a year. The ears are a regular circle, double, the caps are decorated with buttons.


Cap - owl with crochet ears
Evgeniya's work. Hat "Owl" - a very simple model. Knitting begins from the crown with single crochet stitches (see diagram). You can knit and monophonic, this is optional. The size depends on the thickness of the threads and the size of the child's head.

Crocheted bunny hat with ears
Artwork by Yulia Galetskaya. Introducing my new work cap for spring for a 1.5-year-old daughter “Bunny”. I crocheted a hat No. 3 from threads of 20% wool and 80% gray acrylic (I don’t remember the brand), 100% pale pink acrylic “Yarn from Troitsk”. Knits easily and quickly according to patterns.

Sheep hat with ears
The work of Ludmila Davydova. I love knitting very much. This lesson came to me with the birth of my second child - my long-awaited daughter.
I'll tell you a secret - I love knitting hats. I knit according to my mood, I definitely need mood and inspiration, without this I can’t create or get up. Strictly according to the description, I don’t like knitting, I like to fantasize, invent something of my own. So my work is completely simple in execution, just supplemented with small accents.

Crocheted hat with ears and mittens
Works by Natalia Khromykh. With the onset of cold weather, the question arose of a warm hat. I wanted her to be beautiful too. I rummaged through the Internet and found a Mini mouse hat, scarf and mittens. That's what happened! The bottom of the hat was knitted according to Figure 1.2 in the diagram. To the desired depth, she knitted an article with a crochet (for a head volume of 48-50 cm - 17 cm).

Children's hat Mouse with ears
Beanie “Mouse” is double: the inner-Diamond in 2 threads is knitted with half-columns, gray - “Children's whim” in 2 threads - columns with one crochet. Author Svetlana.

Knitted hat with Kitty ears
Knit a hat in the form of your favorite cartoon character for your baby. Based on this description, you can knit a hat for a bear, bunny, tiger, etc.
- Knitted hat size: for OG 48 cm.
- Knitted hat height: 13 cm.
You will need: 60 grams of cotton thread and a hook of a suitable size.

When we are looking for a description of a hat with ears, we do not always mean that the ears should be on top)) I.e. the cap can also have ears at the bottom, they protect the ears of our children from wind and cold. Of course, hats with ears can be worn by both adult women and men. Next comes a selection of hats not with decorative, but with protective ears.
Hat for a boy with ears
Roxanne's work. Autumn hat for a boy 1.5-2 years old, knitted from Kamtex Nadezhda threads, hook No. 3.

Knitted hat with pompom ears
The work of Olga Izutkina. baby hat braids. Knitted from yarn 50% acrylic, 50% wool, head circumference 48-50, hand-sewn fleece lining, natural raccoon fur pom-poms, tied to ribbon bows for easy washing. This model can be knitted for both girls and women.

Crochet baby hats with ears
Tamara's work. Beanies knitted from different quality yarns, but mostly from Alize lanagold. Hook number 3. The pattern is very interesting: simple in execution and unusual in the end result. You can tie the ears if you wish. The model is suitable for both a boy and a girl, the main color scheme.

Hat with Owl ears
Artwork by Olga Arikainen. Hat - an owl is knitted from mohair. Yarn ANGORA GOLD (10% mohair, 10% wool, 80% acrylic), 550 m, 100 gr. Knitting in two strands, hook 3 mm.

Hat with ears Berry mood
The work of Tatyana Sakadina. I want to show you one more of my work. More precisely, even two - two small sets, which I called "Berry mood". I knitted sets for my daughter, at the age of 2.5 years. I was inspired to knit these hats by the work of a craftswoman under the nickname TIM (there are a lot of her works on the Internet).

Winter hat with ears for a girl
The work of Galina Lukerina. Cap for head circumference 50 cm. Double cap. The lower one is made of 100% acrylic, the hook is 2.5 mm, I knitted from the leftovers, so I can’t say exactly how much it took. The upper part and ears from Alize Lanagold, hook 4.5 mm, it took a little more than 50 gr. Snowflakes are crocheted from Iris, hook 1.5 mm. I also used white beads and laces for ties.

Children's autumn hat with ears Tenderness
Children's autumn hat "Tenderness" - the work of Yulia Lekarkina.
Tied to a 8 month old girl. You will need: 1 skein of Alara “Lanoso” yarn (50% acrylic, 50% cotton) white, leftover pink yarn for the flower, hook No. 4. and 2.5.

Crochet hat with Owl ears
Another version of the hat is owls with ears. Job Natalia Trusova. The hat is knitted from Pekhorka acrylic yarn in 2 additions, crochet No. 4.

Knitted hat with ears, decorated with butterflies
Knitted hat with butterflies - the work of Olga from Irkutsk. The hat is crocheted with LAMA BABY “Baby” yarn (merino wool 30%, acrylic 70%) and crochet hook No. 1.3.

Hat with ears in Regia sock yarn
Hat size: for 3-5 years, head volume - 50 cm.
You will need: 70 grams of woolen threads (regia sock yarn was used in this model), hook No. 3-3.5.

Hat with ears video master classes
Hat with ears crochet for beginners
The hat is knitted on the OG 57 cm, without any reductions or additions. The hat took 1 skein of purple thread and a little yellow. Threads Yarnart Gold (100gr/400m, acrylic and 8% metallic). Hook number 4. Knitting a hat with ears begins with an elastic band from single crochets.
Hat - cat with crochet ears
The hat is knitted on the OG 50 cm, without seams, from top to bottom. Yarn Pehorskaya "Children's whim" (50% wool, 50% PAN (fiber), hook No. 2.1.
The video should load here, please wait or refresh the page.
Hat with crochet ears
The children's hat is knitted on OG 50 (it took a little more than a skein of the Trinity "Snowdrop", 100% cotton), hook No. 4.
The video should load here, please wait or refresh the page.