Ideas for knitted items for little princesses are simply amazing in their variety. Dresses, sundresses, bodysuits, booties, caps, sets for baptism and discharge - all this can be crocheted or knitted. Yes, some things require experience and patience, but beginners can take simple models that look no less impressive on a child.
Adorable openwork cap for a newborn baby
If you have skills in crocheting, then making such a cap with your own hands will not be difficult. Beginners can also try to knit it, since the openwork pattern here is not too complicated and will certainly be possible for those who are taking their first steps in such needlework.
Materials
- White cotton yarn – 50 g.
- Pink cotton yarn – 10 g.
- Crochet hook No. 2.
- Satin ribbons for ties – 70 cm.
The model is ideal for discharge in the warm season or for summer walks
Size
The cap is suitable for a child from birth to three months.
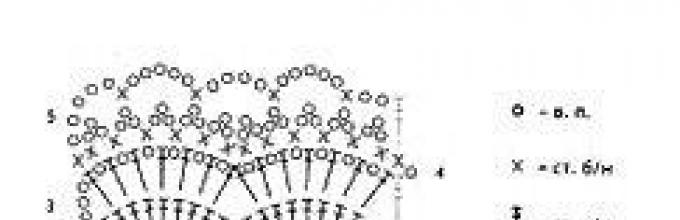
Scheme

Openwork pattern scheme
Description
1. Donyshko
Knitting starts from the bottom. To do this you need to make a chain of 10 air. loops and close it into a ring. The next row will be 16 stitches. with double crochets (Fig. 1).

Knitting the bottom (Fig. 1)
In the third row you need to knit two stitches from each loop. with double crochet (32 pcs.). In the fourth row, increases (two columns from one loop) are made through 2 loops, in the fifth - through 3 loops, in the sixth - through 4 loops, in the seventh - through 5 loops. The result will be a circle (Fig. 2).

Knitting the bottom step (Fig. 2)
2. The main part of the cap
The beginning of the main part begins with tying the circle with arches. Arches are made of 5 air. loops and knit in every fourth stitch. A small section (about 2 cm) should be left untied.

Tying the bottom with arches made of air loops
After this, you need to turn the knitting and start tying the work with an openwork pattern according to the pattern.

First row of openwork pattern
Next, you need to knit as many rows according to the pattern as needed to the desired depth. For a newborn baby, 4-6 rows should be enough, but you need to take into account the thickness of the threads and the size of the hook. If possible, it is better to try on the product.

The main part is finished with an openwork pattern
Then you need to tie the cap along the bottom edge so that you can insert a ribbon for the ties. The first row of strapping is st. without a crochet, second - art. with two or more yarn overs (you need to focus on the width of the ribbon). At this stage the thread is cut.

Knitted border for threading ribbon
3. Finish
First you need to tie the bottom. The binding is done according to the openwork pattern. The tying thread is attached at the location indicated by the arrow.

Now you need to take pink yarn and decorate the edge of the bottom binding with one row of st. without a crochet. The same binding is done along the front edge of the cap. A ribbon is inserted into the border along the bottom of the cap. The work is finished.

Decorating the product with pink yarn

The cap is ready!
Crochet summer set for girls (dress, panties, Panama hat)
Size
The set is designed for a child from 0 to 3 months.
Materials
- Yarn 100% cotton (white) – 150 g.
- Yarn 100% cotton (turquoise) – 50 g.
- Buttons – 2 pcs.
- Underwear elastic (needed for panties).
- Crochet hook No. 3.

This beautiful set for your baby will be indispensable on warm summer days.
Scheme

Rice. 1

Rice. 2

Rice. 3
1. Dress
The dress needs to be knitted from the yoke. First you need to cast on 44 stitches. Every 11th loop you need to notice and then make increases (one loop at a time) before and after these loops. For a square yoke you will need 4 rows. Next will be one row according to the hem pattern (Fig. 2). After this, you need to set aside the loops for the sleeves; they are knitted in one row according to the hem pattern. When knitting sleeves, you need to make up five air. loops for armholes Then you can continue knitting the hem (14 rows with white threads + 1 turquoise). To finish, you need to tie the neckline next to the st. without a crochet.
2. Panties
The front and back parts must be started in the same way - a chain of 10 air. loops (white thread). The back part consists of 10 rows (one increase must be made in each row).
We knit the front part like this: two rows without increases, attach the thread to the beginning of the back part and knit, making increases every other row. Having knitted eight rows, you need to combine both parts and knit four rows in a circle.
To finish, the panties are tied with turquoise thread on top (three rows of 1x1 raised elastic). You need to thread a linen elastic band into the harness to keep the panties in place.
The step edges of the panties are decorated with turquoise thread in one row of st. without a crochet.
3. Panama hat
The bottom of the Panama hat starts from the ring (10 air loops) and continues knitting st. single crochet according to the pattern (Fig. 1). After this, you need to knit 8 rows of st. without a crochet. In the ninth row you need to make 12 increments evenly and finish knitting. For decoration, you need to tie a Panama hat in one row according to the pattern (Fig. 2) with turquoise thread.
In conclusion, according to the diagram (Fig. 3), you need to knit two flowers and sew them to the dress and hat, decorate the middle of the flowers with a button.
The knitted summer set is ready.
Knitted dress for girls
Size
The model is designed for a child from birth to six months.
Materials
- Children's yarn – 200 g.
- Knitting needles No. 3.5.

If you knit a dress from woolen yarn, you can wear it in cold weather as a warm sundress with turtlenecks.
Scheme

1. Back of the dress
You need to start knitting from the back.

2. Before
The front part is knitted similarly to the back, but the neckline should start at the height of the armholes.
3. Assembly
It is necessary to sew the front and back along the shoulder and side seams. The neck and bottom can be crocheted st. without a crochet or in a lobster step. This way they will look more elegant and neat. You need to crochet or knit a lace to thread it through the holes under the yoke.
The baby's dress is ready!
Decorative headband for girls
Size
All calculations are given for knitting a model of size 50─52
Materials
- Fine yarn (cotton or acrylic) – 20 g.
- Hook No. 2.
- Hat elastic band to match the yarn – 50 cm.

These headbands look beautiful and will complement any little baby’s outfit.
Scheme

Description
- First, 127 air are recruited. loops and knit one row of st. without a crochet. You need to carefully thread and hide the hat elastic into this row of posts.
- The remaining rows are knitted according to the pattern.
- Cut the thread and attach it to the bottom of the headband and also knit rows according to the pattern. In this case, you need to ensure that the knitting is symmetrical.
- Cut the thread, fasten and sew the ends of the bandage.
- Steam the finished bandage thoroughly with an iron and let it dry.
A beautiful accessory for a little fashionista is ready! Pattern and patterns of knitting patterns
1. Sandpiper
Work begins from the back. It is knitted as follows:

The front of the sandpiper is knitted similarly to the back. Then you need to assemble the product by sewing the back to the front along the side seams. Two loops are made on the straps and buttons are sewn on.
2. Bolero
The bolero is knitted according to this description:

You need to assemble the product by making seams along the shoulders and sides. Sew the sleeves into the armholes. Then you need to knit a strip to decorate the edges of the bolero. To do this, loops are made along the edge of the back, shelves and neckline with white threads, and 2.5-3 cm are knitted according to the pattern from the first diagram.
Summer kit is ready!
These are the interesting and relevant patterns you can knit for your little one, spending very little time and effort. Most of the master classes presented will be suitable for repetition even by those needlewomen who have recently begun their first steps in crocheting and knitting.
A charming dress is knitted for a newborn baby.
Girl's knitted dress
Girl's dress knitted from soft baby yarn
Size: 0-6 months
Materials: baby yarn 50 g/100 m, knitting needles 3.5-4.0 mm.
How to knit a dress for a girl:
Cast on 62 loops.
Knit with a scarf pattern - 2 rows.
Next knit 8 knits, yo, 1 knit, put a marker, 1 knit, yo, 10 knits, yo, 1 knits, marker, 1 knit, yo, 14 knits, 1 yo, put marker, knit 1, yarn over, knit 10, knit yarn over, knit 1, marker, knit 1, yarn over, knit 12.
At the same time, start making holes for the buttons: knit to the last 4 stitches, yarn over, k2 together, k2. Make 2 more holes along the yoke.
Knit 3 rows in a garter pattern.
Track. row: *knit up to the 1st stitch before the marker, yo, k2. (marker between them), yarn over, repeat from * 3 more times, finish with knit stitches.
Repeat last 4 rows 7 more times.
Knit 4 rows in a garter pattern.
Next, divide the loops: knit to the marker, slip the loops between the first and second markers onto an additional thread for the sleeve, continue knitting to the third marker, re-slip the loops between the third and fourth markers onto an additional thread, knit to the last 4 loops.
Next, knit the last 4 loops together with the first 4 loops - thus connecting in a circular row.
Place a marker and knit in the round with knit stitches – 4 rows.
Knit with facial loops - 2 rows.
Track. row: *knit 3, knit 2 together, yarn over, knit 3, repeat from * around.
**Knit with a scarf pattern - 12 rows.
Knit 2 rows with knit stitches.
Then repeat from ** 2 more times.
Knit with a scarf pattern - 12 rows.
Track. Row: *K2 together, yarn over, repeat from *.
Knit 3 rows with knit stitches.
Fold the edge to the wrong side and hem.
Is there a new addition to your family or your friends’ family? Do you dream of knitting something for your newborn baby? Then you came to our site not by accident. Knitting for newborns: knitted socks, knitted overalls for newborns, baby knitted hat, sets for newborns, knitted booties, knitted hats, dresses, panties, blouses. All models are on the website with free detailed descriptions, photographs, diagrams, patterns and knitting recommendations. In the first years of a baby’s life, it is very important that the baby is warmly dressed and every mother wants everyone to admire him. Be sure to knit some cute little thing for your newborn baby or ask your friends! The models on the site will satisfy every taste. Free crochet and knitting patterns and patterns for newborns.

Size: 56/62
Materials: 50 g for a blouse, 25 g for a hat and booties of blue yarn (100% wool, 140 m/25 g) and 350 g for a blanket of blue yarn (100% merino wool, 95 m/50 g), Knitting needles No. 3 and 5.4 buttons, 1 m blue ribbon 7mm wide
BLOUSE
Garter stitch: knit. and out. R. – persons P.

Dimensions: 56/62 (68/74) 80/86. You will need; for pullover 200 (250) 300 g, for jacket 250 (300) 350 g, for overalls 150 (200) 250 g blue yarn (47% cotton, 39% polyacrylic, 14% polyamide, 100 m/50 g): straight knitting needles No. 3.5 and No. 4; short circular knitting needles No. 3.5; for a jacket 4 (5) 5 buttons and for overalls 5 (7) 7 buttons
Elastic band, knitting needles No. 3.5: alternate knit 2, 2 yen.
Facial surface: faces. R. – persons p., out. R. - purl P.; knit faces in circular rows.

Sizes: 80, 86-92, 98/104 Materials: 250 (300/400) g light green yarn (70% polyacrylic. 30% virgin wool, 107m/25g or 100% merino wool. 95m/25g); straight knitting needles No. 2.5 and 3; short circular knitting needles No. 2.5; 2 buttons. Elastic band, knitting needles g* 2.5: alternately 1 st. satin stitch, 1 p. iron. Path with braids (pattern width 24 [...]
Ideas for knitted items for little princesses are simply amazing in their variety. Dresses, sundresses, bodysuits, booties, caps, sets for baptism and discharge - all this can be crocheted or knitted. Yes, some things require experience and patience, but beginners can take simple models that look no less impressive on a child.
Adorable openwork cap for a newborn baby
If you have skills in crocheting, then making such a cap with your own hands will not be difficult. Beginners can also try to knit it, since the openwork pattern here is not too complicated and will certainly be possible for those who are taking their first steps in such needlework.
Materials
- White cotton yarn – 50 g.
- Pink cotton yarn – 10 g.
- Crochet hook No. 2.
- Satin ribbons for ties – 70 cm.
The model is ideal for discharge in the warm season or for summer walks
Size
The cap is suitable for a child from birth to three months.
Scheme
Openwork pattern scheme
Description
1. Donyshko
Knitting starts from the bottom. To do this you need to make a chain of 10 air. loops and close it into a ring. The next row will be 16 stitches. with double crochets (Fig. 1).
Knitting the bottom (Fig. 1)
In the third row you need to knit two stitches from each loop. with double crochet (32 pcs.). In the fourth row, increases (two columns from one loop) are made through 2 loops, in the fifth - through 3 loops, in the sixth - through 4 loops, in the seventh - through 5 loops. The result will be a circle (Fig. 2).
Knitting the bottom step (Fig. 2)
2. The main part of the cap
The beginning of the main part begins with tying the circle with arches. Arches are made of 5 air. loops and knit in every fourth stitch. A small section (about 2 cm) should be left untied.
Tying the bottom with arches made of air loops
After this, you need to turn the knitting and start tying the work with an openwork pattern according to the pattern.
First row of openwork pattern
Next, you need to knit as many rows according to the pattern as needed to the desired depth. For a newborn baby, 4-6 rows should be enough, but you need to take into account the thickness of the threads and the size of the hook. If possible, it is better to try on the product.
The main part is finished with an openwork pattern
Then you need to tie the cap along the bottom edge so that you can insert a ribbon for the ties. The first row of strapping is st. without a crochet, second - art. with two or more yarn overs (you need to focus on the width of the ribbon). At this stage the thread is cut.
Knitted border for threading ribbon
3. Finish
First you need to tie the bottom. The binding is done according to the openwork pattern. The tying thread is attached at the location indicated by the arrow.
Now you need to take pink yarn and decorate the edge of the bottom binding with one row of st. without a crochet. The same binding is done along the front edge of the cap. A ribbon is inserted into the border along the bottom of the cap. The work is finished.
Decorating the product with pink yarn
The cap is ready!
Crochet summer set for girls (dress, panties, Panama hat)
Size
The set is designed for a child from 0 to 3 months.
Materials
- Yarn 100% cotton (white) – 150 g.
- Yarn 100% cotton (turquoise) – 50 g.
- Buttons – 2 pcs.
- Underwear elastic (needed for panties).
- Crochet hook No. 3.
This beautiful set for your baby will be indispensable on warm summer days.
Scheme
Rice. 1
Rice. 2
Rice. 3
1. Dress
The dress needs to be knitted from the yoke. First you need to cast on 44 stitches. Every 11th loop you need to notice and then make increases (one loop at a time) before and after these loops. For a square yoke you will need 4 rows. Next will be one row according to the hem pattern (Fig. 2). After this, you need to set aside the loops for the sleeves; they are knitted in one row according to the hem pattern. When knitting sleeves, you need to make up five air. loops for armholes Then you can continue knitting the hem (14 rows with white threads + 1 turquoise). To finish, you need to tie the neckline next to the st. without a crochet.
2. Panties
The front and back parts must be started in the same way - a chain of 10 air. loops (white thread). The back part consists of 10 rows (one increase must be made in each row).
We knit the front part like this: two rows without increases, attach the thread to the beginning of the back part and knit, making increases every other row. Having knitted eight rows, you need to combine both parts and knit four rows in a circle.
To finish, the panties are tied with turquoise thread on top (three rows of 1x1 raised elastic). You need to thread a linen elastic band into the harness to keep the panties in place.
The step edges of the panties are decorated with turquoise thread in one row of st. without a crochet.
3. Panama hat
The bottom of the Panama hat starts from the ring (10 air loops) and continues knitting st. single crochet according to the pattern (Fig. 1). After this, you need to knit 8 rows of st. without a crochet. In the ninth row you need to make 12 increments evenly and finish knitting. For decoration, you need to tie a Panama hat in one row according to the pattern (Fig. 2) with turquoise thread.
In conclusion, according to the diagram (Fig. 3), you need to knit two flowers and sew them to the dress and hat, decorate the middle of the flowers with a button.
The knitted summer set is ready.
Knitted dress for girls
Size
The model is designed for a child from birth to six months.
Materials
- Children's yarn – 200 g.
- Knitting needles No. 3.5.
If you knit a dress from woolen yarn, you can wear it in cold weather as a warm sundress with turtlenecks.
Scheme
1. Back of the dress
You need to start knitting from the back.
2. Before
The front part is knitted similarly to the back, but the neckline should start at the height of the armholes.
3. Assembly
It is necessary to sew the front and back along the shoulder and side seams. The neck and bottom can be crocheted st. without a crochet or in a lobster step. This way they will look more elegant and neat. You need to crochet or knit a lace to thread it through the holes under the yoke.
The baby's dress is ready!
Decorative headband for girls
Size
All calculations are given for knitting a model of size 50─52
Materials
- Fine yarn (cotton or acrylic) – 20 g.
- Hook No. 2.
- Hat elastic band to match the yarn – 50 cm.
These headbands look beautiful and will complement any little baby’s outfit.
Scheme
Description
- First, 127 air are recruited. loops and knit one row of st. without a crochet. You need to carefully thread and hide the hat elastic into this row of posts.
- The remaining rows are knitted according to the pattern.
- Cut the thread and attach it to the bottom of the headband and also knit rows according to the pattern. In this case, you need to ensure that the knitting is symmetrical.
- Cut the thread, fasten and sew the ends of the bandage.
- Steam the finished bandage thoroughly with an iron and let it dry.
A beautiful accessory for a little fashionista is ready! Pattern and patterns of knitting patterns
1. Sandpiper
Work begins from the back. It is knitted as follows:
The front of the sandpiper is knitted similarly to the back. Then you need to assemble the product by sewing the back to the front along the side seams. Two loops are made on the straps and buttons are sewn on.
2. Bolero
The bolero is knitted according to this description:
You need to assemble the product by making seams along the shoulders and sides. Sew the sleeves into the armholes. Then you need to knit a strip to decorate the edges of the bolero. To do this, loops are made along the edge of the back, shelves and neckline with white threads, and 2.5-3 cm are knitted according to the pattern from the first diagram.
Summer kit is ready!
These are the interesting and relevant patterns you can knit for your little one, spending very little time and effort. Most of the master classes presented will be suitable for repetition even by those needlewomen who have recently begun their first steps in crocheting and knitting.
We knit a dress for a girl with knitting needles
It's always nice when you know that you can knit something for yourself with your own hands. But it’s even more pleasant to do this for your children. For example, dresses for girls are a great idea. After all, there are such a huge number of them, especially since craftswomen do not stop coming up with new ideas every day. After all, the scope of imagination cannot be limited by anything. Threads and knitting needles can help make light summer dresses and warm dresses for winter.
A knitted dress for girls can be made for girls of different age categories, from newly born to teenagers. In this article you can see some interesting ideas on how to knit and simple instructions that may be suitable for everyday wear or for various holidays. Also here you can see several secrets that every beginner needs to know. So, how do we knit a dress for a girl? What you need to know.
Where to start knitting a dress for a girl
Before knitting a gift for your beloved girl, you need to pay attention to three things:
- Select style. If you are good at knitting and this is not the first time you have done it, then you can choose a complex model. But beginners will have to start with something simple and select a simple pattern in order to... It is also worth paying attention to the age of the child. If your child is under two years old, then dresses without particularly large or large decorations will suit him. The dress should be simple and easy to put on and, of course, the child should move freely in it. But for a teenage girl, it is necessary, first of all, to find out her taste preferences, look at fashion trends and also take into account the girl’s appearance. But one way or another, the future dress should decorate your child and be comfortable.
- Select the required material and calculate its quantity. If the dress is openwork, summer and light. Then yarn made of cotton or thin acrylic is suitable for it. But thick threads, such as wool, are great for the winter season. In order for the dress to have a tight-fitting silhouette, it is necessary to take threads with viscose, because then the dress will be more elastic. If the child is still very small, then for such children there is children's yarn that does not cause allergies. Depending on how old your child is and what style of dress he chose, the number of threads is calculated. Up to two years you can take 200-300 g, 400 g for older children.
- Calculate knitting density. First, you need to take special measurements to understand how many loops you need to take for each part. The measurements include: hip circumference, waist, chest, product and sleeve length, as well as pattern. Next, you need to make a sample from the threads you have chosen and use it to count the number of loops per 1 cm of fabric. Next, based on the calculations made, you calculate the number of loops for each part.
When you have completed all three points, you can start knitting the product itself. Now you know what skills you need to have to knit a dress yourself.
Dress for newborn

Costume for newborn girl
Dressing up a newborn baby girl is a very fun and interesting activity. Moreover, it does not take very much time. The model presented below can be simple and very beautiful, suitable for ages 1-3 months. So you will need 200 g of white acrylic thread, as in our example. But if you want, you can take any other color. Knitting needles No. 2.5, then yellow threads for fasteners or buttons.
The product - a dress for a newborn - includes six parts: a front, two sleeves, two parts of the back and yokes, which must be made according to the following pattern:
- front end. Cast on 76 stitches on the knitting needles, knit 10 rows and at this time form the pattern of the edge of the fabric. At the same time, alternating: 2 rubles. purl loops and 2p. facial. The front flange is knitted using stockinette stitch (knit in knit rows, purl in knit rows). You need to knit until the height is 18 cm. Then close one loop at a time along the edges of the product. On the next row, the stitches begin to decrease as follows. On each side, in even rows of the product, 2 loops should be left at the end and beginning. Then knit them together and repeat this action in all even rows five times. This way you get a few more rows, and the fabric reaches a height of 21 cm. Next, you need to transfer the front loops to an additional knitting needle and proceed to the next part.
- First half of the rear shelf. You need to cast on 35 loops and knit 10 rows, as in the first part of the fabric. Then comes stocking stitch, we reach a height of 18 cm and bind off two loops from the right edge. On the next row there will be a decrease, as for the front, only on one side and leave part unknitted.
- Second half of the shelf knits in the same way as the first one. The only difference is that the loops must be closed on the left side, not the right.
- Knitting sleeves. If you knit the sleeves together at once, they will turn out the same. So we take two balls and cast on 38 loops. Now you have two working threads. The first 10 rows must be knitted, just like the front part. Next comes the front stitch and you need to make 3 additions in every ninth row of 1 loop. There should be 44 stitches at the end. Next, the straight product is knitted in stockinette stitch until the sleeve reaches a length of 15 cm. Then you need to decrease two loops at the edges of the fabrics. In the next step, you need to decrease 1 loop per row, while giving two loops at the edges. Decrease occurs 5 times. At the end of the work, the length of the product should be 18 cm.
- Next we make a yoke. Using knit stitches you need to knit the second part of the back, then the right sleeve, the front, the second sleeve and complete the first part of the back. In the second row there are also facial loops, and it is necessary to symmetrically reduce 12 loops on both parts of the back, and on the front shelf, reduce 24 loops. Next comes two purl rows, two knit rows, and every 7 rows you need to decrease 12 loops symmetrically. Decrease occurs 5 times. At the end of all the work there should be 70 loops on the knitting needle, and you close them off.
- Assembly is the final stage of creating a canvas. Sew the back and front along the sides. Knit a clasp along the edges of each back flap. To do this, you need to cast on 81 loops and make 6 rows alternately 2 p. purl loops, and 2p. facial. Then take a hook and tie the edges of the dress with the cloves. Sew up the bottom of the back, sew buttons on top, and embroider yellow flowers on the hem of the product.
Spring dress for teenage girl

We knit a dress for a teenage girl for spring
This beautiful dress - a spring dress for a teenage girl - must be knitted in stockinette stitch, so it is very simple and easy to make. The model may be suitable for ladies who are size 46-48. For this product you need to take 650 g of thin strands of wool blend of a blue shade and knitting needles No. 7. You need to adhere to the following knitting sequence:
We knit the back. You need to cast on 54 loops and look at the diagram:
- odd numbers and the first row are knitted 11, purl 2, knit 28, purl 2 and knit 11.
- Even and the second row must be made, as shown in the figure, under the purl stitches, and under the knit stitches, knit stitches.
- after 26 rows, when the fabric is 18 cm and on the 28th row you need to add 1 loop on each side of the product.
- further the canvas will be 28 cm and this is the 50th row. From it you need to decrease one loop on both sides, and then again one loop along the edges of the back after 10 rows.
- then you need to decrease one loop on one side every 7 rows every 2 times. On the other side there will be a broach.
- then you need to knit again according to the pattern and when the fabric is 28 cm or 88 rows, then you need to add 1 loop on each side of the fabric, three times in 7 rows, and then the product is knitted again.
- when you reach 102 rows or 57 cm, then on the left side you need to decrease the loop four times in 3 rows. there will be a broach on the right side. From the same row, you must simultaneously increase on the left side six times, every 3 rows.
- here the canvas already becomes 62 cm or 112 rows. From each edge you need to close 3 loops. The given row will be the beginning for the sleeve opening. Next, on each side, you need to decrease one loop 4 times through the row. Next comes the front stitch.
- further, 1 loop is decreased from each edge, 20 rows from closing the loops. Next, close 1 loop along the edges 1 time through 2 p. then close three times with 2 loops in one row. Then in the same rows there is a decrease 4 times, 1 loop from the edge. There should be 18 loops at the end. You knit them in stockinette stitch for 10 rows. Then the loops are closed.
- Front shelf done in the same way as the back.
For the sleeve you need to take 34 loops and knit in stockinette stitch. Or stocking stitch. In every second row you need to add 2 times 1 loop along the edge. On each side of the sleeve, bind off 2 loops every six rows. Next, five times every row you need to decrease 1 loop along the edge of the product, then 3 times 2 stitches. and reduce the loop 4 times on one side. On the other side there will be a broach. When the sleeves are 20 cm from the slope, at 36 rubles. there should be 10 loops. You knit them in stockinette stitch for another 10 rows and the loops are closed.
The last step is to sew all parts of the product together and iron the seams. After this, the product can be considered ready.
Here is another good example of a dress for a girl, which is shown in the video below:


