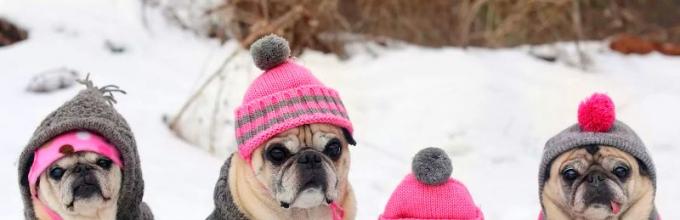

Do you like dogs? Then this publication is for you. Our pets are so faithful, so obedient, so smart, let them also be smart and beautiful! Moreover, inYazing for your pets is a huge, incomparable pleasure!
1:946 1:953
Owners of small breed dogs are especially close to the topic of clothing for their pet!
2:16102:4
Here is an example of a sleeveless vest for a small dog
2:93


Sleeveless vest with fringes
5:58You will need:
50 g of beige yarn, 20 g of brown and terracotta yarn (100% wool, 250 m/100 g), straight or circular knitting needles No. 2.5, crochet hook.
Knitting density:
elastic band 2×2 30 p. = 10 cm, stockinette stitch 25 p. = 10 cm, 40 r. = 10 cm.
Loop calculation
Take your dog's measurements and calculate the number of loops.
Neck circumference- 21 cm (63 p. + 2 cr. p. = 65 p., round to 66 p., since their number must be a multiple of 3); 1/3 girth ~ 7 cm (21 p. + 1 p. for elastic symmetry 2×2 = 22 p.); 1/12 girth ~ 1.8 cm x 2 = 3.6 cm (11 p.) - the width of the armholes at the beginning of knitting.
5:1020Bust- 35 cm + 2 cm for a loose fit = 37 cm (111 p.); 1/2 girth (width of back and tummy) - 18.5 cm each (56 p.)
5:1233 5:1238R distance from withers to middle of back- 11 cm.
5:1328 5:1333Armhole height: distance from the base of the neck to the end of the front paw + 1 cm = 7 cm (28 r.)
5:1488Armhole depth: for small dogs 2 cm (6 p.). 1/2 chest circumference - 1/3 neck circumference - armhole depth = 18.5 cm - 7 cm - 4 cm (2 cm for each armhole) = 7.5 cm (18 p.); 18 p.: 2 = 9 p.; Therefore, when knitting the armholes, you need to add 9 stitches from each edge of the tummy and back.
5:19635:4
To find out how many rows to add loops, divide the distance from the base of the neck to the end of the front paw + 1 cm by the number of added loops: 7 cm = 28 r.; 28 r.: 9 p. = 3 r. This means that yarn overs should be made along the edges of every 3rd row.
5:423 5:430Back/tummy
5:464Using a beige thread, cast on 66 sts. Using a 2×2 elastic band, tie a collar 12 cm high, making stripes of the same width with dark brown and terracotta yarn. Cast off 11 stitches and knit 22 stitches. (tummy), cast off 11 stitches, knit 22 stitches. (back).
5:869Turn the knitting over: knit 22 purls. (back), then take the thread from the second ball and knit 22 purls. (tummy). You can gather the loops of one piece onto a knitting pin and knit it later.
5:1212 5:1217Next, knit the back and tummy 28 rub. stitch, making yarn overs along the edges of each 3 rows. (9 times). The volume of the parts will increase by 18 stitches. Knit the first and last 3 stitches in garter stitch so that the edges do not curl. Then, along the edges of each part, dial 7 air. p. (armhole depth = 6 p. + 1 cr. p.). Now each piece has 54 stitches (22 stitches + 18 stitches + (2×7 stitches), and you need 56 stitches (18.5 cm). Add the missing 2 stitches when switching from satin stitch to rib 2 ×2, making 2 yarn overs at equal intervals. Using a 2×2 rib, knit another 4 cm, making colored stripes, like on the collar.
5:2180 5:6Assembly
Sew the details of the sleeveless vest and use a crochet hook to create a fringe at the collar using dark brown and terracotta yarn.

Clothes without seams

8:2


Clothes with a hood
10:1063 10:1066
11:2

Knitted by adding and decreasing stitches in the right places.
12:629Measuring neck circumference
Bust
Waist circumference
Leg circumference
Distance from the “collar” to the dog’s paws
Naturally, each dog has its own size.
12:928We calculate the loops. The yarn is different.
We cast on loops on knitting needles equal to the circumference of the neck.
We knit a collar.
12:1125After the collar, we divide the knitting into three parts. It depends where the fastener will be. If it is on the belly, then there are approximately 15 loops on the sides and the rest is on the back.
12:1422The number of loops depends on the density of the yarn (threads)
In every 2nd row we add one loop to the center from the sides.
So we knit up to the paws. Before the start of the hole for the paws.
12:98 12:261These three pieces are then joined and knitted together. Approximately 3 cm.
Then we begin to decrease the loops in the middle from the hole for the paws. Approximately two loops in every 4th row.
And so on until the end of knitting. I get 35-36 cm from the neck to the tail, including the elastic band.
Well, the design is as your imagination dictates!
It is tied with an elastic band on the armholes and straps using stocking needles.
You can make holes for tassels after knitting the collar and stretch the cord with tassels, etc.
For girls, I knit the belly to the end of the fabric; for boys, it’s better to 8 cm from the armholes and close the loops. Continue the required distance only for the central part - the back. Everything is individual and needs to be measured. To sit beautifully!
12:1558 12:4The hood can be knitted as a sock heel. Make it removable with buttons or ties.
12:175 12:182Knitted sweater for dogs
12:236 12:239


Here is the principle of knitting these sweaters and the basic pattern!
15:119We knit these sweaters from the collar. Calculate the number of hinges for the gate. If it is high with a lapel, increase its length by 2 - 4 cm so that after sewing the product, the collar does not squeeze the neck. Also add stitches for symmetry, for example, when sewing the edges of a collar knitted with 1×1 elastic, 1 knit stitch and 1 purl stitch must be joined, otherwise the seam will be noticeable.
15:786 15:793So that the sweater can be worn over the collar and at the same time fasten the leash without any problems, make a hole in the collar for the collar ring. To do this, when knitting the penultimate row of the gate in the place where the middle of the back will be, close 3 - 5 loops in a row, and in the next row, cast on the same number of chain stitches. When the collar is ready, divide the knitting into two unequal parts: 1/3 loops - tummy, 2/3 loops - back. They can be knitted from two balls at the same time, or you can gather the tummy loops onto a knitting pin and knit it later.
15:1773 15:6 
The depth of the armhole depends on the size of the dog
16:670 16:675For small dogs(Yorkshire terrier, toy terrier, chihuahua) it is 1 - 1.5 cm,
16:833for average(poodle, dachshund, Jack Russell terrier, white terrier) - 2 - 2.5 cm, for larger dogs- 3 cm or more.
16:1042 16:1047To find out the armhole height, measure the girth of the front paw, add 1 cm, calculate 1/2 of the girth and subtract the armhole depth multiplied by two. If you plan to edge the armholes with elastic, then increase their height and depth by 1 cm. After both parts of the sweater are ready, sew them: first sew the shoulder seams (sewing the edges of the collar), and then the side seams.
16:1705For details on how to calculate loops for a sleeveless sweater, see the description of the sweater.
16:179 16:186Sleeveless dog sweater “Heart”
16:273You can reduce the width of the backrest in two ways:
1. Smoothly: knit 2 loops together along the edges of the back in every second front row;
2. Sharp: knit 2 loops together along the edges of the back fabric in each front row.
The edges of the back, knitted with stockinette stitch, wrap and spoil the appearance of the product. To prevent this from happening, knit the back to the length of the tummy, knit the first and last 3-4 loops in garter stitch (that is, all rows of knit stitches).
16:1069For any pattern, it is better to knit the last 1.5 - 2 cm of the back with an elastic band. Then the product will take on a finished look, and the back will not ride up. If the pattern has voluminous braids, then when switching to an elastic band, knit all the loops of the braids 2 loops together
16:1511 16:6 
1 - 1/3 neck circumference;
2 - 2/3 neck circumference;
3 - the distance from the base of the neck to the front paw (this measurement is inaccurate and is used to calculate the approximate number of yarn overs along the edges of the parts);
4 - distance between the front legs + 2 cm (allowance for armholes);
5 - back width = (chest circumference + 3 cm) - (distance between front legs + 2 cm);
6 - belly length = distance from the base of the neck to the middle of the abdomen or to the hind paw);
7 - back length;
8 - the height of the armhole, the girth of the front paw increased by 1 cm (or by 2 cm, if the girth is very small) - the depth of the armhole x 2;
9 - armhole depth = 1 - 3 cm (depending on the size of the dog). If you plan to edge the armhole with an elastic band, increase its height and depth by 1 cm.
If the distance from the base of the neck to the beginning of the front paw (measurement 3) is more than 3 cm, then the vertical distance from the collar to the beginning of the armhole (b) may not correspond to the value of measurement 3, since it is inclined (a). That is, the actual number of rows will be less than the number that you get when calculating loops using a regular pattern measuring 10x10 cm. To make the correct calculation, knit the sample, making a yarn over at the end of the front rows, or calculate the yarn overs approximately: if measure 3 is equal to 3 cm, make 3 - 4 yarn overs, one from each edge of the front rows of the fabric, 4 cm - 5 yarn overs, 5 cm - 6 yarn overs, 6 cm - 7 yarn overs, 6.5 cm - 8 yarn overs.
17:1150 17:1157
Here's another option for knitted clothes for our kids!
the simplest thing you can think of.
18:168 
You will need:
100 g of brown melange yarn (50% wool, 50% acrylic, 280 m/100 g), knitting needles No. 2.5, brown buttons (5 pcs.), needle with a wide eye.
Knitting density:
elastic band 2×2 26 p. = 10 cm, 28 r. = 10 cm,
garter stitch 25 p. = 10 cm.
Loop calculation
Take measurements from the dog and calculate the loops.
Length of the product- 25 cm.
Bust- 53 cm (137 p. - 1 p. for elastic symmetry 2×2 = 136 p.)
Neck circumference- 30 cm (78 p. + 2 cr. p. = 80 p.)
Distance from base of neck to front paw- 7 cm (20 r.)
Front paw circumference- 20 cm; 1/2 girth - 10 cm, 1/6 girth (armhole depth) = 3 cm (8 p.), therefore, 136 p. - (8 p. x 2) = 120 p.; 120 p.: 3 = 40 p. (15 cm) width of the tummy and each shelf
Armhole height: 10 cm - 3 cm (armhole depth) = 7 cm (20 r.)
Plank (2 pcs.) - 25 cm = 62 p.


Description of work
Cast on 136 stitches and knit 11 cm (30 stitches) with a 2×2 rib. Then knit 40 stitches (first front), close 8 stitches (armhole), knit another 40 stitches (tummy), close 8 stitches again (armhole), knit the remaining 40 stitches (second front).
Turn over your knitting and knit 40 stitches of the second front, then take the thread from the second ball and knit the tummy loops, then use the thread from the third ball to knit the loops of the first front. Thus knit 20 rubles. Then dial 8 air. p. over closed loops. Knit in a straight line 1 cm (3 rows). Next, in three steps, begin to decrease the loops: 136 sts - 80 sts = 56 sts; 56 p.: 3 = 18 p. This means that you need to subtract 18 p. at a time:
21:21611st row- elastic band 2×2, 2 sts. every 7 p.;
2, 3, 4th rows- according to the drawing;
5th row- elastic band 2×2, 2 sts. every 6 p.;
6, 7, 8th rows- according to the drawing;
9th row- elastic band 2×2, 2 sts. every 5 p.
Knit the remaining 8 rows. in a straight line and close the loops. For the placket, cast on 62 stitches and knit 2.5 cm in garter stitch. On the other placket, make five buttonholes at equal intervals. Sew the trims to the front of the sweater. Sew buttons onto one of the strips. Quilt the collar from the inside out with rubber thread in 2 - 3 rows.
CHILDREN - DACHS - a sweater for you!
21:1013(by shortening the length of the back, we adjust it to the size of your dog)
21:1134As a rule, it is difficult to calculate a sweater for a taxi because... it has non-standard measurements..... the simplest calculation for you:


This is such a wonderful sweater - very convenient to work with.....let's start.
23:650 23:655*So, to knit a dachshund sweater, we will need from 50 to 200 g of yarn (depending on the size of the dog), a set of double needles (5 pcs.) and circular knitting needles of 2 numbers, usually No. 3 and 3.5 or 4, depending on the thickness of the yarn.
23:1040* Measuring the girth of the dog's neck in the place where the tightly worn collar is usually located and cast on the required number of loops on smaller knitting needles. We close the knitting into a ring and knit the required number of rows around the neckline (in this example, the neckline is knitted with a double elastic band)
23:1576 23:6
Next, we distribute the loops, trying on our neck on the dog. I took the same number of loops for the back and chest, 3 loops for the sleeves and 6 loops for the raglan lines (4 stitches of the braid and 1 purl loop on each side). I knit the sweater itself using stockinette stitch.
24:978 24:1239 24:1246
At the same time, we decrease the loops for the breast between the legs
25:121 25:128 
Then we remove the loops of the back and sleeves onto knitting needles with fishing line (you can use a strong thread) and knit the breast in straight and reverse rows
26:873 26:880
This is necessary for a good fit of the sweater, because the chest in taxi clothes should be much longer and more voluminous than the back; in the process of knitting the chest, we add loops so that the chest and back meet at the elbows:
27:1784 27:6
For now we leave the loops of the sleeves on the knitting needles with fishing line:
28:618 28:625
We combine the loops of the chest and back, knitting the outer loops so that there is 1 purl between the halves of the braid. loop and knit the torso in a circle, if necessary, reduce the extra tummy loops to the waist:
29:1513 29:6


something like that…….
32:36 32:43The dachshund has short, smooth hair that is unable to protect the pet in severe frosts. But you still need to go for a walk... This means that a loving owner will have to make sure that in bad weather the pet is equipped with warm clothes.
[Hide]
Make it yourself or buy it in a store?
Dog fashion is quite common today. Moreover, bespoke tailoring and ready-made models sold in pet stores are equally popular. Needlewomen happily dress their pets in sewn suits, hats, raincoats and other clothes. Everyone else is actively purchasing stylish models of the same clothes in stores.
Sorry, there are no surveys available at this time.
Both options have their pros and cons. If you decide to sew something with your own hands, you can do it exactly as you see fit in exact accordance with the size of your pet. And besides, it turns out to be much cheaper than buying clothes for dogs in the store.
But, on the other hand, you are unlikely to be able to sew or knit fashionable items, luxurious collars, intricate caps, raincoats and pants with your own hands. Therefore, if you really want to please your dog with a fashionable suit, then if you have the means, you can afford it for yourself and for him. Moreover, clothes for dachshunds are not uncommon in pet stores. Well, if you have the desire and minimal skills in needlework, you can significantly increase the size of your pet’s wardrobe.
Knitted fashion for dachshunds
If you know how to knit, then half the problem in finding warm clothes for your dog disappears. Take 200 grams of thread (you can use leftovers from old knitting), knitting needles No. 2 or No. 3 and feel free to start creating your own masterpiece. Start from the neckline, then knit in rows an amount equal to the distance from the edge of the product to the paws.
To avoid wrinkles on your dog's back, make short rows at the back. It’s better not to make your dachshund’s sleeves long, as the dog’s short legs can regularly get them dirty. If you are familiar with the basics of knitting, then you most likely know how to knit glove fingers. You can use the same principle to make sweater sleeves for your dachshund.
What can you knit for a pet?
If you know how to knit, then your pet will probably not freeze even in the most severe frosts. After all, from warm threads you can create real fashion masterpieces such as hats, scarves, boots, sweaters, overalls and suits. All these clothes can be knitted either using paper patterns, which are easy to find online, or using pre-made measurements.
If you are not good at knitting, but want to improve your skill, then first try to make something simpler for your beloved dog. For example, take your old sweater and cut off the sleeve. Measure the distance from the neck to the paws from the edge (neck), add 5 cm and cut out holes for the front paws. Finish the edges of the product and that’s it, the dachshund sweater is ready! Well, for an individual fit, you can make recesses in the tummy and neck area.
Knitted walking suit
For a walk, you can use dachshund overalls or a sweater with pants. If you are going to knit yourself, then keep in mind that you should use different patterns for each gender. After all, boys and girls go to the toilet differently.
From simple options, you can choose a long sweater for your dachshund that protects from wind and cold. It is knitted according to the standard pattern, starting from the neckline. You can use different knitting methods and multi-colored threads as decoration. If your skill is at a higher level, then you can try knitting dachshund overalls or warm pants, which are easily attached to the top of the suit using ties, Velcro or buttons. Do not forget that it is better to knit the trouser legs one at a time, regularly measuring the product for the dog during the process, for which it is better to take knitting needles on a fishing line.
Sewing as an alternative to knitting
Some people can knit a product while watching a movie, while others prefer sewing to knitting. If you choose the second option, you can also enrich your pet’s wardrobe with beautiful and useful hand-sewn items. One of the universal and most popular options for walking is considered a blanket, which you can quickly sew with your own hands. First, you should take the necessary measurements in the chest area (the widest part), as well as along the edges where the product will begin and end.
Video master class on sewing a stylish jacket for a pet.
Next you need to take a fabric measuring 70*70 cm and somewhere in the middle (with a slight shift to the left) cut a hole for the head. It can be decorated with a frill, ruffles or even a strap. Next, you will need to make side ties that will secure the blanket. If there is a lot of material on the sides, then it can be trimmed or grooves made. In addition to ties, blankets can also be secured with Velcro or buttons. For the set you can sew a cap or scarf.
Making a pattern
Here we bring to your attention sewing patterns for dog clothes. Even if the pattern was not originally intended for a dachshund, it can still be used safely. It will just be necessary to lengthen the distance from the neck to the tail, since Dachshunds have a more elongated body compared to other breeds.
Photo gallery
The request returned an empty result.Video “DIY dog clothes”
This video contains a selection of photographs of warm suits, overalls and sweaters made by yourself.
A dog in smart clothes has long ceased to be exotic. For small dogs, clothing is not a luxury, but a necessity. Many dogs of toy breeds have imperfect thermoregulation mechanisms, so without clothes they freeze and catch colds very easily. There are usually two types of pet clothing: practical clothes for cold weather and outfits that serve a purely decorative function.
The first group includes all kinds of jackets, sweaters, and overalls. The second group includes hats and panama hats, dresses for girl dogs, summer shorts and T-shirts. It’s good when warm clothes are also beautiful. In this outfit, there is no shame in walking with your pet in the park or on the dog playground at the amateur dog breeders club. Toy terriers, dwarf spitz dogs, and dachshunds need good clothing. Due to their anatomical structure (long body and short legs), dachshunds often have problems with blood circulation, so warm clothing is very important for them.
Gallery: clothes for dachshunds (25 photos)


Key Features
Every housewife dreams of sewing clothes for a dachshund. . However, not everyone has time for this.. Fortunately, the Internet comes to the aid of eternally busy housewives. Now you don’t have to search for a long time in specialized stores for literature on sewing clothes for dogs. When sewing and knitting clothes for ordinary and dwarf dachshunds, keep the following in mind:
Knitting clothes for a dachshund
Knitting a sweater, fluffy jacket or warm suit for the winter for your beloved dog is quite simple. Dwarf dachshunds especially need warm clothes, because they get very cold during walks in winter. Sometimes, if it is very cold outside, or the animal has an injured paw, housewives even knit shoes for dachshunds - booties and warm socks . To knit or crochet clothes for a four-legged friend, needlewomen will need:

DIY jumpsuit
The style of overalls for a female dachshund and a male dachshund will be slightly different due to gender differences. In order to sew a jumpsuit, you first need to make patterns. It is best to use ready-made patterns. The dachshund jumpsuit consists of the following parts:
- The upper part resembles a sleeveless blouse;
- The lower part, which is a kind of panties with a hole for a tail;
- Straps on which the entire structure is attached;
- Drawstrings sewn into the waistband to adjust the jumpsuit to fit.
 You can do without ties, but then if the overalls turn out to be a little looser than necessary, it will hang like a bag, making it difficult for the dog to move. Therefore, it is better to sew a drawstring with ties approximately in the middle of the overalls. During a walk, they must be carefully tied so that the dog does not get entangled in the ropes. In general, if possible, you should avoid any long ties, because the short legs of a dachshund can easily get tangled, and this is a sure way to injury.
For overalls, it is best to take thick knitted fabric. Genuine leather is also suitable, but sewing from leather is quite difficult for beginning craftswomen. In addition, to work with leather you need special, very thick sewing needles. It is not recommended to sew overalls from denim, because the dog will quickly sweat in jeans. In addition, this rough fabric rubs the delicate skin of the dachshund. If you really want to become the owner of a “denim” dog, you can use knitwear with a denim pattern. This fabric is usually used for sewing tights and leggings.
There are different patterns for dog overalls. In some models, the top and bottom parts are cut and sewn separately, while in other versions the jumpsuit is cut as one piece, and then the straps are sewn or fastened to it. The straps should not hang too loosely, otherwise they will fall off during a walk and the dog will be injured. But they should also not be made too tight, so as not to rub the skin.
Perfect option- straps with a special mechanism that regulates their length. In this case, the overalls will serve the dog for several years, because it will “grow” with the dachshund. And of course, we must not forget about the hole for the tail. It must be done immediately, while cutting the fabric. Cutting a hole for the tail on a finished jumpsuit is quite difficult, and there is a risk of damaging the fabric.
Sewing and patterns of blankets
 Blanket is the appropriate “clothing” not only for donkeys, elephants and horses, but also for small dogs. A blanket must be worn after sterilization or any other surgical interventions to protect scars from infection. Also, a warm blanket will help the dog keep warm in severe frosts and give the animal a respectable appearance. It is best to make a blanket from thick fabric. Knitting enthusiasts can knit or crochet this important accessory. However, a fabric blanket is more convenient because it weighs less. Sewing blankets is carried out in the following sequence:

Of course, it’s worth sewing a beautiful outfit for a dachshund. A dog in clothes is not only a beautiful, but also a healthy animal, as well as the beauty of the yard and the pride of the owner. But the main thing in clothing for animals is not beauty, but convenience. Sometimes it's better to sacrifice beauty for comfort four-legged friend. This is what true dog lovers do. If the dog can move comfortably in new clothes, it means that the owner’s efforts were not in vain when choosing a style and sitting at the sewing machine.
Attention, TODAY only!
Knitted sweater for a dachshund. Small dogs quickly freeze during a winter walk, begin to be capricious, ask to be held and inexorably pull the owner home. Therefore, a warm sweater will be useful not only for you, but also for your four-legged friend. To knit a sweater for a dachshund (or other small dog of approximately the same size), we will need: Knitting needles (2.5 mm, 3 mm, or 3.5 mm). 100 grams of yarn of any color you like (this amount of yarn will be sufficient if our dog is no larger than a small dachshund). Zipper closure. We can determine its exact length at the end of knitting. While working, do not forget about the schematic drawing of the dog sweater pattern, it will help you achieve the desired result. pattern of a knitted sweater for a dachshund Description of work: 1. Neck. Cast on 54 loops and tie with a regular elastic band of 6-8 cm. To make sure that the volume is chosen correctly, you need to find out the circumference of the neck by measuring it on the collar. After several rows of knitting, you can compare the knitting length up or down by unraveling the knitted sample and re-casting the required number of loops. Our knitting process goes from neck to tail, that is, we knit the sweater from top to bottom. 2. We knit the “chest” part of the dog’s sweater. Having knitted the neckline, we continue knitting with facial loops, adding 1-2 loops on both sides after several rows. We knit about 5 cm. 3. Holes for paws. In the picture of the dog sweater pattern, the holes for the paws are schematically marked. According to the picture, we divide the knitting into 3 parts and knit each part separately for about 5 cm. The middle part is the back. Try the knitting on your dog to determine if our holes are long enough (if necessary, continue knitting to the desired length). 4. Bottom of the sweater. Now we connect the 3 parts together. We knit about 7cm. If your dog has a pronounced waist, then when knitting this part you need to gradually reduce the loops on each side, returning to the original knitting volume (54 loops). We tie the bottom of the sweater like a neck, with a simple elastic band; the required length is determined by trying it on your dog. 5. Sleeves. We need to connect 2 rectangles. We cast on about 25-35 loops, taking into account that the width of the knitting should be twice as large as the length of the hole for the paws. And the length of the rectangle is equal to the length of the front paw of the quadruped. We sew the finished rectangles into cylinders, as shown in the free dog sweater pattern pattern, and sew them to the holes on the main part of the sweater. 6. Clasp. Sew a zipper to the free edges of the sweater. An alternative option is a button closure and hinged loops.
Size: the coat has a length of about 43 cm and a circumference of approximately 38 cm. Materials: 150 g of Merinos 8 yarn (100% merino wool, 50 g = 90 m), knitting needles No. 3.5 and 5. Main patterns: hollow rib, 1x1 rib, purl satin stitch, fantasy patterns Fantasy pattern A: knit according to pattern A, in even rows not indicated in the pattern, knit stitches as per knitting pattern. To perform 1 right cross, set aside 1 st, k3, knit. set aside, for 1 left cross, set aside 3 stitches PR, purl 1, knit knits set aside, for 6 stitches crossed to the left, set aside 3 stitches PR, k2, knit set aside. Having finished the 32nd row, repeat from the first. Fantasy pattern B: 1st row: * K2, P2. * repeat from * to * the entire row, finish k2 row and all even ones: * p2, k2 * p2 row3: * 2 p., crossed to the left (= set aside 1 p. PR, k1, knit knit set aside), purl 2. *, 2 sts, crossed to the left Row 5: repeat from 3rd. Fantasy pattern C: Row 1: * K2, P2. *, k2 row and all even: * p2, k2. * Purl 2. Row 3: * 2 sts, crossed to the right (= set aside 1 st. ZR, k1, knit set aside), purl 2. * 2 sts, crossed to the right 4th row: repeat from the 3rd Right finishing edge: 1st row: remove 1 st, without knitting, 1st, inserting the right knitting needle into the next. p, but one row below, p2. Row 2: k2, p2. Row 3: repeat from the first. Left finishing edge: row 1: p2, k2. Row 2: slip 1 p, without knitting, p 1. ., introducing the right knitting needle following. p., but one row lower, k2 Row 3: repeat from 1st Knitting density: pattern A 30 p. = 12 cm, pattern B and C 22 p. = 10 cm Upper part Using knitting needles No. 3.5 and contrasting color yarn, cast on 65 p. and knit 1 row of faces (at the end of the work this row will be unraveled), with yarn of the desired color, knit 1 purl. and 4 rows with a hollow elastic band. Next, switch to 1x1 elastic. On OB 7 cm, continue knitting with needles No. 5, making 17 increments in the first row and distributing the loops as follows: 4 sts for the right finishing edge, 22 sts with pattern C, 30 sts with pattern A, 22 sts with pattern B and 4 sts. left finishing edge. Having knitted 2 rows, begin to decrease 4 stitches 8 times, 1 stitch in each 2nd row, for decreases at the beginning of the row, knit 2 knits together, at the end - 1 stretch. At OB 28 cm, decrease 4 sts 4 times, 1 st in every 6th row and 4 times, 1 st in every 20th row. On the wrong side of the work to decrease, knit at the beginning of row 2 together purl. crossed, at the end - 2 together. Continue knitting only on the loops of the right finishing edge, gradually picking up the remaining loops like this: 1-3-5-7-9th rows: knit 4 sts. right edge, purl 3 traces together. p. 2 row and all even: remove 1 p. knit, without knitting, knit 4 p. edges 11th row: knit 4 p. edges, knit together purl. 4 next p. Having completed the 12th row, interrupt the work and connect (sew) the right and left finishing edges. Bottom part Using knitting needles No. 5, cast on 6 sts and knit purl. satin stitch Having completed 2 rows, add 2 stitches 2 times, 1 stitch in each 2nd row, including the added loops in the purl. smooth surface Continue knitting, distributing the loops like this: 4 sts of the right finishing edge, onto the 2nd next. start knitting, following pattern B, and 4 sts of the left finishing edge. In even rows not indicated in the diagram, knit stitches as the knitting looks. To perform 2 stitches crossed to the right, and 2 stitches crossed to the left, see the explanations for pattern B and C. Having completed the 28th row, continue the work you started without increasing. At OB 18 cm, switch to knitting needles No. 3.5 and knit 1 row like this: 4 sts, right edge, * k2tog, purl 2. *, repeat from * to * 5 times, k2 together, finish, knit 4 stitches on the left edge. Then knit the edges as before and knit on 22 central stitches as the knitting looks. At OB 21 cm, close all the loops. For the tail, using knitting needles No. 3.5, cast on 5 sts and knit 2 knits, 1 purl. and k2, knit as knitting looks, to a height of 12 cm, bind off all loops. Assembly Close the upper part in a circle, sewing together the short parts of the edges. Connect the lower and upper parts, making seams 2 points away from the edge of the finishing edges and leaving 6 cm open at the front paws. Fold the tail piece in half and sew it at the edges of the top piece.


