Isothread technique, diagrams for beginners.
Works using isothread technique- an exciting activity not only for adults, but also for children. At first glance, it seems that this technique is very complicated, but in fact you just need to learn the pattern and everything will work out great.
You need to master the technique of filling a corner, a circle, a web. After this, you will be able to complete quite complex paintings using the isothread technique.
teach this art to your child, it is not only interesting, but also useful. This hobby develops a child’s perseverance, eye, imagination and abstract thinking, hand coordination and fine motor skills, and fosters accuracy and attention.
Filling a corner using isothread technique:
1. Draw an angle on the cardboard.
2. Divide each side of the angle into the same number of equal segments.
3. Number the point (on one side of the corner - start from the top, on the other - vice versa)
4. Use a needle or awl to make punctures at all points except the top.
5. Thread the needle and make a knot.
6. Fill in the corner according to the diagram above.
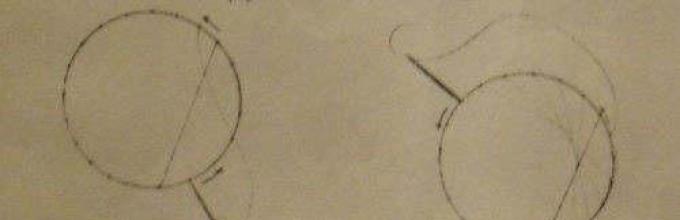
Filling a circle using isothread technique:
1. Draw a circle.
2. Divide the circle into equal parts.
3. Make punctures at all points obtained.
4. Fill the circle according to the diagram. 
Schemes of work using isothread technique: 


See other topics from this section here -
Learn about the isothread technique, with which you can create beautiful paintings from threads. See how to make a fabric panel.
For beginners: isothread diagrams

The isothread technique was invented by English weavers. They proposed an interesting way of making panels: nails were driven into the frames, and multi-colored threads had to be pulled on them in a certain sequence. The result was beautiful canvases that decorated the walls.
To make thread paintings, let's first learn 2 fairly simple techniques. Using and combining them, you can create interesting compositions. The first motif is a technique for filling a corner, the second concerns filling a circle.
Here's what you need for this job:
- cardboard;
- pincushion and needle;
- threads: iris, floss, silk;
- awl;
- scissors;
- pencil;
- ruler.

On a sheet of paper, draw a right angle with sides of 8 and 10 cm. Make markings on one and the other side, placing dots every centimeter. Make holes on all these markings with an awl.

If you are just mastering the isothread technique, then number the dots, this will help you avoid getting confused when embroidering with thread.
- Insert the needle from the wrong side into the cardboard (a knot remains on this side) at number 1, pass the thread to the front side, insert the needle into hole number 2.
- Make a puncture from the inside out into hole number 3. The needle is on the face. Move it to 4.
- The next turn of the thread will have a path on the front side equal to the distance from numbers 5 to 6.
- The next straight line has a distance of 7–8.
- Based on this technique, fill in all the segments from one side to the other of the corner.
The second principle is filling the circle.

Draw a circle, number it with dots, placing them at equal distances. The more there are, the tighter the turns will fit together.
If you subsequently make patterns in the shape of a drop or an oval, do them using the design of an angle or a circle.

Get acquainted with another principle of designing elements using the isothread technique. Diagrams will help with this.

Here are 2 options for filling out the heart.

When you have learned how diagrams help you create paintings using the technique of isonite, and have learned how to perform simple elements, move on to practical work. The Butterfly painting consists of simple patterns that will help you recreate this spectacular insect.

For this thread painting you will need:
- colored cardboard;
- image of a butterfly;
- awl;
- green and yellow floss threads;
- needle;
- thin tape;
- scissors.

The cardboard should be of such a color that the threads used look good on it. For example, bright and light colors look great on dark colors.
Redraw the butterfly onto the cardboard and make holes at equal distances using an awl. For convenience, you can number the segments for the correct movement of the thread.

Let's start with the top wing. Here's how we design it. From the inside out we secure the ends of the threads with tape.

We design the second wing in exactly the same way - symmetrically with respect to the first. This is what happens.

The lower ones will be made from threads of a different color.

To mark the body and antennae of the butterfly with threads, sew them in a straight line and go back. We cover the reverse side with a white sheet of paper or cardboard so that the work looks neat on this side as well.
Such a butterfly can become the front side of a postcard, like the following samples.

Using isothread patterns, you can make a charming dog or heart, flowers to give your creations. You can leave these embroidered items in your home; they will give your home a unique look.
- Use smooth cardboard or thick paper as a base; sometimes velvet cardboard is used for paintings.
- To work you will need an awl, take a sharp and short one. Make punctures on the cardboard from the front to the back so that it is neat.
- To draw a diagram, take a simple, well-sharpened hard pencil.
- Use a needle with a large eye, this will allow the thread to pass through unhindered.
- To avoid damaging the working surface, place a backing under the cardboard; it can be a wooden board or thick foam plastic.
- Watch the thread tension. If you pull it too hard, you may tear the cardboard base. A very weak turn will cause the thread to sag.
- The wrong side will look better if the completed thread painting is glued onto thick cardboard.
- The isothread technique is used to make panels, postcards, paintings, bookmarks, and covers.
Thread paintings
See what other panels you can make from this material. This is how paintings are created from threads and nails (which are used instead of punctures).

The base can be plywood or other similar material into which nails can be driven. They are attached along the boundaries of the contour of the design and wrapped with thread in a certain order, using the isothread technique or in a chaotic manner.

For such a picture of threads and nails you will need:
- painted plywood;
- nails;
- hammer;
- bright threads.
For the next thread and nails painting, take:
- a solid base with a dark background;
- white threads;
- drawing;
- nails;
- hammer.

Attach the selected design to a thick base. Drive nails along its external and internal contours. Decorate the pattern with thread, sequentially winding it either on the outer or on the inner nail.
Since there are fewer heart-shaped nails than those driven along the outer contour, wind the thread on one inner one and several outer ones.
If you don't want to maintain proportion, arrange the thread randomly.
For the next picture of nails, the thread comes out from one point and then, sequentially, rushes to the outer contours of the wings.

And here’s how a randomly wound rope will help you make a beautiful inscription, a heart. Using this technique you can make a sign and save a lot on it.

The master class will help you understand the intricacies of the next work, where threads also play a major role.
You will need little for it:
- cardboard;
- wool threads of various colors;
- pencil, scissors;
- brush;
- glue.
We decorate with threads of different colors, also gluing them on small details: eyes, nose, mouth, face. If there are flowers or other small elements on the panel, also fill them with woven yarn.

Now you can move on to larger elements - the body, tail, and at the end paste over the background of the picture.

Fabric painting
They turn out no less beautiful and original. Fabric paintings can be made together with children, especially those on which they draw with chalk. It will not crumble from the finished canvases, and why, you will learn about this secret very soon.
For artistic creation you need:
- pieces of cotton fabric;
- colored crayons;
- Bowl;
- starch water;
- frying pan or wide plate;
- foil.
You can cut pieces of rectangular or any other shape from cotton fabric. The brighter the colors of the crayons, the more colorful the picture will be.
Place the shreds in a bowl. Dilute starch with water in a ratio of 1:3, pour this liquid over pieces of fabric, soak them well in the solution.

Wring out the flap and place it on a flat surface on a plate or frying pan. Draw a design with chalk.

Decorate other canvases in the same way. Now you need to lay out fabric paintings on foil, doing it yourself or entrusting it to the kids. After all, they will be very interested in learning about a new type of creativity and trying it out.

That's it, you can frame the panels and hang them on the wall. The starch solution fixed the chalk and it will not fall off. If you don't have ready-made frames, glue them together using PVA from wooden popsicle sticks. Even round hoops, which are used for embroidery, will be used.

Here's how else you can create paintings from wet fabric, using its ability to drape beautifully. For this piece of art you will need:
- plywood or fiberboard;
- thin plain cotton fabric;
- newspapers;
- water;
- flour.

Pour half a glass of flour into a small saucepan, pour in 200 ml of water, mix thoroughly with a whisk. Put the mixture on fire. Stirring occasionally with the same kitchen tool, bring to a boil. Remove from heat, cool.
Spread the fabric, taking the paste with your hands, rub it over the surface of the fabric. Place this side on the plywood.
The fabric should be 5–8 cm wider than the fiberboard on all sides. After all, we will drape it and it will shrink.

- We begin to drape the fabric. Divide the picture into approximately 2 parts. The top one will be smooth, here you will depict the sky and the sun. We drape the bottom one so that the resulting images are: mountains, water, shore, trees.
- Where the sky will be, carefully level the fabric with your palms so that the surface becomes smooth, without air bubbles under the fabric.
- For the relief part of the picture, decorate the fabric with folds of various shapes and sizes.
- If you want to mark a prominent feature, such as a large rock, then use newspaper. Moisten it with flour glue and place it under the canvas where needed.
- Glue small parts onto a wet cloth immediately.
- The finished fabric painting is dried for approximately 10–12 hours.
- If you want to apply a drawing to the panel, then do it when the canvas is completely dry. This could be: a church, a house, a tree, an animal, a person, etc.).
- After you have painted the church and coated its domes with glue, sprinkle millet onto this part of the fabric painting with your own hands. We paint the church with gouache or acrylic spray paints.
- Paint the sky and water with blue paint. The shore is yellow.
- Cover the moss with green paint and let it dry. Wait until the canvas itself dries well. Only after this, glue the moss to the crown of the trees and instead of ground vegetation.
- For this, it is good to use a heat gun or Titan or Dragon glue.

It’s also nice to make paintings from fabric, first cutting out the flaps with your own hands, then putting them in place.

For this use:
- pieces of fabric;
- threads;
- glue;
- braid;
- glitter;
- pencil;
- thick cardboard.
- First draw the future picture in pencil on the cardboard. Let it be a vase with plants.
- Fill the background with braid of various colors, placing it straight or wavy.
- Cut out the flowers using the same template, but also using different fabrics: light blue, dark blue, purple. Glue glitter to the cores.
- Glue a vase onto the canvas and flowers on top, grouping them in several pieces and decorating them with green leaves.
- After the fabric has dried, the painting can be framed and hung on the wall.

Using the patchwork technique, you can create many more fabric paintings. For flight inspiration, watch interesting videos:
"Isothread- no less exciting and entertaining needlework technique. You can also find other names: thread graphics, thread image, embroidery on cardboard, thread design, isographics. The main thing is an openwork pattern on clear geometric lines.
When you look at the finished works, in which the threads are intricately intertwined, you might think that it is very difficult to repeat. But when you master the basics of embroidery on thick paper or cardboard, then any complex pattern can be done. Beginning craftswomen should hardly take on complex compositions; it is important to learn how to make basic motifs; there are not so many of them compared to other techniques.
Main motifs of isothread
The first motive is corner filling .
To begin, take a sheet of cardboard and draw a right angle. The length of the sides is 8-10 cm. Place a dot every centimeter and make a hole with an awl. Beginners are advised to immediately enter the numbers along which the needle will move.
So, the first round! The needle enters the cardboard from the wrong side (the knot remains there) at number 1, and moves along the front side to number 2. 
Then from the wrong side go to number 3.

Go along the front side to hole number 4.
Move from below to 5 and make a turn into hole 6.

Next you can see segment 7-8.

And using the same principle, you must fill in all the segments in the graphic drawing.

When the principle of filling is clear, you will not need to draw numbers; you will start working from memory.
Angles can be of different lengths and any degree, but the principle of filling them is the same, but the result is different.
To reinforce your learning, watch this video lesson:
The second motive is filling the circle .
There are also some nuances here that beginners should know about.
You need to draw a circle and put points on equal segments. The more dots, the denser the pattern. Then everything depends on the distance at which the turns of the threads will lie. The examples in the photo show the options!
The longer the piece of thread, the closer the filling is to the center of the circle. If the turn lies shorter, there will be interlacing threads near the edge of the line.


When working with circles, you also need to write down the thread stroke in numbers at the first stages.
The oval and drop are filled according to the principle of the circle or angle motif. You will understand everything in practice.
Another principle of the iso-thread technique, when all the work is done from one point . For example, a graphic drawing is a heart. There are two options for filling it out.


The movement takes turns.
 Here the turns are laid back a step.
 These fill options can be used for any design. When you master the basic motives, then you will combine and combine them at your discretion.
Helpful information
Beginners will be interested in some tips and subtleties of the iso-thread technique . Let's look at them in more detail.
— For the base It is better to use thick paper or smooth cardboard; works on velvet cardboard are less common.
— To draw a drawing, you need a simple pencil, preferably hard and well sharpened, so that the line of motifs is thin.
- You will also need a ruler for drawing lines and angles, and a compass for forming circles of different diameters.
— Awl It is better to use short but sharp. They need to pierce the cardboard from the front side to make the work look neater.
— Needle It is recommended to take one with a large eye so that the thread can pass through easily.
— Threads You can use any, but floss and iris are considered the best for this technique. Works made with woolen thread look great on velvet paper.
— Holes should be pierced on the backing so as not to damage the table covering. It is recommended to use a piece of cardboard from a packaging box or thick foam.
— To secure the thread on the reverse side you can use narrow tape or PVA glue.
— To prevent the thread from getting tangled while working, cut off a piece that is not too long.
The isothread technique is used to make postcards, panels, paintings, notebook covers, and bookmarks.
— At the initial stages, it is important to monitor the density of the embroidery. If you pull too hard on the coil, you may tear the cardboard. A weak thread clamp will sag and look sloppy on the finished work.
— To hide flaws on the reverse side, the work must be glued to cardboard or placed in a frame without glass.
Painting “Butterfly” using isothread technique (master class)
Now let's move on to practical work. When all the basics of the technique are clear, you can begin embroidering a separate item. For example, butterflies. It will consist of the simplest patterns, when the entire image is completely filled.

For work you need the following materials:
- set of colored cardboard;
- graphic image of a butterfly (in which all the points are drawn);
- floss threads of two colors (yellow and green);
- awl;
- needle;
- scissors;
- thin tape.
Step by step

Take colored cardboard of such a shade that the threads you have chosen are clearly visible. For example, purple if the embroidery is with yellow and green threads.
Place the image of a butterfly on the cardboard and make holes with an awl. Don't forget about the backing so as not to spoil the work surface.

In the graphic drawing, use numbers to indicate the direction of movement of the needle.

This is the base with holes you need for work.

Take a needle, insert a thread into it and start forming segments.


This is what the openwork weaving should look like.

Do not forget to secure the edges of the threads with tape on the wrong side of the work.
The second yellow wing needs to be made symmetrically.


When you embroider the lower wings, you can change the color of the threads to make the work more vibrant.
You can even embroider the base in one color, and then add a different shade from shorter sections along the edge.

To form the body and antennae of the butterfly, you just need to sew the sections in a straight line and return.
This is what the finished work looks like.
It is better to cover the reverse side with a white sheet of paper to hide embroidery errors.
Agree, it will be nice to receive such work as a greeting card.
I hope that my detailed story about the iso-thread technique and a successful example of work will inspire you to come up with original ideas and soon beautiful embroidered items will appear in your home.
Regards, Tatiana!"

When you master the iso-threading technique, you will be able to create such beautiful paintings as in this video with your own hands:
Schemes and templates
For beginning needlewomen, ready-made diagrams and templates with numbers may be useful. You can print pictures from the Internet and embroider by numbers.
Hearts:


Flowers:


How to make something original panels made of threads and nails
And another story from Tatyana about the practical application of this technique:
“We have creative people working in our office, both boys and girls. Our department is located on the second floor. You have to climb one flight of stairs. And he is so dull and monotonous. On a rainy morning, my co-worker suggested we “revive” the wall on the stairs. We did not risk painting on it, since our office rents this room for rent. Therefore, it was necessary to make some kind of large panel or, as a last resort, paint a picture.
We found some interesting technology on the Internet. string art. It is based on the use of nails and threads. An image is created when the turns of threads are intertwined in a certain pattern between the heads of the nails. Everyone appreciated the idea and began to implement it.
After the renovation, there was a piece of drywall measuring 1 by 2 meters in the pantry. We decided not to cut it into pieces, but to use it whole. The girls drew a bird of happiness in the center of the base (essentially an ordinary peacock), on either side of it were two trees and at the bottom of the work were improvised bushes of grass.
The guys bought large nails with wide heads and drove them at a distance of about 2 cm from each other throughout the graphic image. Moreover, the carnations on the bird itself are dotted very densely, about 0.5 cm deep. This is so that the pattern is filled out and the turns of the threads fit well.
When all the men's work was completed, it was again the girls' turn to show the dexterity of their hands. We have selected amazing threads for all elements of the work. Lilac on the feathers and red on the body are thin threads of the “iris” series, and thick threads on the circles of the tail and tree crowns are textured threads for knitting.
The weaves had to be done in isothread technique, strictly according to the drawing. What a gorgeous bird!

 Trees were easier to form, since it was only necessary to hide the base a little, so the turns of threads were intertwined in a chaotic manner. Notice how the threads on the trunks are shaded and how the textured ones look good on the crown.


 Then the guys suggested making a frame for the panel to make the work look more interesting. They nailed a piece of wood around the edge of the base.
The work was complex and painstaking, but the result was worth it. The result was a beautiful and bright panel made of threads and nails.

Now our stairwell is the most colorful in the entire building. And if fate takes us to a new place of work, then the picture will go along with our team.”
We will be glad to see photos of your work!
Did you like the product and want to order the same from the author? Write to us.
More interesting:
Send your photos
Do you also make beautiful crafts? Send photos of your work. We will publish the best photos and send you a certificate of participation in the competition.See also:
DIY wedding card
What could be better than the brightest holiday in life than a wedding? On this day I want everything to be...
DIY cards - scrapbooking
The girl, who signed the name Tradicia, told how she makes cards with her own hands. "Recently...
Wood burning technique
Pyrography - wood burning Currently, the art of wood burning (pyrography) has become...
How to make salt dough, recipes and secrets
All about salt dough My statement may seem strange to some, but salt dough can...
Making a Valentine's Day card using quilling technique
Another master class on making an original card for Valentine's Day using the quilling technique from...
The master class is intended for children of senior preschool age (5-7 years old).
Isothread- this is embroidery on thick material (paper, cardboard, velvet paper, sandpaper, etc.). Works using this technique turn out to be unusual and exquisite. Using embroidery using this technique, you can decorate a wall panel, postcard, or packaging box. In this master class we will embroider a picture on the theme “Cockerel”; such a picture can be used as a gift for any holiday.
Target: Strengthen the ability to create images with thread.
Tasks: Develop fine motor skills of the hands. To cultivate children's aesthetic perception and independent drawing with thread.
We will need a ready-made drawing diagram or draw it ourselves.
For this embroidery we will need:
sewing threads (blue, yellow, orange, red);
sewing needle;
sheet of cardboard (green);
graphite pencil;
pushpins;
a piece of foam for lining while piercing with a pushpin.
Description:
On a sheet of colored cardboard on the reverse side we apply a drawing of the Cockerel (circles, triangles) and I use stencils.
Along the lines on the wrong side we apply markings for the holes (using a stencil). The number of holes on both sides of the corner should be the same.
.jpg)
Having placed a plate of foam plastic, we use a pushpin to pierce holes according to the markings. There will be holes on the front side that repeat the pattern on the back.
.jpg)
We thread the needle and begin to embroider the corner on either side according to the pattern. We embroider all the corners in the picture.
.jpg)
We embroider all the circles according to the pattern.
.jpg)
.jpg)
.jpg)
The picture “Cockerel” is ready.
.jpg)
In the same way, you can embroider the following pictures (photo 9 - “Bunny”, 10 - “Cat”, 11 - “Sun”, 12 - “Soap Bubbles”, 13 - “Fireworks”).
.jpg)
.jpg)
.jpg)
.jpg)
.jpg)
Paintings using isothread technique are extremely beautiful and elegant. At first glance, it may seem that thick paper is a very complex material. It is clear that every handicraft requires skills. It is unlikely that you will be able to immediately create a complex, intricate drawing from a photo. But you just have to learn two basic methods: filling a corner and a circle, and needlework will immediately become easy and understandable. Those who already have experience in this needlework can easily create the most intricate patterns and compositions.
Isonit diagrams are depicted quite simply. With this embroidery you can create almost any design. It is enough to draw an outline and make holes along it. Next, we will consider in detail a master class on how to do such work.

Materials and tools for thread graphics are available in every home. Therefore, even for novice craftsmen, it will not be difficult to find everything you need.

Basic techniques for isothread embroidery
Any string graphics schemes have similar methods for filling out elements. Let's look at the main methods.
Corner Filling
You need to draw an angle on a piece of thick paper. The size and severity do not make a difference. Each side of the isothread drawing must be divided into equal sections. To do this, use a ruler to measure intervals of 5 millimeters. We start work from the top of the corner. We mark each distance with a dot and a number. In these places, using a backing and an awl, you should make holes. The corner is sewn up as shown in the diagram. Embroidery begins from the inside out.

Filling a circle
Draw a circle on thick paper using a compass. It must be divided into twelve identical segments. We also mark the points with numbers and make punctures in these places. The peculiarity of filling the circle is that the smaller the distance between the punctures, the more beautiful the image will be. The main thing is that there are an even number of holes.
 As for the length of the isothread stitches, long stitches fill the element more than small stitches. And accordingly, the central hole will also be smaller. The circle is embroidered according to the pattern.
Arcs and spirals
Embroidery of these elements is carried out using the same method as for the circle. But the length of the stitches should be short. The size of one stitch should be less than half an arc. The width of the embroidery directly depends on the stitch size. The smaller it is, the thinner the arc will be.


As for the peculiarities of embroidery of spiral figures, it is done all the time in only one direction. The stitch length of this isothread can only be from 3 to 5 punctures. After you have figured out the basic methods of embroidery using the thread graphics technique, you can proceed directly to the product. We offer a small master class of a children's pattern.
Kitty
This one is easy. A master class of such work is quite suitable for children’s first creativity.
For embroidery you will need:
- black thick paper;
- white floss threads;
- thin white paper;
- pencil;
- pin;
- clamp;
- glue;
- needle.
Manufacturing process
On white paper, use a sharp pencil to draw an outline of the cat. The photo shows what such a scheme looks like.
 We attach the sheet to dark cardboard and secure it with clamps. Using paper clips will leave dents in the finished product that will not go away. Therefore, it is better to take special paper clips.
On the outline of the image, dots with numbers must be placed at regular intervals. In these places we pierce holes with a pin. Before you start making holes, place thick, dense material under the workpiece. It will not damage the work surface. We thread the thread into the needle, but do not make a knot. Isothread embroidery should begin from the reverse side. After making a couple of stitches, the end of the thread should be secured on the wrong side with glue.
 The ears and part of the tail are embroidered using the corner filling method. All other elements - by filling the circle. Separately, cut out eyes, nose, and antennae from multi-colored materials and glue them to the cat. The embroidery is ready!
 You can also conduct a master class with your children on embroidery using the technique of threading dandelions. It's not difficult, any child can handle it.
Spring dandelions
 This master class does not require any special skills. This image is an excellent option for inking diagrams for beginning craftsmen. The picture is created using the simplest stitches.
For embroidery you will need:
- cardboard;
- green paper;
- glue;
- needle;
- pencil;
- awl;
- yellow and green threads.
Manufacturing process
You need to glue green paper onto the cardboard. A color scheme is drawn on it. At equal distances, you need to mark points with numbers with a pencil. Using an awl, holes are made along the contour of the design. We begin to embroider from the wrong side, securing the tail of the thread with glue.


The flower and dandelion bud, which are shown in the photo, are embroidered with yellow thread using the method of filling the arc with triangles. The stem is created with stitches of green thread. The leaves are made by filling the corner with green threads. The finished embroidery can be framed or decorated with a baguette.
Tone thread graphics
Creating tonal isothread is considered the highest degree of skill. But it’s also easy to do. The main thing in this art is to choose the right materials and place all the elements beautifully and harmoniously.
In nature, all shades are divided into two groups: warm and cold. Visually warm ones are perceived as protruding forward, cold ones - receding back. Using such tricks, a unique volumetric embroidery is created.
 In addition, shades are divided into light and heavy. Heavy ones include dark, saturated ones, light ones include cold, light ones. If the composition is embroidered correctly, the top part of the image will be “lighter” than the bottom. It is also necessary to ensure the harmony of the combination of color shades and fabric. In the photo, such paintings have unique artistry and originality.
The tone embroidery is very beautiful. It is particularly elegant and picturesque. The master class of such works is based on the correct relationship of color schemes.
The isothread technique is an ideal activity for children of any age. It is not difficult to perform, but very exciting. The very first classes allow you to create attractive and artistic works, which young needlewomen really like. In addition, this embroidery method develops attention, thoroughness, and fine motor skills in the child. Isothread for beginning craftsmen is the best way to get acquainted with such needlework as embroidery.


