
Before the cold weather, many begin to warm themselves: hats, mittens and other accessories and clothing are purchased first. And if you know how to crochet, then you can knit a hat yourself, for example, something like this, which will please both yourself and those around you. This model is universal and, depending on the color, can become a women's, men's, or children's accessory.
How to crochet a hat for autumn (spring)
- a ball of wool blend yarn (wool, acrylic, thickness of at least 250 m per 100 grams);
- hook;
- scissors.
As you can see, nothing special. We will start with an elastic band, and crochet elastic band will be knitted crosswise, so at first glance it will be a little difficult to distinguish it from elastic with knitting needles: (photo 2). However, this elastic band has less stretch and is a little tighter than knitting.

So, we knit the first row of 15 chain stitches using single crochets.
Then we turn the knitting over and knit it back, also in single crochet columns, but we knit it by the column itself, raised concave column:

Each time we alternate rows with simple and embossed columns and get a finished elastic band: (photo 3).

Wrong side: (photo 4).

We connect both ends with a hook (you can also use a needle) with connecting columns: (photo 5, 6, 7, 8).


After this you can start pattern. Scheme:

Pattern Description:
We make an air loop and a single crochet: (photo 9).

Then an air loop (photo 10) and another column (in the hole between the elastic columns): (photo 11, 12).


We continue like this until the end of the row. In the next row we knit a column under the arch of the air loop, and in place of the column we knit an air loop. The pattern is very simple, but effective: (photo 13, 14).


We knit to the desired height, and then proceed to shortening the loops. They are also simple to perform. First, an air loop is not knitted between every 9th and 10th stitch: (photo 15).

In the next row we get rid of the air loops between the 7th and 8th columns, then between the 5th and 6th: (photo 16).

And so on until only single crochets remain. After which you need to knit a few more rows, shortening the stitches (knit 2 stitches with one top): (photo 17).

The remaining 10-12 columns can simply be pulled together with thread: (photo 18) and pulled out at the end inside out.

Knitted hat for autumn is ready:


1. FASHIONABLE KNITTED HATS AND BERETIKS FOR WOMEN THIS SEASON
Autumn has painted everything around with bright rich colors, it is getting colder every day and even the first frosts are expected at night. It's time to think about updating your wardrobe not only with warm knitted sweaters and shirtfronts, skirts and scarves, but also stylish bright (and most importantly, warm from the cold) hats that will protect women's health from the constantly plaguing colds characteristic of the autumn-winter season .
And what could be more convenient and comfortable than hats or berets knitted with your own hands from high-quality yarn according to the patterns of modern models?...
Choosing yarn for crocheting:
This season, monochromatic models made of bright yarn will be popular, under which you can hide your hair. The beret can be decorated with a flower (kanzashi) knitted or folded from satin ribbons.
◘ Headdress in the form of a wide crocheted bandage.
Now this option will be as popular as last season. A wide knitted headband is more suitable for girls with long hair. Plain models with a large accessory on the side (or a knitted flower) look elegant. For a sporty style of clothing, you can knit a wide headband with a Norwegian pattern.
2. USEFUL TIPS FOR BEGINNERS AND SOME SIMPLE OPTIONS FOR CROCHETING WOMEN’S HATS
Useful tips for beginner knitters.
Start crocheting a hat from the bottom. First make two air loops. In the first inverted air. We knit a loop with 6 single crochets. If you start knitting the fabric of the hat this way, you will be able to avoid the appearance of a hole. In the next row of the circle, you can double the number of loops = 12. Then knit in a spiral with single crochets and add 6 stitches in each circular row.
How to quickly knit a light summer hat:
How to crochet a beret from Irish lace:
3. DIAGRAMS AND DESCRIPTION OF THE STEPS OF CROCHETING DIFFERENT MODELS OF HAT GEARS FOR WOMEN
Option #1:
Option #2:
Option #3:
WE CROCHET A GORGEOUS SUMMER BERAT ACCORDING TO THE PATTERN WITH A DESCRIPTION OF THE STEPS OF WORK. EXCELLENT LIGHTWEIGHT MODEL FOR WOMEN.
Option #4:
Option #5:
Option #6:
Option #7:
Option #8:
Winter is coming soon. It's time to crochet a new warm hat. You shouldn't walk in cold weather without a hat. And at the same time I want to look beautiful. Therefore, we present to you a selection of knitting patterns with descriptions of crocheted winter hats with patterns and descriptions so that you have a choice to suit every taste.
Spectacular crochet winter hat
Warm cozy set for winter
The first option is a bright knitted hat for the winter and... The set is knitted from thick section-dyed yarn, so you can knit it in a few days, even if you are a beginner knitter. The principle of knitting embossed columns is shown in the photo step by step, the pattern is completely simple.
You will need:
- yarn with parameters 100met/100g - 200 grams;
- hook No. 8;
— faux fur pompom with a diameter of 15 cm.
Scarf pattern: (multiples of 4)
1st row: 3 air loops (VP), then s/n columns;
2p.: 2 VP, * 2 embossed columns s/n (RSSN) behind the front wall (the hook must be inserted in front around the column s/n of the bottom row), 2 half-columns * - repeat from *, finish 2 RSSN behind the front wall, 1 half-column.
3p.: 2 VP, * 2 RSSN behind the back wall (insert the hook from behind into the bottom row), 2 half-columns * - repeat from *,
complete 3 half columns.
4p.: 2 VP, * 2 half-columns, 2 RSSN for the front. wall *, 3 half-columns.
5p.: 2 VP, * 2 half-columns, 2 RSSN behind the back wall * 3 half-columns.
Repeat the pattern the first time from rows 1 to 5, then from rows 2 to 5.
Elastic band (for hat): (circular rows, multiples of 4)
1st row: 3 VP, then column s/n, finish 1 connecting column in the starting point;
2p.: 2 VP together with the 1st p/st, * 2 RSSN for the front wall, 2 p/st *, finish with 2 RSSN for the front wall, 1 RSCH, 1 connecting column. to the second initial VP.
Density: main pattern 7 p. = 10 cm.
Description of knitting hats:
- Cast on 36 VP, close it in a circle with a connecting column.
- Continue working with a 14cm rib pattern.
- Begin rounding the cap to form the crown. In the first r. knit all the half-stitches together (=27 stitches). In the second r. knit raised treble stitches together (= 18 sts). Next, knit a row of treble crochets, knitting them 2 at a time (=9p.). One more r. without decreases and pull the remaining ones together with a working thread. Strengthen it firmly.
- Make 1 row along the edge of the hat. in a crayfish step (place st.s./n from left to right).
- Sew on the pompom.

Loop scarf: Start with a chain of 24 ch and 3 ch for the rise. Continue with the pattern for a 170 cm scarf. Sew along the short side.
Source: Little Diana magazine.
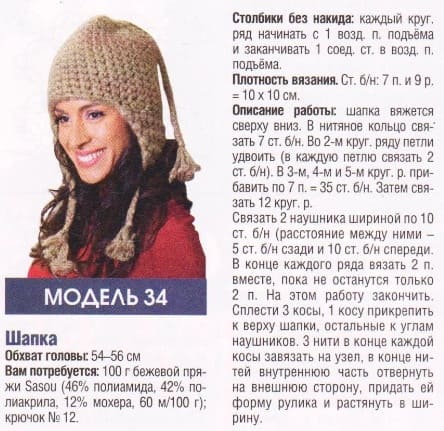
Hat made of bulky yarn for the winter

Many girls and women love small, neat hats. But in the winter cold you need to dress warmly. An excellent solution for this case is knitting from bulky wool yarn. The headdress will look stylish with fur coats and down jackets.
Size: 56-57 cm
Required:
- two types of yarn 1 - from Lana Grossa: Famoso dark gray (45% wool, 55% polyacrylic, 38m/50g) - 100 grams;
— 2 — Uno gray-black color (52% wool, 48% polyacrylic, 65met/50g) — 50 grams;
- hook No. 12.
Density: 5 p. = 10 cm
Crochet hat description:
- Start at the top of the cap with two chain stitches using thread #1. In the 1st circular row, knit 6 columns of b/n into the second chain stitch.
- In the 2nd r. continue with the same stitch and double the stitches (=12 stitches). At 3 p.m. double after 1 p. (=18 p.).
In the 4th - after 2 p. (= 24 p.). - From 5 to 14 p.m. knit without additions. Finish with a row of connecting posts.
- Use yarn number 2 to make a pompom.
Source: Filati magazine
White winter hat with lapel and openwork scarf

White is always a popular color for winter
It’s good when the hat is warm, but if there is also a flap, then in winter it will be even warmer. And it will look great over a jacket, fur coat, or down jacket. Let's look at a warm winter crochet knitting pattern. But only those who know how to crochet and knit can knit it.
Size 56 cm
Required:
— 450 g of yarn with parameters 190 met/100 g;
- knitting needles No. 3.5;
- hook No. 3.5.
Density: 23 p. = 10 cm
Scheme for making a women's hat:
- Cast on 96 stitches on the knitting needles and knit 23 cm in stockinette stitch in the round (all stitches are knit).
- For the crown of the hat, knit every second r. All loops are two together. Pull and fasten the remaining 24 stitches.
- At the bottom of the cap for an openwork lapel, crochet 10-12 cm of the pattern according to the pattern. Fold the lapel twice, laying out a beautiful openwork pattern.
- For a scarf, dial 51 air stitches. and knit 180 cm with a pattern according to the pattern (= 12 repeats and 3 stitches for symmetry). Make 46 tassels (23 per edge) by cutting 8 30 cm long threads for each tassel.

Crochet blue hat with pompom for girl
Crochet a bright hat for winter weather and you will immediately feel warmer. The stripe effect is created by the sectional dyeing thread.
For head circumference 50-54 cm.
Required:
- yarn with characteristics 250m/100g with color change - 100 grams;
- hook No. 4.
Pattern for the hat: double crochets in a spiral without connecting stitches.

Blue color for blue winter
How to crochet a hat?
Work starts from the top of the cap.
- Cast on 10 chain stitches, join in a circle and work 10 treble crochets.
- Second row: double the number of loops, inserting the hook twice in each gap (=20 stitches).
- In the third r. increase after 1 p. (=30p.), in the fourth - after 2p. (=40p.), 5 and 6 rubles. - no increase, 7 rubles. - add after 1 p. (=60p.), at 8 p. double every 6th stitch (=70 stitches).
- Then continue without increments until the height is 22 cm.
- Finish with one p. Art. b/n.
- Make a pompom from the remaining threads and sew it to the hat.
Source: Little Diana magazine
Delicate winter hat made from mohair crochet
If we talk about winter knitted fashion, then it is impossible to ignore products knitted from mohair. The yarn is soft, fluffy and warms well during the cold season. The presented version of the hat is very simple. Even a novice craftswoman who has picked up a hook for the first time can knit it. So, a step-by-step pattern for crocheting a winter knitted hat for women.

Mohair charm for winter
Head circumference: 54-56 cm, hat height without pompom - 21 cm.
You will need:
— Mochairlana yarn from Lana Grossa (42% mohair, 33% merino wool, 25% polyamide, 137 met/25g) — 50 g gray-lilac color;
- hook No. 4,5 and No. 5.
Density: 18 half. = 10 cm
How to knit a half-stitch: make 1 yarn over on the hook, pull out a loop, then with one new yarn over close all three stitches on the hook. Knit half stitches in circular rows, each circle starting with 2 chain stitches. rise.
How to add loops: from one half-column of the previous row. knit two at once.
How to decrease loops: Yarn over the hook and pull 1 stitch through two loops, then use a new yarn over to cover all stitches on the hook.
Step-by-step instructions for beginners:
- Make a chain of 4 chain stitches with hook No. 5, close them in a circle with a connecting stitch. Next, knit the hat in half-stitches.
- We make additions: 1 circle - dial 2 air p. for lifting and increase the number of half-columns to 10.
Round 2: double each half stitch (=20 stitches);
Round 3: add every other stitch (= 30 stitches);
Round 4: double every third half-stack. (=40p.);
5th round: doubling every fourth half st. (=50p.);
6 circle: every fifth half-column (= 60 p.);
7 circle: every sixth half-column (= 70 p.);
8 round: every seventh (= 80 p.);
9th round: - " - eighth (= 90p.);
10th round: - " - ninth (= 100p.);
11th circle: - “- tenth (= 110 p.);
12th round: - " - eleventh (120p.)
Round 13: knit without increments.
At this point you have knitted the flared part of the hat. - Now you need to decrease the loops:
Round 14: Cast off all 9th and 10th stitches 12 times. together (=108p.);
15 round: 12 times all 8 and 9 sts. together (=96p.);
Round 16: similarly knit 7 and 8 stitches together. - 12 rubles;
17th round: 12 r. all 6 and 7 half-columns (=72p.);
4. Next, we will knit the stand-beads with crochet number 4.5:
Circles 18-23: single crochet 72 p. - Make a bomb with a diameter of 5 cm and sew it to the hat.
Several models of winter hats for experienced craftswomen
For those knitters who already have considerable experience in crocheting patterns, there is no point in providing step-by-step instructions, as for beginners. Enough pattern diagrams. You can do all the calculations yourself and figure out the pattern of the pattern.

Pattern for experienced craftswomen

Another crochet pattern for a women's winter hat

Star pattern for hat

Knitted hat with colored stripes 


Incredibly beautiful crochet pattern for a hat:

For lovers of exclusive hats

Stylish women's hat style for women
When talking about winter knitted hats, it is impossible to forget about caps. There are two with a beautiful pattern for your choice.

You will need:
— Patons Canadian threads (100gr/187met);
- hook No. 5;
- 2 buttons.
Density: 14 tbsp. — 10 cm
How to knit a hat:
- Dial 3 v/p and close it in a ring. Knit from 1 to 14 r according to the crochet pattern. Expansion stage.
- Next, repeat rows 13 and 14 until you reach 20.5 cm from the top.
- Let's move on to making the plank: 1p. - 1 v/p, 1 column b/n in each column, connecting. pillar. (=64p.). Repeat this row again.
- Visor:
1st row: 1 single stitch, (1 double stitch in all columns) - 46 times, turn the product;
2-10r.: repeat 1r. turning rows “back and forth”. - Unscrew the side edges of the visor as in the photo. Secure them with buttons.
Voluminous knitted model for the winter
Development of the Urbu Garn style, adapted from Swedish by Marina Lindberg.
You will need 100g of medium thickness yarn and a No. 4 hook.

A classic beret is always in fashion
Knit a chain of 3 stitches and combine into a circle. Each new r. start with an air loop. From the ring, knit 7 columns. (STBN)
1st row: * 1 STBN, 2 columns each. in every 2nd column. previous p. *;
2p.: * 2 STBN, from one column. - two *;
3rd: like the second;
4p.: * 3 STBN, from one column. - two *;
5 and 6 rubles: like the fourth;
7p.: * 5 STBN, from one column. - two *;
8p.: * 6 STBN, from one column. - two *;
9p.: knit in the same way, increasing the loops in every 7th loop;
10p.: add in the eighth p.;
11p.: add in the ninth paragraph;
12p.: add in the tenth p.;
13r.: increase in the eleventh paragraph;
14 rubles: increase in the fifteenth paragraph;
15-18 rub.: no additions;
19p.: 13 STBN, * pull out a stitch from the next column. (=2 sts on hook), pull sts out of next stitch. (=3 sts on hook), pull yarn through all 3 sts, 13 sc*
20r.: * 7 STBN, one on three points as in 19r. *
RUR 21-27: knit according to the pattern.
Next we knit a bar: from 70 STBN - 5 rows.
Visor: along the edge of the strip, tie 34 STBN - 2 rows. Then at the beginning of each r. skip 1 p. Such decreases must be made 8 times.
Finally, tie the entire hat with STBN around the entire circumference.
Perky hat with columns

Morning fashionable color - Bay of Biscay
A cheerful crocheted model of a winter hat in this season's trendy Bay of Biscay color will diversify your wardrobe. The color looks especially good when combined with dark chocolate.
Size: 52-54 cm
Required:
— section-dyed yarn with characteristics of 90 m per 50 g;
- hook No. 6.
Pattern for the hat: circular r. in a spiral - * 1StBN, next st. pass with air. * - repeat from *. Knit the next rows of stitches from the air stitch of the previous row.
Work progress: make a chain of 64 sts, close in a circle using a connecting stitch. and knit with a pattern for a hat. When you knit 14 cm, knit all 7 and 8 sts together (= 56 sts). In the second decreasing p. - 6 and 7 at once (= 48 p.). Decrease in the same rhythm until 8 stitches remain. Pull them together with a working thread and secure. diameter 8 cm.
Charming women's knitted hat with a bell
The knitting pattern has already been given on our website, there is no need to repeat it, follow the link under the photo.


The combination of a beautiful pattern and sectional yarn is incredibly beautiful!
Head circumference: 54 cm
Required:
— section-dyed yarn Kid Royal Missisipi (62% kid mohair, 38% polyamide, 500 met/50 g) — 100 grams;
- hook No. 1.5
— clasp for a brooch.
We knit with thread in two folds.
A chain of 6 chain stitches close it in a ring. Then we continue according to pattern 1 until the desired diameter of the hat, then we knit straight. Along the bottom edge of the hat, knit a pattern according to pattern 2. Schemes 3, 4 and 5 show how to make 3 flowers. Connect them together. Using a pin, pin onto the hat.

Two models of winter hats. Please note that the green cap is double.

Video master class on knitting hats for winter:
In this article I will tell you in detail about how to crochet a hat.
There is more than one way of knitting - depending on the pattern, style, etc.
You can crochet a hat in the round - seamless knitting, or you can use longitudinal rows (along the hat) and connect the edges with a seam.
Crocheted hats come in different varieties. Therefore, the methods of knitting them are also different. For example, some hats are knitted starting from the top of the head. As, for example, in the photo:
Others, on the contrary, knit starting from the bottom edge or from the elastic band and towards the crown. Like this hat with a braid pattern:

There is another way how to knit a hat crochet, which is very different from the first two. When the hat is knitted in turning rows lengthwise. One row goes from the bottom edge to the crown, the next - on the contrary, from the crown down and so on. You can download a detailed master class on knitting such a hat (with valuable excerpts from my experience) for free here:

And what a variety of patterns for crochet hats- These are both voluminous patterns, for example various braids, and simple, but no less beautiful.
If the hat is planned with an elastic band, it can also be knitted in different ways.
The most common types are:
- Elastic band made from simple single crochets (cm in)
- Elastic band made from half double crochets
- And also an elastic band knitted with embossed columns in a circle (Like in my
Simple crochet hat

So, to create this hat we will need:
We will knit the hat not in the round as usual, but lengthwise, in rotating rows.
The number of loops that you need to cast on depends on what kind of hat you want to knit - with an elongated crown or a close-fitting one, also with or without a lapel.
- If the hat has a lapel and the crown sticks out, we dial 70 VP+1 VP
- For a hat with a lapel, but without an elongated crown, dial 50VP+1VPP
- If the hat is without a lapel with an elongated crown – 45VP+1VPP
Designations:
VP - Air loop
Runway - air lift loop
Those. 70 VP+1 VP - this means you cast on a chain of 70 chain stitches and 1 chain lifting loop, then turn the knitting and knit the first row.
Knitting a beanie hat
We will knit such a hat with regular single crochets (SC), capturing both walls of the loop. This is its difference from when we captured only the back wall of the loop.
We cast on the required number of loops in the chain - 70, 50 or 45 loops - depending on what kind of hat you will knit - plus one lifting chain stitch.

We unfold the knitting and knit the first row with regular single crochets.
Attention! The first 12 loops are knitted, and in the 12th loop place a marker (or a paper clip, a thread of a different color - whatever you have on hand).

We knit the second and all other rows of the hat with single crochets, capturing both halves of the loop as in the photo! That is, the loop has 2 walls, or 2 halves, we insert the hook, grabbing both halves of the loop, and pull the working thread through them.

We get 2 loops on the hook:

We grab the working thread again and pull it through these 2 loops. The single crochet is ready.

Knitted the row to the end. We make 1 runway (lifting loop), unfold the knitting and knit the 2nd row.
When we reach the marker, we remove it. In the same 12th loop where the marker was, we also knit 1 sc (single crochet), and in the next, 11th, 1 connecting stitch. That is, we insert the hook into the 11th loop, grab the working thread and pull it through this loop and the loop on the hook at the same time. You will find more details on how to knit a connecting stitch here:
Now we make 1 lifting loop again, unfold the knitting and knit the next row.
We knit all subsequent rows with single crochets on both sides of the loop.
Important point!
In order for the bottom edge of the hat to be elastic, and the hat to sit comfortably and not pull your forehead, you need to stretch out the last loop of the descending row more. We also knit this last loop, grabbing it by both walls so that the edge of the hat looks neat.
Ascending row - goes from the bottom edge of the cap to the top of the head.
Descending row - we knit from the top of the head to the bottom edge of the hat.
Photo 1 - Insert the hook into the last loop, grabbing it by both walls, grab the working thread and knit it, (remember - it is important to pull the loop stronger) we get 2 loops on the hook.

Photo 2 - we pull the loop harder like this - we get 2 loops on the hook.

Then we grab the working thread again and pull it through these 2 loops.

So we knit in turning rows until we knit all 12 remaining stitches J
We will get the first wedge, as in the photo.

How many wedges will there be?
It depends on the size of the hat and the thickness of the yarn and hook. If you crochet number 3 - 3.5 - then we usually make 7 wedges, for a head circumference of 55-58cm.
If we knit with thicker yarn and hook number 4 or more, then we need no more than 6 wedges.
But the best thing is, when you have knitted 5 or 6 wedges, try on the hat, try to connect its edges on the forehead. If the hat has not stretched too much, it means that it has been knitted enough.
When the first wedge has been knitted, we knit a descending row: make 1 runway, turn the knitting and knit a descending row - the first 12 loops. At 12th we put the marker again and finish the row. And the ascending row - we reached the marker, removed it, and in this 12th loop we will knit 1 sc for both walls of the loop, in the next loop - 1 connecting stitch. Next, runway 1, turn and knit a descending row. This is how we knit the 2nd and other wedges.
Connecting the edges of the hat
We fold our hat lengthwise and “sew” the edges, starting from the bottom of the hat, using connecting loops.
BUT we only grab the back half of the loop. Then the seam will be neat and less noticeable.
We hook the back half-loop of one and the other edge, grab the working thread and pull it through these 2 loops on the hook at the same time. So until the very end of the crown.
Important! Try not to pull, knit loosely, or crochet a larger size. Then the edge will be smooth.

This is what the seam looks like from the wrong side:

But I’ll show you a closer look at the top of our cap:

This is what the hat looks like without a lapel:

And here is the same hat, but with a lapel:

I think it turned out to be a nice pattern, what do you think? :)
Now you know, how to crochet a hat easy and simple and I’m sure you’ll definitely knit it now!
Take part in the blog and win a prize!
And also subscribe to new master classes so as not to miss all the fun!

A crocheted women's hat is not only a warm accessory. This is a fashionable attribute, without which it is impossible to create a complete image.
The variety of models of modern hats is so wide that everyone will find exactly the one that suits him. A crocheted hat will be the epitome of comfort and will highlight the taste of a fashionista.
Many girls prefer to knit their own hats. This way you can get an accessory for any outfit. And also get a cute set by knitting a scarf or fashionable gloves.
Before starting work, you need to take care of choosing a tool and yarn.
What yarn to choose for a hat 
To make the hat truly comfortable, for an autumn hat you need to choose yarn with a wool content of at least 40%. A for a warm winter hat, the percentage of wool should be higher - 70%.
Important! Artificial additives in yarn, such as acrylic, extend its service life, prevent the formation of pills, and prevent bacteria from multiplying.
Synthetic threads, although they look thicker, do not protect against the cold and electrify the hair.
The color must be selected based on two criteria:
- appearance features;
- outerwear.
There are premium segment threads. This unique merino wool yarn. It costs a little more, but differs in that a thin knitted hat will warm better than a thick one. It is incredibly soft, wears well, and does not lose color or shape. Suitable for knitting children's clothes, as it does not prick and does not cause allergies.
How to choose a hook for work 
A correctly chosen hook is the key to successful work. There are hook sizes from 1 to 15, the recommended number is indicated on the skein of yarn. If the pattern requires it, the hook may be a little thicker. A few more recommendations:
- the hook should fit comfortably in your hand;
- the handle should be smooth, without burrs;
- the head should not be too sharp;
- the beard should hold the thread well.
The length of the hook depends on the type of pattern; for a hat it is better to choose a standard one (up to 15 cm).
If the yarn is unpacked, then you can determine the size of the hook as follows: fold the thread in half, stretch it and place it in the groove of the hook. In a correctly selected hook, the thread fits completely, leaving no free space.
Crochet a women's hat
You can crochet almost any women's hats: both summer ones for the beach and warm winter ones.
Beanie hat for beginners 
A beanie is a hat that does not have ties or elastic, but it stays well on the head. This type of headdress is knitted with a “stocking” and, due to its elongation, drapes well on the top of the head. Good for winter.
Advice. It is better not to take threads that are too thick; the ideal option is yarn with 50% wool content.
The yarn consumption for the product will be approximately 100 grams.
Symbols on the diagram:
- ü O - air loop.
- ü X - single crochet for the back half loop (RS).
- ü - half single crochet behind the back half loop (PSBN).
In accordance with the description, the hat is knitted RLS in the transverse direction, where the number of stitches cast on is the height of the product (according to this pattern, 28 cm).

Description of work
- Cast on 38 chain stitches + 1 lifting stitch.
- In the second loop, tie 27 sc and 1 hdc.
- Skip the first stitch, knit 28 sc.
- Lifting loop, 29 SBN, 1 PSNB.
- Skip the first loop, knit 30 sc.

Knitting in this way is also convenient because during the process you can try on the product and adjust its width. After finishing knitting, it is better not to cut the thread, but use it to sew the edges of the fabric. Then thread the end of the thread into the needle and pull the hole at the top.
If, in addition to the hat, you knit a snood scarf, you will get a fashionable, cozy set.
Hat with lapel 
Lapel hats are popular because they suit any face shape. This winter hat can be made double, making it very warm.
For knitting you will need
- 200 grams of yarn;
- hook of the appropriate size;
- needle with a wide eye;
- scissors.
Scheme of work step by step
Knitting starts from the crown.
Knit an air loop into the sliding ring and knit 12 single crochet stitches inside it.
Holding the posts, tighten the ring and knit a connecting loop.
Make a rise of 3 air loops and knit 2 dc in each loop of the 1st row. Tie a connecting loop through the lifting post. There should be 24 columns.

In each even loop of the next row, knit 2 dc, in the odd one - one at a time. You should get 36 loops.
In the first two loops there is one dc each, in the third - 2 dcs. Another 12 loops should be added. To make 60 loops, 2 DCs need to be knitted in every fourth loop. In the next row, to increase, you need to knit 2 dcs in every fifth loop to make a total of 72.
The next 3 rows are knitted according to the same principle. And two double crochets are knitted into every 6, 7, 8 loops, respectively. The diameter of the circle should reach 16 cm.
In the 10th and each subsequent row, you need to knit one DC into each loop until the length of the entire product from the crown reaches 32 cm.

In the same way, you need to knit another part of the hat, since it must be double. Connect the parts by matching the tops and ends of the knitting. Knit a row of two threads with single crochets.
Warm hat with fluffy columns
This hat can be knitted either in one color or using several colors of thread. It is possible to knit a classic hat with a lapel or a fashionable beanie.

For knitting you will need:
- 100 grams of yarn;
Sequence of work
Knit 10 sc into a slip stitch and tighten. Knit a connecting loop. Knit 4 chain stitches into the first loop and yarn over. Return to the previous loop, pull the thread through, repeat 4 times so that there are 8 threads on the hook. Knit them with a common stitch, in accordance with the diagrams.
The pattern diagram is shown below.

Skip one loop, knit a dc and one chain stitch. Yarn over before each stretch. Pull 4 more threads through the previous loop so that there are 8 threads on the hook again. Knit them with a common stitch.
As a result, the first row should consist of 10 lush columns.

In the second row, knit 5 chain stitches at the beginning of the row and make 2 chain stitches before each chain stitch. Due to this, the loops will be higher and the knitting will not be pulled together.

In the third row, after every two chain stitches, you need to add one loop to make a total of 15 stitches.
In the fourth row, the additional air loop will be after every third. In the fifth after every fourth, and in the sixth - after every fifth.
After knitting six rows, you need to measure the diameter, it should correspond to the volume of the head, divided by 3.14 minus 1–2 cm.
You can lengthen the fabric and knit a hat with a lapel, and if it is winter, then sew on a pompom made of natural fur.
Hat with patterns 
This version of an autumn hat with a beautiful “shell” pattern is not difficult to knit.
Rubber
Knitting begins with an elastic band, for this you need to do the following.
Cast on 12 chain stitches + 1 lifting stitch (it must be knitted at the end of each row).
Single crochet for the back half loop.
All subsequent rows are knitted like the second until the length of the ring matches the circumference of the head. After this, the ring must be closed by knitting the first and last rows together.
Pattern
To start knitting a pattern, you need to unfold the ring and perform the following steps.
Work a row of sc.
Knit according to the following pattern.
- Skip 2 stitches and work 5 double crochets into the third stitch. Skip 2 loops, knit 1 single crochet and so on until the end of the row.
- In the second row, knit similarly so that the shells are staggered.

- Follow the pattern until row 17.
- In the 18th row, knit 3 double crochets, skip two loops, knit sc.

- Row 19: 2 dc, skip one loop, knit sc.

- Row 20: Dc in each stitch. Connect each two with a common loop, thus halving the volume of the circle.
To finish knitting, thread the thread into the needle and pull off the top. The hat is ready.
If the hat needs to be insulated, you can sew a lining from thin fleece fabric.
New models autumn - winter 2018
The fashion for crocheted items is becoming stronger with each new season. Nowadays, various models of hats are relevant, of which a real fashionista should have a lot.
Important! A fashionable hat can be warm and practical, emphasizing the femininity and individuality of a girl.
This season, large knitted hats, thin openwork berets, and laconic small hats are popular.
Kubanka 
Kubanka hat is a real trend of the season, which all fashionistas strive to acquire. Such headdresses were traditionally worn in the south of Russia, hence their name. Previously, such hats were made from natural mink or astrakhan fur, but now knitted models are in fashion.
For independent knitting, it is better to choose a voluminous pattern for the crown, and the bottom is knitted with regular double crochets in the round.
Cap
A crocheted cap is a headwear for women that has not gone out of style for many years.

Thanks to the visor, the image becomes more youthful and playful. There are many model options: a baseball cap with a large thick visor, a ladies' cloche with a small visor. Such a hat can be not only sporty, but also feminine.
Bell 
A bell hat will add a special charm to a woman's look. It can be worn with a fur coat or a classic coat, decorated with a bow or flower. This hat will be a real find for girls who wear glasses and have difficulty choosing hats.
- When knitting a headdress for a woman it is important to accurately calculate the diameter of the base and the length of the knitted fabric. To do this, you need to take measurements and make a simple calculation. To understand how many loops correspond to the distance in centimeters, you need to knit a small fragment of the pattern from the selected yarn in accordance with the diagrams. And then calculate the number of loops per centimeter.
- During the knitting process, each hat must be measured., since all diagrams are approximate.
- If the knitting goes in waves, it means the fabric is not dense enough. We'll have to disband and start over.
- If half of the product is knitted, and the fitting showed that the size is slightly mismatched, then you can not unravel the knitting, but resort to a little trick. If the hat is too tight, then take the hook half a size larger, and if it’s too big, take half a size smaller.
To complete the work, do not forget about decorative elements. You can use embroidery, beads, and other decorative elements.


